Special Symbols Followed by a Non-Breaking Space

Written by Allen Wyatt (last updated June 29, 2024)
This tip applies to Word 2007, 2010, 2013, 2016, 2019, 2021, and Word in Microsoft 365


For legal writing, Tony often needs to use section symbols, pilcrows, and ellipses. For ellipses, he requires three periods with a space before the first period, between each period, and after the last period, consistent with his organization's style guide. Tony would like to find a quick way to enter these symbols followed a non-breaking space after the symbol. Other than recording a macro, he wonders if there is any other way to do this.

Without resorting to macros, there are two primary methods you can use to accomplish this task. One is to use AutoCorrect and the other is to create Building Blocks. Either will do, but you may want to use AutoCorrect if you want your special symbols to be available in other Microsoft Office applications.

Using AutoCorrect

There are three things that Tony wants to handle: Section symbols, pilcrows, and ellipses. Here's how you would set up all three as AutoCorrect entries:

  1. Display the Word Options dialog box. (In Word 2007 click the Office button and then click Word Options. In Word 2010 and later versions display the File tab of the ribbon and then click Options.)
  2. Click Proofing at the left side of the screen.
  3. Click AutoCorrect Options. Word displays the AutoCorrect tab of the AutoCorrect dialog box. (See Figure 1.)
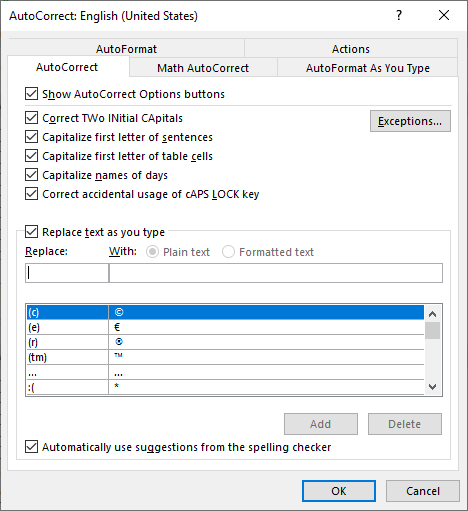
  4. Figure 1. The AutoCorrect tab of the AutoCorrect dialog box.

  5. In the Replace box, enter some characters you want to trigger the insertion of a section mark. For instance, enter "_s" (without the quote marks).
  6. In the With box, press Alt+0167 using the numeric keypad. The section mark character should appear.
  7. With the insertion point still right after the section mark in the With box, press Ctrl+Shift+Space. This adds a non-breaking space.
  8. Click Add.
  9. In the Replace box, enter some characters you want to trigger the insertion of a pilcrow. For instance, enter "_p" (without the quote marks).
  10. In the With box, press Alt+0182 using the numeric keypad. The pilcrow character should appear.
  11. With the insertion point still right after the pilcrow in the With box, press Ctrl+Shift+Space. This adds a non-breaking space.
  12. Click Add.
  13. In the Replace box, type three periods.
  14. In the With box, enter the characters you want used for your ellipsis, including any spaces or non-breaking spaces (Ctrl+Shift+Space).
  15. Click Add.
  16. Click on OK to close the AutoCorrect dialog box.

Make special note of the "Replace" characters you used in steps 4, 8, and 12. These are what you should type, and as soon as you type a space or a punctuation mark after those characters, Word will replace them with the corresponding entries you made in the "With" box (steps 5, 9, and 13).

Using Building Blocks

Creating a Building Block is an easy process. Here's how you would create one for the section mark:

  1. In a document, type the section mark (Alt+0167) followed by a non-breaking space (Ctrl+Shift+Space).
  2. Select the section mark and the non-breaking space. (Make sure you don't select anything beyond the end of these two characters.)
  3. Press Alt+F3. Word displays the Create New Building Block dialog box. (See Figure 2.)
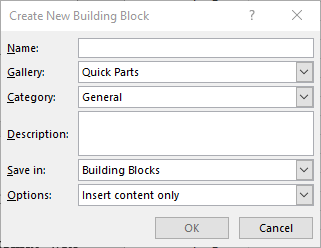
  4. Figure 2. The Create New Building Block dialog box.

  5. Replace the contents of the Name field with a short mnemonic you want to use for your section mark, such as "_s" (without the quote marks).
  6. Use the Gallery drop-down list to choose AutoText.
  7. Click on OK.

Repeat these same steps for the pilcrow (Alt+0182) and for your ellipses. In step 4, use mnemonics that are appropriate to the Building Blocks you are creating, such as "_p" for the pilcrow and "_e" for the ellipses, both without quote marks.

To later use the Building Blocks, type the mnemonic you specified in step 4 and then press F3.

WordTips is your source for cost-effective Microsoft Word training. (Microsoft Word is the most popular word processing software in the world.) This tip (13297) applies to Microsoft Word 2007, 2010, 2013, 2016, 2019, 2021, and Word in Microsoft 365.

Author Bio

Allen Wyatt

With more than 50 non-fiction books and numerous magazine articles to his credit, Allen Wyatt is an internationally recognized author. He is president of Sharon Parq Associates, a computer and publishing services company. ...

MORE FROM ALLEN

Maintaining Leading Zeroes

When merging ZIP Codes from a data source such as Excel, you might find that Word ends up dropping out leading zeroes in ...

Discover More

Changing the Format of Existing Dates

There are a myriad of ways in which a date can be formatted: day first, month first, number of digits in the year, etc. ...

Discover More

Returning the Rightmost Value in a Row

Do you need to figure out the rightmost value within a row in which not all cells may contain values? This tip provides a ...

Discover More

The First and Last Word on Word! Bestselling For Dummies author Dan Gookin puts his usual fun and friendly candor back to work to show you how to navigate Word 2013. Spend more time working and less time trying to figure it all out! Check out Word 2013 For Dummies today!

More WordTips (ribbon)

Word Won't Capitalize Some Sentences

By default, Word capitalizes the first letter of sentences as you type. If you notice that Word doesn't capitalize some ...

Discover More

Automatic Italics of Newspaper Names

The AutoCorrect tool in Word is a great help in making sure that all instances of a name (such as a newspaper name) are ...

Discover More

Stopping EHR from Correcting

When you type words into a document, Word can modify those words. If you don't want Word to make those modifications, ...

Discover More
Subscribe

FREE SERVICE: Get tips like this every week in WordTips, a free productivity newsletter. Enter your address and click "Subscribe."

View most recent newsletter.

Comments

If you would like to add an image to your comment (not an avatar, but an image to help in making the point of your comment), include the characters [{fig}] (all 7 characters, in the sequence shown) in your comment text. You’ll be prompted to upload your image when you submit the comment. Maximum image size is 6Mpixels. Images larger than 600px wide or 1000px tall will be reduced. Up to three images may be included in a comment. All images are subject to review. Commenting privileges may be curtailed if inappropriate images are posted.

What is 7 - 7?

There are currently no comments for this tip. (Be the first to leave your comment—just use the simple form above!)


This Site

Got a version of Word that uses the ribbon interface (Word 2007 or later)? This site is for you! If you use an earlier version of Word, visit our WordTips site focusing on the menu interface.

Videos
Subscribe

FREE SERVICE: Get tips like this every week in WordTips, a free productivity newsletter. Enter your address and click "Subscribe."

(Your e-mail address is not shared with anyone, ever.)

View the most recent newsletter.