In the middle of a document, Word started inserting a blue line across the page between some (but not all) of Fred's paragraphs. He can grab the line with the mouse, like a line in a table, but he can't really move it. The line, however, prints. Fred wonders what causes the line and how to get rid of it.
It sounds like this blue line is actually a paragraph border. With the default formatting configuration in Word, these can be automatically (and, often, mistakenly) added to a document in many different ways. To get rid of the borders, follow these general steps:
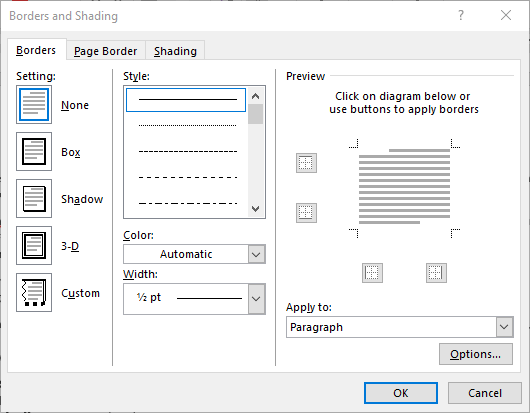
Figure 1. The Borders and Shading dialog box.
That should get rid of the border. If it doesn't, then you may want to move the insertion point into the paragraph immediately above the blue line and repeat steps 2 through 8. The reason you should do this is that the blue line, appearing between paragraphs could be either below or above the paragraphs above and below it.
Of course, getting rid of the border on one paragraph may have the effect of causing the blue line to "jump" to another paragraph. The reason that this may happen is that Word can suppress borders for some paragraphs when the surrounding paragraphs have the same border turned on. If this happens, just keep playing "whack a mole" with the borders on each paragraph, following the above steps.
If you tire of playing "whack a mole," you could try selecting all the paragraphs in your document (press Ctrl+A) and then pressing Ctrl+Q. This removes any paragraph formatting from the selected paragraphs—including borders—and reverts the formatting to whatever is specified in the underlying styles. This approach is typically most satisfying when you are using styles for your formatting and none of those styles use paragraph borders. If you used explicit formatting for the paragraphs in your document, then pressing Ctrl+Q removes that explicit formatting, which could be quite frustrating.
WordTips is your source for cost-effective Microsoft Word training. (Microsoft Word is the most popular word processing software in the world.) This tip (12846) applies to Microsoft Word 2007, 2010, 2013, 2016, 2019, and 2021.

Create Custom Apps with VBA! Discover how to extend the capabilities of Office 365 applications with VBA programming. Written in clear terms and understandable language, the book includes systematic tutorials and contains both intermediate and advanced content for experienced VB developers. Designed to be comprehensive, the book addresses not just one Office application, but the entire Office suite. Check out Mastering VBA for Microsoft Office 365 today!
When you get one paragraph formatted just the way you want, you might want to copy that formatting so it can be applied ...
Discover MoreThere are times that you just want to begin a paragraph (perhaps a heading) at the top of a new page. Word allows you to ...
Discover MoreWord can help you do quite a bit of complex formatting to your lists, both bulleted and numbered. Using the steps ...
Discover MoreFREE SERVICE: Get tips like this every week in WordTips, a free productivity newsletter. Enter your address and click "Subscribe."
2025-04-09 12:37:48
I'm sure it's too late to help Eduardo, but if you're in the same position as he, click on File and then Options. In the left panel, choose Advanced. In the right pane, about halfway down, in the "Show document content" section, uncheck "Show text boundaries."
(see Figure 1 below)
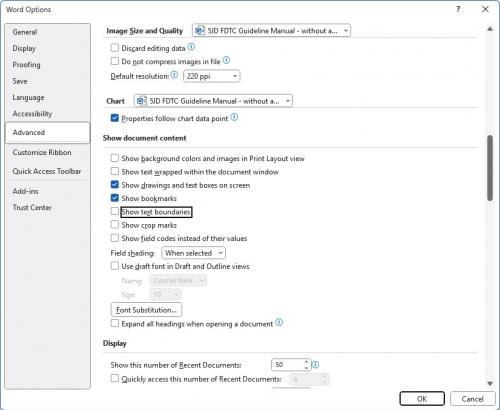
Figure 1. Word's Advanced Options dialog box at "Show document content" section
2020-07-09 12:15:04
Hi, in my computer I see the text like in Tables, but I didn´t insert any table and all the time I select mode Printing Design to see.
When I send to others, they see without this table lines.
I don´t know how to unselect this mode.
The picture shows how I see. (see Figure 1 below)
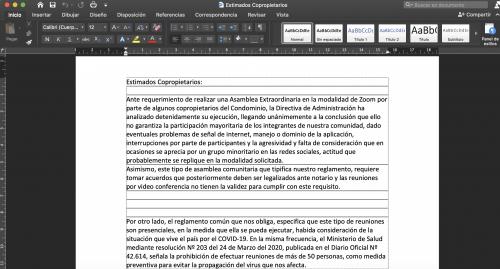
Figure 1.
Got a version of Word that uses the ribbon interface (Word 2007 or later)? This site is for you! If you use an earlier version of Word, visit our WordTips site focusing on the menu interface.
Visit the WordTips channel on YouTube

FREE SERVICE: Get tips like this every week in WordTips, a free productivity newsletter. Enter your address and click "Subscribe."
Copyright © 2026 Sharon Parq Associates, Inc.
Comments