Phyllis is looking for the easiest way to add spacing before and after the items in bulleted or numbered lists. The line spacing can be changed (i.e., single space or double space), but Phyllis cannot discover a way to add space before and/or after the lists.
Before talking about "the easiest way," it is very helpful to fully understand how Word handles vertical spacing in your document. Critical to that understanding is realizing that each element in your list is a discrete paragraph. In addition, it is a fair bet that there is paragraph before the list and a paragraph after the list. This understanding is shown in the following figure, where I've numbered each of the paragraphs. (See Figure 1.)
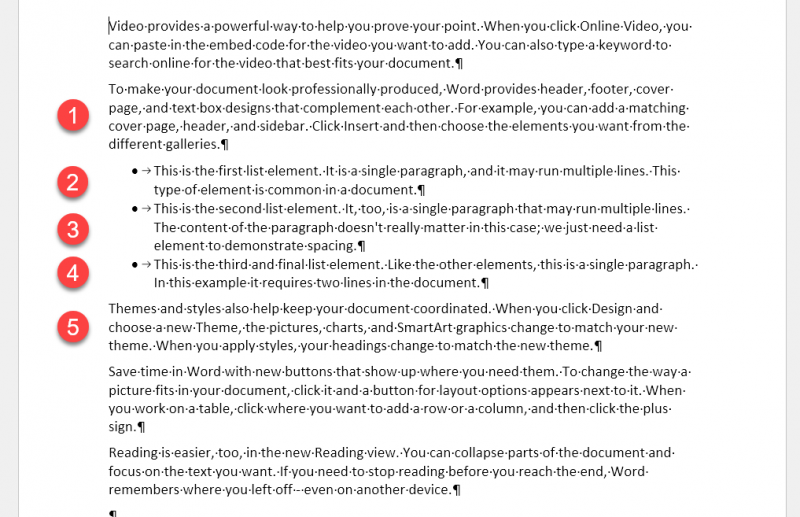
Figure 1. An example document showing a bulleted list.
Vertical spacing for the five paragraphs in the figure is controlled by settings in the Paragraph dialog box. You display this dialog box by selecting the paragraphs you want to affect, displaying the Home tab of the ribbon, and then clicking the small icon at the bottom-right corner of the Paragraph group. (See Figure 2.)

Figure 2. The Indents and Spacing tab of the Paragraph dialog box.
The pertinent controls for vertical spacing are the Before, After, and Line Spacing controls. If you want to adjust spacing within a paragraph (between lines of a paragraph), then you would use the Line Spacing control. I suspect, however, that this is not what Phyllis is concerned with, since she indicates that she knows how to change line spacing. Instead, it is the Before and After settings that are important. These controls allow you to specify how much space should appear before and after whatever paragraphs you have selected.
There is a potential gotcha here, though, and that is the check box immediately below the After control: Don't Add Space Between Paragraphs of the Same Style. This brings me back to the example document, with the numbered paragraphs.
Notice that paragraphs 2, 3, and 4 are the bulleted list. When the paragraphs were selected and the Bulleted List tool clicked on the Home tab of the ribbon, Word converted them to a bulleted list by automatically applying the List Paragraph style. (It doesn't matter if you pay attention to styles or not—as I said, Word does this automatically.) Part of that style definition is for the Don't Add Space Between Paragraphs of the Same Style check box to be selected.
What does this have to do with vertical spacing. Well, in the example document, paragraph 1 uses the Normal style and it has 6 points of space after it; same thing for paragraph 5. But when Word changed paragraphs 2, 3, and 4 to the List Paragraph style, then the extra 6 points of spacing in the After setting is overridden by the check box setting, so no extra spacing appears between paragraphs 2/3 and paragraphs 3/4 because they all use the same List Paragraph style.
Confusing? It can be, unless you keep in mind how all these settings work in relation to each other. So, if you want additional spacing between paragraphs 2/3 and 3/4, then you need to either explicitly clear the Don't Add Space Between Paragraphs of the Same Style check box for those paragraphs or, alternatively, clear the check box in the List Paragraph style definition.
What about space before and after the list? You can follow the same approach:
You would repeat the same steps for the last paragraph in the list (in the example, paragraph 4), but you would adjust the value in the After control.
If you work with quite a few lists, then these steps can become tedious. The best, easiest, and fastest approach (which is what Phyllis asked for) is to create your own style definitions for your lists. For each list you would define 3 styles—one to be applied to the first list element, one for the final list element, and one for all the other elements in the list. Define the desired vertical spacing in each style definition, then apply the styles to the elements in your list, and you are good to go.
Note:
WordTips is your source for cost-effective Microsoft Word training. (Microsoft Word is the most popular word processing software in the world.) This tip (11169) applies to Microsoft Word 2007, 2010, 2013, 2016, 2019, 2021, and Word in Microsoft 365.

Learning Made Easy! Quickly teach yourself how to format, publish, and share your content using Word 2021 or Microsoft 365. With Step by Step, you set the pace, building and practicing the skills you need, just when you need them! Check out Microsoft Word Step by Step today!
If you have several paragraphs you want to keep together on the same page, there are settings in the Paragraph dialog box ...
Discover MoreNeed to indent an entire paragraph from the left margin? It's easy to do using the tool described in this tip, easily ...
Discover MoreGot singular lines at the bottom or top of a page? These are often referred to as widows and orphans, and Word allows you ...
Discover MoreFREE SERVICE: Get tips like this every week in WordTips, a free productivity newsletter. Enter your address and click "Subscribe."
2022-04-10 02:24:24
MWil
Allen: I addition to your above analysis of "how to," I think that many of your subscribers would also appreciate your expert recommendations about the settings for these formatting items.
I find those settings to be more critical than most people realize, because they impact the readability (and subsequent impact) of their emails, memos, documents, PDFs, etc.
e.g., Notice how you format your Tip above with the comfortable spacing between lines and the numbered list of items in your lower half of the Tip, compared to the top half text sample graphic that is more cramped.
Your lower half spacing makes the document easier to read, and therefore it is far more likely to be read than a document whose line spacing and formatting is more cramped (e.g., most things drafted by lawyers).
Another supporting example -- look at how the major news organizations format their articles and stories; all with wider spacing. They need to present things that are easier to read in order to encourage people to actually read them.
So here are my default settings on everything I write. Although many will have their own preferences that contradict mine (probably with great arguments why), mine are very easy to remember, implement, and result in a much more readable document than most of those you receive every day.
Word document & email settings:
-- Before and after paragraph spacing: 6 pt
-- Line spacing: multiple @ 1.2
-- Uncheck "Don't add space between paragraphs of the same style
Write and read away with confidence . . . !
2022-04-09 14:55:20
David Gray
I have employed this technique for many years, with one key difference; I apply the two styles to the last paragraph before and fie first paragraph after the list. I have First Paragraph After List and Last Paragraph Before List styles defined in Normal.dotx and all of its descendants. Though I haven't done so yet, you could add hotkeys to those two styles to make them easy to apply.
Got a version of Word that uses the ribbon interface (Word 2007 or later)? This site is for you! If you use an earlier version of Word, visit our WordTips site focusing on the menu interface.
Visit the WordTips channel on YouTube

FREE SERVICE: Get tips like this every week in WordTips, a free productivity newsletter. Enter your address and click "Subscribe."
Copyright © 2026 Sharon Parq Associates, Inc.
Comments