Donna has a document that has three tables in it. When she views it, the document appears fine. When she sends it to someone else the tables move and overlap each other. She wonders how to prevent this from happening.
Welcome to the wonderful world of table positioning in Word! When you insert a table using the ribbon tools, the vertical anchor is set to "paragraph," by default. The table will then move up and down as that particular paragraph mark moves with editing. If successive tables are anchored to successive paragraph marks, then the tables will all move together and cannot overlap.
If you subsequently drag a table up or down using the mouse, then the anchor changes to the nearest paragraph mark plus an offset and the wrapping changes from the default of "none" to "wrap around." Often this change of wrap radically changes the layout of the page and you have to change the table back to "no wrap" to resolve the chaos.
It sounds as if one of Donna's tables is anchored to the page (or margin) and another is anchored to a paragraph. The tables have probably, at some stage, been dragged up or down and perhaps blank lines have been added to position them on the page. This works just fine for your system. However, when you send the document to a different person, then all heck breaks loose. The other person's copy of Word has different settings from yours for font sizes and line spacing. Therefore, paragraph anchors are at different positions on the page whereas the page-anchored table is in a fixed position. Thus, you can easily see overlap of the tables and other strange behavior.
The solution is to set paragraph anchors and no text wrapping for all tables and then make sure that the table anchors are successive paragraphs. Assuming that the tables are to be displayed underneath one another the steps are:
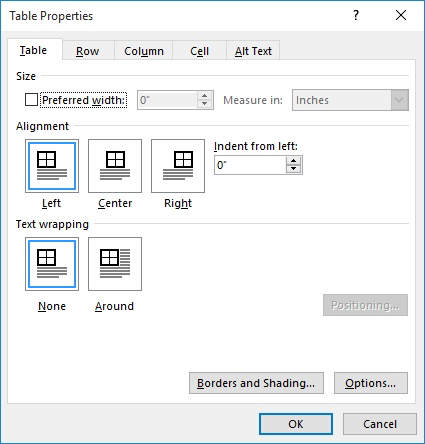
Figure 1. The Table tab of the Table Properties dialog box.
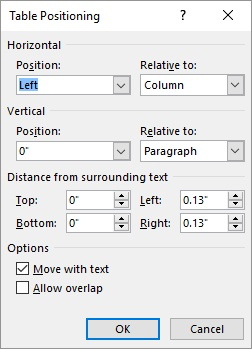
Figure 2. The Table Positioning dialog box.
These steps adjust the positioning for only a single table, so you'll need to repeat the steps for the other two tables, as well. You'll probably find that the tables are now out of position, so use the mouse to drag them to their desired position. This will change the anchor to the nearest paragraph mark, plus add an offset. In addition, dragging changes the wrapping from "none" to "around," so you'll need to again display the Table Properties dialog box for the positioned tables and click on None.
After you perform these steps, the tables should be vertically one right after the other and should remain that way if you send the document to someone else.
If your tables were horizontally next to each other, though, then that is an entirely different story. In that case the easiest solution is probably to insert each table into its own text box and then position the text boxes next to each other. You can format the positioning on the text boxes so they don't move with text and are positioned relative to the margins of the page rather than to paragraphs. (Also make sure you format the text boxes so they have no borders.) This should give you the result you want when you share the document with others.
Of course, if you continue to run into problems you might just want to generate a PDF from your Word document. You can then share the PDF with others, and it will look just like it did on your system. (This obviously won't work if you need those other people to make changes to your document. It is great, though, if all they need to do is view it.)
WordTips is your source for cost-effective Microsoft Word training. (Microsoft Word is the most popular word processing software in the world.) This tip (12576) applies to Microsoft Word 2007, 2010, 2013, 2016, 2019, and 2021.

Learning Made Easy! Quickly teach yourself how to format, publish, and share your content using Word 2021 or Microsoft 365. With Step by Step, you set the pace, building and practicing the skills you need, just when you need them! Check out Microsoft Word Step by Step today!
Want to get just the right amount of spacing above and below text in a table cell? A very easy way to do this is to ...
Discover MoreIf you've got a table that spans multiple printed pages, you probably want to repeat a row or two of that table as a ...
Discover MoreGot a lot of tables you need to format all at once? While you could make your changes manually, a much quicker way is to ...
Discover MoreFREE SERVICE: Get tips like this every week in WordTips, a free productivity newsletter. Enter your address and click "Subscribe."
2021-10-20 06:33:25
Leah
Great article. Quickly solved my problem..
2021-07-12 12:21:09
Ricker
Is there a way to completely disable the 4-way arrow that is called the "Select Table button" in Word for Mac 10.14.6? It is nothing but an annoyance when editing a DOC file from another computer.
2021-05-02 04:03:43
Thank you Allen. Your tips were of great heIp to me. I wasted two hours thinking and trying all sort of things to straighten out my table . It turns out it was very easy, but these things usually are; the problem is you just don't know where to find the solution. In my case, all I needed to do was simply changing "text wrapping" in the table from "around" to "none".
2020-12-11 10:07:13
Md. Habibur Rahman
Thanks a lot. Take love.
2020-09-11 06:41:31
Maria
This article just saved someone's life. Thank you!
2020-05-14 03:21:23
mahammd sayyid
thanks a alots this helped me alots
2020-02-27 16:26:37
Anne
Thank you so much. Twice a year I am sent a rota with overlapping tables, which is difficult to read. Now I know what to do to separate the tables, it really works! thank you!
2019-05-13 16:48:49
Thank you Allen. You stopped me from throwing my mouse on to the wall in frustration!
Got a version of Word that uses the ribbon interface (Word 2007 or later)? This site is for you! If you use an earlier version of Word, visit our WordTips site focusing on the menu interface.
Visit the WordTips channel on YouTube

FREE SERVICE: Get tips like this every week in WordTips, a free productivity newsletter. Enter your address and click "Subscribe."
Copyright © 2026 Sharon Parq Associates, Inc.
Comments