When working in a document, Ian often wants to delete or move text. However, if there is an adjacent image or object, Word selects the text and the image/object and deletes, moves, or copies them both and this is very irritating to Ian, particularly when he only wants to select the text. Ian wonders how he can avoid selecting the images or objects along with the text.
In a Word parlance, images are typically pictures and objects are things like shapes or charts. How they are treated in a document, for the purposes of this tip, are essentially the same. Thus, for the sake of simplicity I'll simply refer to images instead of images and objects. Understand, however, that the concepts and techniques discussed apply to both.
There are two ways that images can be placed in a Word document: inline or floating. If you've been working with Word for a while, you pick up clues about images that can tell you what type you are dealing with. The rock-solid answer about whether an image is inline or floating is to right-click on your image to display a Context menu. Hover the mouse over the Wrap Text option, and you can see a flyout menu that shows various wrapping options. The selected wrapping option indicates how the image was placed in the document. (See Figure 1.)
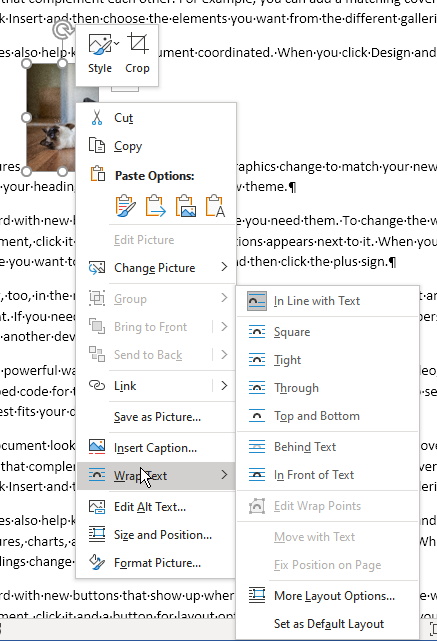
Figure 1. You can easily see how an image is treated in your document.
If the first wrapping option (In Line with Text) is selected, then the image is inline. If any other option is selected, then the image is floating.
What does this have to do with not selecting images when selecting text? Quite a bit, really. If your image is inline, then it is treated, by Word, as just another text character. This means that when you select text, and the selection includes the image, you cannot "unselect" just the image. Why? Because, again, Word treats inline images just like text.
Floating images are a different story, however. By default, floating images are anchored to a paragraph. If you use the Show/Hide tool on the Home tab of the ribbon, you can find the anchors for your floating images. Just click on a floating image and you will see a blue anchor appear to the left of the first line of the paragraph to which it is anchored. (See Figure 2.)
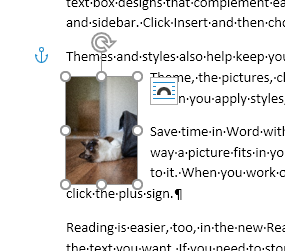
Figure 2. A blue object anchor appears after selecting a floating image.
When you select a paragraph that has an image anchored to it, then the image is also selected. Thus, one solution to not selecting the images is to not select paragraphs to which images are anchored. This may seem overly restrictive, so there is a different way to handle the selected images.
Before getting to that other way, there is an interesting tangent related to object anchors and not selecting images. When you first place a floating image or convert an inline image to a floating image, it could be anchored to any point within a paragraph, even though the anchor shows to the upper left of the paragraph. Thus, you could select a portion of the text within a paragraph, and you may or may not also select the image, depending on whether the image is anchored within that portion of text.
Now, here's the interesting part: If you drag and move the image so that its anchor moves to a different paragraph, that image becomes anchored to that different paragraph. In the process, the actual anchor point is moved to the paragraph mark (the pilcrow character) at the end of the paragraph. (The visible blue anchor doesn't move to the paragraph mark; it still appears to the upper left of the paragraph. However, the actual point at which the image is anchored is moved to the paragraph mark.) This means that after moving the image, you could select all of the text in the paragraph with the exception of the paragraph mark, and the image anchored to that paragraph won't be selected.
Quite honestly, though, when you are working with floating images, the easiest way to exclude them from whatever text you've selected is to apply a technique you're probably already familiar with. First, select all the text, which should also select the images. Now, hold down the Ctrl key as you click on each of the floating images. The images are removed from the selection and, if you cut the text (Ctrl+X), the images remain, automatically anchored to whatever paragraphs remain after the cutting.
Note that if you try this technique with an inline image, Ctrl clicking will deselect everything except the image on which Ctrl clicked. Why? Because, again, Word treats inline images just like text.
Another approach is to work with the blue object anchors that appear when you select an image. Let's say you want to delete or move a paragraph and that paragraph has a floating image anchored to it. If you click the image, then you can click on the anchor and drag that anchor so it is next to a different paragraph on the page. For instance, you might drag the anchor to the paragraph before the one you want to move or copy. Once the anchor is moved, you can select the paragraph you want to delete or move, and the image should not be affected by selecting that paragraph.
If you would like to know a bit more about object anchors, then you may find this tip helpful:
https://tips.net/T8229
WordTips is your source for cost-effective Microsoft Word training. (Microsoft Word is the most popular word processing software in the world.) This tip (11901) applies to Microsoft Word 2007, 2010, 2013, 2016, 2019, and 2021.

Create Custom Apps with VBA! Discover how to extend the capabilities of Office 365 applications with VBA programming. Written in clear terms and understandable language, the book includes systematic tutorials and contains both intermediate and advanced content for experienced VB developers. Designed to be comprehensive, the book addresses not just one Office application, but the entire Office suite. Check out Mastering VBA for Microsoft Office 365 today!
Want to modify the way your text flows between pages in a document? Word allows you to insert several types of breaks ...
Discover MoreWord has an interesting way of allowing you to select a rectangular block of text, without reference to what may be ...
Discover MoreMost people use the Clipboard to copy and move text in Word. Before the Clipboard, Word used F2 to move text and Shift+F2 ...
Discover MoreFREE SERVICE: Get tips like this every week in WordTips, a free productivity newsletter. Enter your address and click "Subscribe."
2021-11-21 17:05:31
Tomek
This comment is for extreme geeks only and discusses anchoring of the floating images (or other objects) in Word. Understanding this may help you figuring out why floating objects behave the way they do when you do other things in Word (like changing or selecting text). If you are a lesser geek or not a geek at all, you may want to jump to the last paragraph of this comment for my advice on how to treat images and other objects without worrying too much with the technical stuff.
I posted an earlier version of this comment also in another tip: https://wordribbon.tips.net/T008229_Understanding_Object_Anchors.htmlb but as it is more relevant to this tip, I am posting an updated version also here.
First topic: where does the anchor point hide (hint: I do not mean the small blue anchor icon).
In his tip Allen stated:
“Now, here's the interesting part: If you drag and move the image so that its anchor moves to a different paragraph, that image becomes anchored to that different paragraph. In the process, the actual anchor point is moved to the paragraph mark (the pilcrow character) at the end of the paragraph. (The visible blue anchor doesn't move to the paragraph mark; it still appears to the upper left of the paragraph. However, the actual point at which the image is anchored is moved to the paragraph mark.) This means that after moving the image, you could select all of the text in the paragraph with the exception of the paragraph mark, and the image anchored to that paragraph won't be selected.”
In my testing in Word from MS365 under Win10, I found the highlighted part of this statement to be not 100% accurate.
Let’s assume that the floating image is anchored to a paragraph, and its position is defined horizontally as absolute to the right of column, and vertically absolute below paragraph. Also, the whole paragraph to which the object is anchored fits completely on one page.
In this scenario, the anchor point seems to hide just before the first character of that paragraph, not in the paragraph mark (pilcrow). As proof of this:
• If you select just the pilcrow mark at the end of the paragraph, the object does not get selected.
• The object gets selected if you select both the first character of the paragraph and the pilcrow mark. This essentially selects the whole paragraph, including any hidden marks within it. If you deselect any of the two, the object will not be selected; however,
• If you select the pilcrow character from the previous paragraph and the first character of the paragraph to which the object is anchored, the object will be selected. This indicates that the anchor point must be somewhere within this selection.
Why is this important? Because if you insert text before this anchor point (adding extra lines of text to the earlier paragraphs, or adding whole paragraphs), the object will move (provided its option “Move object with text” is checked). Adding text to the paragraph with anchor, even before the existing first visible character, will not cause the object to move, even if option “Move object with text” is checked. This is because you would be adding text after the anchor point. The move/not move behaviour also applies to deleting text.
Dragging the anchor icon to another paragraph does not move the object relative to the page. It results only in adjustment to the position definition for the object. The anchor point will now be hiding before the first character of the paragraph, to which the anchor icon was moved. The object will not move, unless the anchor icon is moved to another page, where the object will be placed in the same position relative to the page.
The anchor icon must be on the same page as the anchored object. Which bring us to consider a slightly different scenario: what if a paragraph starts on one page, and ends a few pages after? There will be a page where there is no first line of a paragraph nor an ending pilcrow. If there is a floating object on such page, the anchor icon will be next to the first line of text on that page, but the anchor point may be located anywhere on this page!!!
To locate it, start selecting portions of text on that page. Once you see the object in question being highlighted, start narrowing your selection The goal is to find two consecutive characters, which when selected will cause the object to be selected (highlighted) too. The anchor point must be hiding in between these two characters.
The location of this anchor point depends among other things on how the object was placed on the page. It could have been converted from an in-line image or shape, it could have been inserted from an external source (file, internet, etc.) or copied and pasted from another program, screenshot, or document, or even from another location in the same document. Afterwards, the anchor point can be moved by editing text that is earlier in the document. If the object is moved to another page, the anchor point and the anchor icon will move along and may become associated with one of the paragraphs on the new page.
Similarly, if you paste a floating object, which was anchored to a paragraph, from another location in a Word document into an existing paragraph, an anchor point will be placed in the location where your cursor was at the time of pasting.
Again, understanding this is important to figure out why sometimes a floating object is selected when you select text elsewhere on the page.
To complicate the matters even more, the object positions can be defined in relation to page, margins, columns, lines, and even characters. In addition to that, they may be set to move with text or stay fixed on a page. Ken Endacott posted a good summary on object anchoring in the tip:
https://wordribbon.tips.net/T008229_Understanding_Object_Anchors.html
check Ken’s comment posted 2015-06-03 08:38:40, and do not forget to read the tip itself.
So, what is the practical learning from all this geeky information. Learning all the permutations of various object anchoring modes and position settings will take a lot of time for no significant benefit, unless, like me, you enjoy solving all kinds of puzzles and have time for it. My advice is as follows (KISS): When creating a document, you can place objects (images et al.) at any location that seems logical, but do not spend a lot of time positioning them (this will likely be messed up anyway). In most cases in-line images are not the best unless you place them in their own paragraph. Only after you finish editing and re-editing the text and other contents of your documents (e.g., tables), focus on moving the objects to the precise locations you want and selecting the type of text wrapping around them. You also have to decide whether you want the particular object to move with the text or stay fixed on the page. In most cases you will want the objects anchored to paragraphs and positioned vertically in relation to paragraphs as well. Remember that you can move the objects almost anywhere on the page. The object anchor may move to another paragraph, but it may not matter. If it does matter you can lock the anchor and keep the object anchored to a paragraph that is not even near the new position of the object (as long as it is on the same page).
I hope this helps.
2021-11-20 09:14:02
Tomek
To simplify Allen's tip:
For floating images:
1. Select all the text you want.
2. Deselect any images that got selected automatically,
as described in the tip (watch for grey border around them).
3. Do whatever you want with the text (copy, cut, drag, delete).
The images will not be affected although they may move.
For Inline images:
1. Convert them to floating type.
2. Follow the steps for floating images.
3. Convert the images back to in-line, if needed.
Got a version of Word that uses the ribbon interface (Word 2007 or later)? This site is for you! If you use an earlier version of Word, visit our WordTips site focusing on the menu interface.
Visit the WordTips channel on YouTube

FREE SERVICE: Get tips like this every week in WordTips, a free productivity newsletter. Enter your address and click "Subscribe."
Copyright © 2026 Sharon Parq Associates, Inc.
Comments