Please Note: This article is written for users of the following Microsoft Word versions: 2007, 2010, 2013, 2016, 2019, and 2021. If you are using an earlier version (Word 2003 or earlier), this tip may not work for you. For a version of this tip written specifically for earlier versions of Word, click here: Getting the Proper Type of Ellipses.
Written by Allen Wyatt (last updated January 2, 2021)
This tip applies to Word 2007, 2010, 2013, 2016, 2019, and 2021
Mary Anne works as an academic editor, which means she must conform to specific, rigorous styles for formatting. In the academic documents on which she works, when part of a quotation is left out, an ellipsis must be inserted. Most academic styles dictate an ellipsis of three dots, each separated by a space, with a space before and a space after the third. If an entire sentence has been left out of the quotation, there will be four dots, each separated by a space, but with no space before the fourth. Mary Anne likes to keep ellipses all on one line, but because of the spaces, Word will spread them over two lines. Word's default ellipsis character does not break over two lines, but she cannot use it as it has no spaces between the dots.
There are several solutions you can use to this problem and the one you choose depends on what you are most comfortable with. All of the solutions have one thing in common: creating a string of characters that represents what you want to use for ellipses. This consists of a certain number of periods, separated by non-breaking spaces.
In the case of the three-dot ellipses, the string would consist of a non-breaking space, period, non-breaking space, period, non-breaking space, period, and a space. Remember that the only space that isn't non-breaking is the final one; this allows Word to break a line after the ellipses, but not before.
In the case of the four-dot ellipses, the string would consist of a period, non-breaking space, period, non-breaking space, period, non-breaking space, period, space. Again, the only space that isn't non-breaking is the last one. In addition, the string starts with a period, not a non-breaking space.
The variances in the solutions come in how you utilize your ellipses strings. You can choose to use AutoCorrect, use a Building Block, or create a macro. The method you choose depends on how you do your writing and editing.
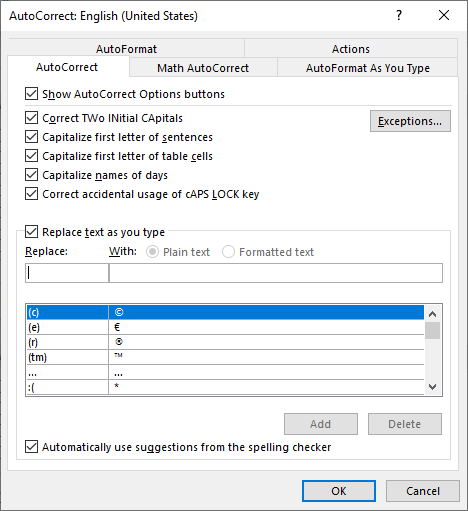
A lot of people choose the AutoCorrect method because that is the method already used by Microsoft for the single-character ellipses that Mary Anne doesn't find acceptable. Here are the steps to follow:

Figure 1. The AutoCorrect tab of the AutoCorrect dialog box.
You've now got the replacement for the standard three-dot ellipses. When you type three periods in a row, those periods are replaced with the text string for the ellipses, as you want them.
This presents a problem for the four-dot ellipses, however. If you create an AutoCorrect entry that replaces four periods with the desired ellipses text string, it will never be used by Word. The reason is simple—when you type three periods, that text is automatically replaced by the three-dot ellipses string, so you never really get a chance to have four periods considered for replacement.
The solution to this is to change the "Replace" text to something else that is unique for each of your ellipses strings. For instance, you could have three periods replaced with the three-dot string and period-space-period replaced with the four-dot string. The drawback, of course, is that means you need to remember what the "trigger" text is to get the type of ellipses you want.
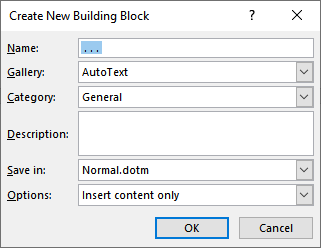
This drawback is also present if you use the Building Block method of adding the ellipses. Nonetheless, some people prefer Building Blocks rather than AutoCorrect. The trick is to simply come up with some text that will serve as a mnemonic for your Building Block. For instance, let's say you want to use the characters "ell3" as your mnemonic for a Building Block entry to be replaced with three-dot ellipses string. You would follow these steps to set it up:

Figure 2. The Create New Building Block dialog box.
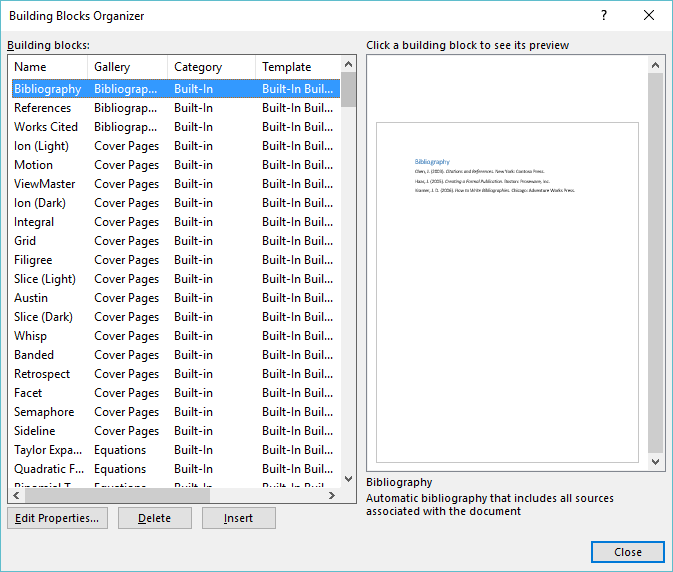
To later use the Building Block entry in a reasonable manner, you need to follow these steps:

Figure 3. The Building Blocks Organizer dialog box.
The final method of getting the ellipses text that you want is to create a macro that does the typing for you. You can record the creating of the ellipses text and then assign the macro a shortcut key. (How you record macros and assign shortcut keys has been covered in other WordTips.) Then, when you want to insert the ellipses, you simply invoke the shortcut key and let the macro take care of the rest.
WordTips is your source for cost-effective Microsoft Word training. (Microsoft Word is the most popular word processing software in the world.) This tip (5995) applies to Microsoft Word 2007, 2010, 2013, 2016, 2019, and 2021. You can find a version of this tip for the older menu interface of Word here: Getting the Proper Type of Ellipses.

The First and Last Word on Word! Bestselling For Dummies author Dan Gookin puts his usual fun and friendly candor back to work to show you how to navigate Word 2019. Spend more time working and less time trying to figure it all out! Check out Word 2019 For Dummies today!
My fat fingers sometimes result in typing letters in the wrong order. Here's a quick tool that allows you to easily ...
Discover MoreWant a really quick way to select text? Just combine the Shift key with a simple mouse click.
Discover MoreIf you are using Word in Draft view, and the text on the screen doesn't wrap at the right margin like it should, the ...
Discover MoreFREE SERVICE: Get tips like this every week in WordTips, a free productivity newsletter. Enter your address and click "Subscribe."
There are currently no comments for this tip. (Be the first to leave your comment—just use the simple form above!)
Got a version of Word that uses the ribbon interface (Word 2007 or later)? This site is for you! If you use an earlier version of Word, visit our WordTips site focusing on the menu interface.
Visit the WordTips channel on YouTube
FREE SERVICE: Get tips like this every week in WordTips, a free productivity newsletter. Enter your address and click "Subscribe."
Copyright © 2026 Sharon Parq Associates, Inc.
Comments