Please Note: This article is written for users of the following Microsoft Word versions: 2007, 2010, 2013, 2016, 2019, 2021, 2024, and Word in Microsoft 365. If you are using an earlier version (Word 2003 or earlier), this tip may not work for you. For a version of this tip written specifically for earlier versions of Word, click here: Making Ignore All Work for a Document on All Systems.
If a word has a red wavy line below it—meaning the spellchecker thinks it is misspelled—you can right-click on it and select "Ignore All." Then the wavy line goes away for that occurrence, and usually for all occurrences of that word in the document. You can also choose to add the word to a custom dictionary, and it won't be marked as misspelled in any other document on your system. But it will be marked as misspelled if the document is opened on other peoples' systems. You may be searching for a way to mark a word as correctly spelled, and have that word always "accepted" regardless of where the document is opened. This desire is particularly strong among those who migrated to Word from WordPerfect, as that is how "Ignore All" worked in WordPerfect.
There are two techniques you can try with your documents. First, if you want that particular word to be accepted as being spelled correctly, you can simply follow these steps:
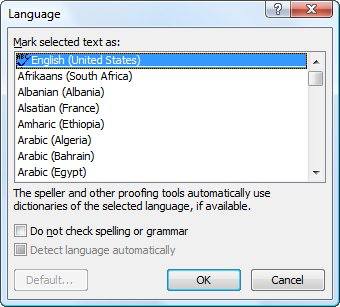
Figure 1. The Language dialog box.
Of course, if you are familiar with using styles, you may find it easier to create a character style that is formatted to not check spelling. You can then apply the style to whatever words you don't want checked. The benefit to either of these approaches (manually setting "do not check" or doing it with a style) is that this formatting travels with the document. Thus, the spelling won't be checked for the formatted text regardless of where it is opened.
The second technique you can use comes in very handy if you don't want any words marked as improperly spelled when the document is opened up on a different system. As one of the last steps in preparing the document before sharing it with others, follow these steps:
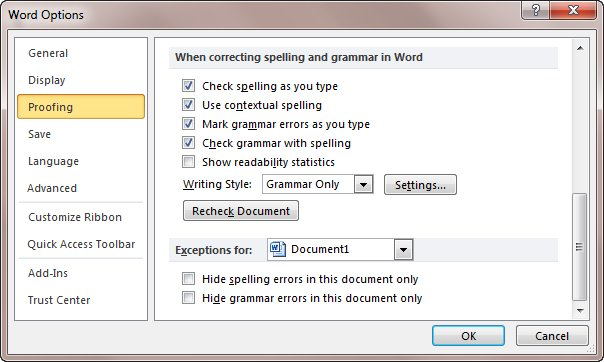
Figure 2. The Proofing options of the Word Options dialog box.
This approach works because the setting you are changing also travels with the document. It won't prevent someone from doing a spell check and finding out that the word is assumed to be incorrectly spelled, but it will stop the wavy underlines from appearing.
Another approach is to simply share your custom dictionary file with others. This is particularly helpful if those you are sharing with are in your workgroup or office. In the Options area for Word, set the dictionary location to be on a network drive, and then everyone can share the same dictionary. If you mark the spelling of a certain word as acceptable, then it will be acceptable for everyone else using the same dictionary.
WordTips is your source for cost-effective Microsoft Word training. (Microsoft Word is the most popular word processing software in the world.) This tip (11394) applies to Microsoft Word 2007, 2010, 2013, 2016, 2019, 2021, 2024, and Word in Microsoft 365. You can find a version of this tip for the older menu interface of Word here: Making Ignore All Work for a Document on All Systems.

Learning Made Easy! Quickly teach yourself how to format, publish, and share your content using Word 2021 or Microsoft 365. With Step by Step, you set the pace, building and practicing the skills you need, just when you need them! Check out Microsoft Word Step by Step today!
Does Word tell you that your custom dictionary is full? It might not actually be full, but even if it is, you can add ...
Discover MoreWhen you close a document, you might want to do one final check of the spelling, just to make sure that you didn't miss ...
Discover MoreTired of Word marking Internet addresses as spelling errors? You can turn off this check by applying the steps in this tip.
Discover MoreFREE SERVICE: Get tips like this every week in WordTips, a free productivity newsletter. Enter your address and click "Subscribe."
There are currently no comments for this tip. (Be the first to leave your comment—just use the simple form above!)
Got a version of Word that uses the ribbon interface (Word 2007 or later)? This site is for you! If you use an earlier version of Word, visit our WordTips site focusing on the menu interface.
Visit the WordTips channel on YouTube

FREE SERVICE: Get tips like this every week in WordTips, a free productivity newsletter. Enter your address and click "Subscribe."
Copyright © 2026 Sharon Parq Associates, Inc.
 Please Note:
This article is written for users of the following Microsoft Word versions: 2007, 2010, 2013, 2016, 2019, 2021, 2024, and Word in Microsoft 365. If you are using an earlier version (Word 2003 or earlier), this tip may not work for you. For a version of this tip written specifically for earlier versions of Word, click here:
Please Note:
This article is written for users of the following Microsoft Word versions: 2007, 2010, 2013, 2016, 2019, 2021, 2024, and Word in Microsoft 365. If you are using an earlier version (Word 2003 or earlier), this tip may not work for you. For a version of this tip written specifically for earlier versions of Word, click here:
Comments