Please Note: This article is written for users of the following Microsoft Word versions: 2007, 2010, 2013, 2016, 2019, 2021, and Word in Microsoft 365. If you are using an earlier version (Word 2003 or earlier), this tip may not work for you. For a version of this tip written specifically for earlier versions of Word, click here: Two Printed Copies to Different Paper Trays.
Joyce has a printer that has two paper trays in it. The first (default) paper tray contains regular white paper. The second paper tray contains a different color of paper. In Joyce's office, whenever they print documents they need to print one copy on white paper and the other copy on the colored paper. She wonders if there is a way to do a single print of the document, but have Word send one copy to the first paper tray and the other copy to the second.
The best way to do this is to use a macro, but there are a couple of different approaches you can use when creating the macro. I'm a firm believer in trying the easy way first, so you might try the following short macro:
Sub PrintTwoTrays()
    Dim sTray As String

    sTray = Options.DefaultTray
    Options.DefaultTray = "Tray 1"
    Application.PrintOut FileName:=""
    Options.DefaultTray = "Tray 2"
    Application.PrintOut FileName:=""
    Options.DefaultTray = sTray
End Sub
This macro uses the DefaultTray property to specify a tray to use for your printer. This approach sets the setting you can see in the advanced settings of the Word Options dialog box. (See Figure 1.)
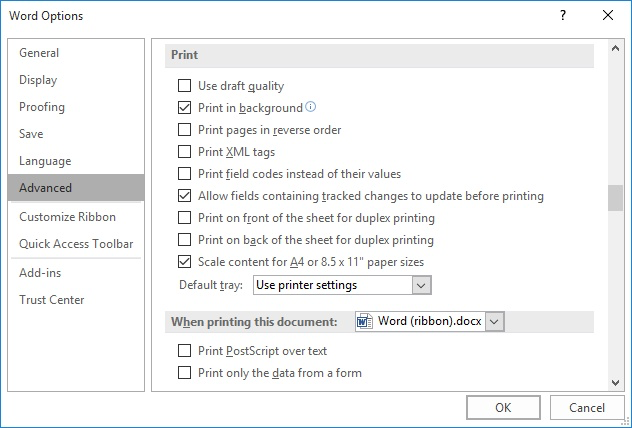
Figure 1. The advanced settings of the Word Options dialog box.
Note the Default Tray drop-down list on the dialog box. This lists the various tray options available for your printer. For most printers, there will be a Tray 1 and Tray 2 option, provided the printer has at least two paper trays. The PrintTwoTrays macro sets the option explicitly to Tray 1, prints a copy, then Tray 2, prints a copy, and then sets the setting back to its original value. If you look at the control in the dialog box and you see different options there, you can change the macro to reflect the appropriate options for your system—just make sure you use the exact wording shown in the drop-down list.
If the simple approach doesn't work, then you'll want to use the more detailed method. This involves setting up two different printer definitions, each of which utilizes a different printer tray. You'd need to define these printers in Windows, and you'll want to make sure that when you print a test page (again, in Windows), it utilizes to the desired paper tray.
At this point you have multiple printer definitions set up, and each will print to a different paper tray on the same printer. You can now specify the desired printer, in a macro, so that the printout goes to the desired paper tray.
Sub PrintTwoTrays()
    Dim sCurrentPrinter as String

    sCurrentPrinter = Application.ActivePrinter
    Application.ActivePrinter = "Tray 1 Printer"
    Application.PrintOut FileName:=""
    Application.ActivePrinter = "Tray 2 Printer"
    Application.PrintOut FileName:=""
    Application.ActivePrinter = sCurrentPrinter
End Sub
You'll obviously want to change the printer names in the macro to reflect the names you assigned to the newly created printer definitions.
Note:
WordTips is your source for cost-effective Microsoft Word training. (Microsoft Word is the most popular word processing software in the world.) This tip (10645) applies to Microsoft Word 2007, 2010, 2013, 2016, 2019, 2021, and Word in Microsoft 365. You can find a version of this tip for the older menu interface of Word here: Two Printed Copies to Different Paper Trays.

Create Custom Apps with VBA! Discover how to extend the capabilities of Office 365 applications with VBA programming. Written in clear terms and understandable language, the book includes systematic tutorials and contains both intermediate and advanced content for experienced VB developers. Designed to be comprehensive, the book addresses not just one Office application, but the entire Office suite. Check out Mastering VBA for Microsoft Office 365 today!
When you create a document, you may envision that document being printed in a specific way. What if you want to save ...
Discover MoreIf you need to print more than one copy of your document, you need to become familiar with the printing options made ...
Discover MoreEver need to print the mirror image of your document? This tip explains how to reverse your image so it can be used for ...
Discover MoreFREE SERVICE: Get tips like this every week in WordTips, a free productivity newsletter. Enter your address and click "Subscribe."
There are currently no comments for this tip. (Be the first to leave your comment—just use the simple form above!)
Got a version of Word that uses the ribbon interface (Word 2007 or later)? This site is for you! If you use an earlier version of Word, visit our WordTips site focusing on the menu interface.
Visit the WordTips channel on YouTube

FREE SERVICE: Get tips like this every week in WordTips, a free productivity newsletter. Enter your address and click "Subscribe."
Copyright © 2026 Sharon Parq Associates, Inc.
 Please Note:
This article is written for users of the following Microsoft Word versions: 2007, 2010, 2013, 2016, 2019, 2021, and Word in Microsoft 365. If you are using an earlier version (Word 2003 or earlier), this tip may not work for you. For a version of this tip written specifically for earlier versions of Word, click here:
Please Note:
This article is written for users of the following Microsoft Word versions: 2007, 2010, 2013, 2016, 2019, 2021, and Word in Microsoft 365. If you are using an earlier version (Word 2003 or earlier), this tip may not work for you. For a version of this tip written specifically for earlier versions of Word, click here:
Comments