Please Note: This article is written for users of the following Microsoft Word versions: 2007, 2010, 2013, 2016, 2019, and 2021. If you are using an earlier version (Word 2003 or earlier), this tip may not work for you. For a version of this tip written specifically for earlier versions of Word, click here: Collecting Highlighted Text Selections.
Cindy has a lot of documents in which she's used the highlighter to mark different text selections. She's looking for a way to pull all those highlighted selections from the document and place them in their own document.
One way to do it is the old-fashioned manual method. You can display the first highlighted selection and select it with the mouse. Then display each subsequent highlighted selection and hold down the Ctrl key as you select the text with the mouse. You'll end up with a group of non-contiguous selections, and you can press Ctrl+C to copy them all to the Clipboard. Open a new document and press Ctrl+V, and the selections are in the new document.
There's an easier way, however. Follow these steps:
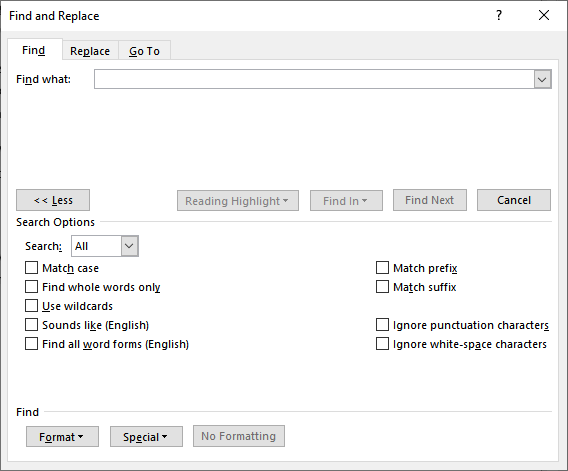
Figure 1. The expanded Find tab of the Find and Replace dialog box.
All of the highlighted text selections are now in the new document.
WordTips is your source for cost-effective Microsoft Word training. (Microsoft Word is the most popular word processing software in the world.) This tip (9232) applies to Microsoft Word 2007, 2010, 2013, 2016, 2019, and 2021. You can find a version of this tip for the older menu interface of Word here: Collecting Highlighted Text Selections.

Discover the Power of Microsoft Office This beginner-friendly guide reveals the expert tips and strategies you need to skyrocket your productivity and use Office 365 like a pro. Mastering software like Word, Excel, and PowerPoint is essential to be more efficient and advance your career. Simple lessons guide you through every step, providing the knowledge you need to get started. Check out Microsoft Office 365 For Beginners today!
One of the final touches you can add to a document is to hyphenate it. This allows text to flow more smoothly from line ...
Discover MoreWhen dealing with documents that contain quoted material, you may need to determine if that material exceeds a specific ...
Discover MoreAdding quote marks is normally as simple as typing them from the keyboard. However, if you want to add quote marks around ...
Discover MoreFREE SERVICE: Get tips like this every week in WordTips, a free productivity newsletter. Enter your address and click "Subscribe."
2022-01-30 15:55:50
Jon Webber
Edit: If you don't see "Highlight All"or "Reading Highlight" and "Find In" then try:
1) Instead of clicking Ctrl-H or Ctrl-F, click on "Find" in the main ribbon and then click "Advanced Find"
2) if the above doesn't work then try:
Originally when I used Ctrl-H or Ctrl-F there wasn't an option to "Highlight All Items Found" but I then clicked on Ctrl-F and when the Navigation Box popped up on the left of my screen, I clicked the down arrow next to the magnifying glass, then clicked on "Options" then I selected the "Highlight All" selection box. Then I went back and clicked on down arrow next to the magnifying glass and this time when I selected "Advanced Find" the tabs for "Reading Highlight" and "Find In" are now visible. I clicked on "Reading Highlight" and selected "Highlight All." Then I clicked on the "Find In" tab and selected "Main Document" and all the highlights in my document were then selected. I closed the find window. Then I used Ctrl-C to copy. Then pasted into a new document.
------------
Original Question: In Word 2019 there is no "Highlight All Items Found" check box, or "Find In" or "Find All." So this solution doesn't work for me. Anyone find out how to do this?
2022-01-30 15:21:39
Jon Webber
In Word 2019 there is no "Highlight All Items Found" check box, or "Find In" or "Find All." So this solution doesn't work for me. Anyone find out how to do this?
2021-04-17 22:40:17
Tomek Dluzniewski
@Jane: In my version of Word (MS 365 Family under Win.10) I also did not find "Highlight All Items Found checkbox". There is "Highlight All" under "Reading Highlight", but this just highlights the text found, which is already highlighted, so it is even not noticeable. It does not select anything.
However, under "Find in" there is an option "Main Document", which does what this tip is about. I am attaching a screenshot of the Find and Replace dialog box from my machine. (see Figure 1 below)
Note: The copied text, if just pasted with Ctrl-V will normally be highlighted as it was in the source document. You may want to use other paste options either from the Ribbon or, after pasting, by clicking on a small Paste-Options icon that pops up at the end of the pasted text.
@Jane: Please let me know if it worked for you.
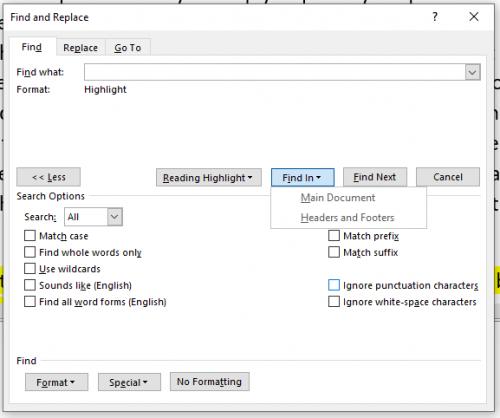
Figure 1.
2021-04-17 10:28:20
Jane Lawson
In my version of Word 2016 I can find no "Highlight All Items Found" check box. All get is the "Format: Highlight" beneath the (empty) "Find What" box. Has anyone else had this problem and found a solution?
Got a version of Word that uses the ribbon interface (Word 2007 or later)? This site is for you! If you use an earlier version of Word, visit our WordTips site focusing on the menu interface.
Visit the WordTips channel on YouTube

FREE SERVICE: Get tips like this every week in WordTips, a free productivity newsletter. Enter your address and click "Subscribe."
Copyright © 2026 Sharon Parq Associates, Inc.
 Please Note:
This article is written for users of the following Microsoft Word versions: 2007, 2010, 2013, 2016, 2019, and 2021. If you are using an earlier version (Word 2003 or earlier), this tip may not work for you. For a version of this tip written specifically for earlier versions of Word, click here:
Please Note:
This article is written for users of the following Microsoft Word versions: 2007, 2010, 2013, 2016, 2019, and 2021. If you are using an earlier version (Word 2003 or earlier), this tip may not work for you. For a version of this tip written specifically for earlier versions of Word, click here:
Comments