Please Note: This article is written for users of the following Microsoft Word versions: 2007, 2010, 2013, 2016, 2019, and 2021. If you are using an earlier version (Word 2003 or earlier), this tip may not work for you. For a version of this tip written specifically for earlier versions of Word, click here: Making Text Bold.
You probably already know that there are a number of ways you can make text bold in Word. One common way is to press Ctrl+B when you want to "turn on" the bold character attribute, type your word (or words), and then press Ctrl+B to turn it off.
Word provides another quick way to make text bold—using asterisks. This may sound strange but is actually quite common in the online world. In plain text e-mail messages, people often use asterisks to *emphasize* words. If you type asterisks in this manner (directly next to a word or group of words, with no intervening spaces) in Word, the asterisks are automatically removed, and the word(s) are shown in bold type.
You can try this yourself by typing *this is bold* (exactly as shown here, including spacing) within Word. When you type the second asterisk, both asterisks should disappear and the words "this is bold" are shown in bold type.
If this formatting shortcut doesn't work for you, it is because of a setting in Word's AutoFormat feature. Follow these steps:
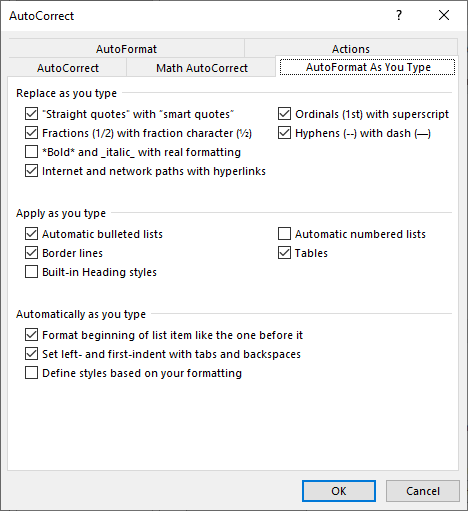
Figure 1. The AutoFormat As You Type tab of the AutoCorrect dialog box.
The shortcut should now work just fine.
WordTips is your source for cost-effective Microsoft Word training. (Microsoft Word is the most popular word processing software in the world.) This tip (8726) applies to Microsoft Word 2007, 2010, 2013, 2016, 2019, and 2021. You can find a version of this tip for the older menu interface of Word here: Making Text Bold.

Discover the Power of Microsoft Office This beginner-friendly guide reveals the expert tips and strategies you need to skyrocket your productivity and use Office 365 like a pro. Mastering software like Word, Excel, and PowerPoint is essential to be more efficient and advance your career. Simple lessons guide you through every step, providing the knowledge you need to get started. Check out Microsoft Office 365 For Beginners today!
Word gives you control over how your text appears on the page. This includes adjusting how close letters are to each ...
Discover MoreAdding notes to your document in Word is a handy tool. But what if you don't want those notes to be seen on the screen or ...
Discover MoreDon't like the font that Word uses for a default in your new documents? You can pick a different font, but the way you ...
Discover MoreFREE SERVICE: Get tips like this every week in WordTips, a free productivity newsletter. Enter your address and click "Subscribe."
2023-10-23 10:08:06
Andrew
Jeff:
1. Press Ctrl-B at the beginning of the text you want to be bold. (Don't select anything.)
2. Type the word or sentence or whatever.
3. Press Ctrl-B after typing the text you want to be bold. You will then be typing "regular" text.
2023-10-22 06:51:52
jeff probst
Hello Allen. Is there an easy way to make every word i type bold (in random places in text)? It's a hassle to select bold (shortcut or otherwise) each time i want to type a word in bold. Thank you for tips.net
2021-01-04 09:16:57
Robert
Thank you Henry, I had missed that very important distinction. It works perfectly if you do it right.
2021-01-03 13:18:02
Henry Noble
@Robert - Make sure to tick the box in the "AutoFormat As You Type" tab.
Ticking the box in the "AutoFormat" tab does not do the trick.
2021-01-02 10:01:09
Robert
Tried the *bold* tip and no matter what I do it doesn't work. Any *help* out there?
Got a version of Word that uses the ribbon interface (Word 2007 or later)? This site is for you! If you use an earlier version of Word, visit our WordTips site focusing on the menu interface.
Visit the WordTips channel on YouTube

FREE SERVICE: Get tips like this every week in WordTips, a free productivity newsletter. Enter your address and click "Subscribe."
Copyright © 2026 Sharon Parq Associates, Inc.
 Please Note:
This article is written for users of the following Microsoft Word versions: 2007, 2010, 2013, 2016, 2019, and 2021. If you are using an earlier version (Word 2003 or earlier), this tip may not work for you. For a version of this tip written specifically for earlier versions of Word, click here:
Please Note:
This article is written for users of the following Microsoft Word versions: 2007, 2010, 2013, 2016, 2019, and 2021. If you are using an earlier version (Word 2003 or earlier), this tip may not work for you. For a version of this tip written specifically for earlier versions of Word, click here:
Comments