David notes that his old typewriter had a lever marked MarRel, short for Margin Release. This allowed him to type beyond the right margin on the page. David wonders how he can type beyond the right margin in Word.
I remember those days of using the MarRel, as well. It could come in handy if you needed to type just one or two more letters in order to finish out a word on the current line.
That usage—to finish out a word on the current line—highlights the main difference between a typewriter and a word processor, such as Word. A typewriter was line-based, and Word is paragraph-based. When you get to the end of a line in a Word document, you just keep typing and if there is not enough room, the word is "wrapped" automatically to the next line.
Because of this difference in orientation, Word doesn't have a MarRel key, nor does it need one. That is because there are actually two settings at play in the wrapping—the margin and the paragraph indent. You can see these two settings visually if you have the ruler displayed on your system. At the right side of the ruler you can see the division between white and gray; this is the margin for your page. The small icon near the right side is the indent for the paragraph. (See Figure 1.)
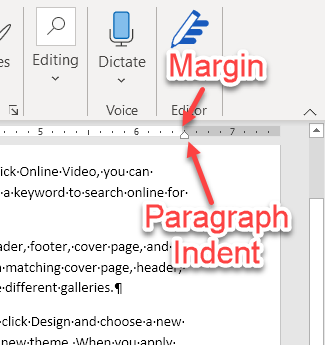
Figure 1. The position of the margin and paragraph indent on the ruler.
In most instances, the position of the paragraph indent icon and the margin will be the same. You can, however, use your mouse to click on the icon and drag it either left or right. You cannot click and drag on the margin. If you click the paragraph indent icon and drag it right, you are, in effect, pressing down the MarRel button, but it is for the entire paragraph, not just for a single line. (Remember—Word is paragraph-based, not line-based.)
If you click and drag the paragraph indent icon, you can see the precise effect if you display the Paragraph dialog box. To do this, display the Home tab of the ribbon and click the small icon at the bottom-right of the Paragraph group. (See Figure 2.)
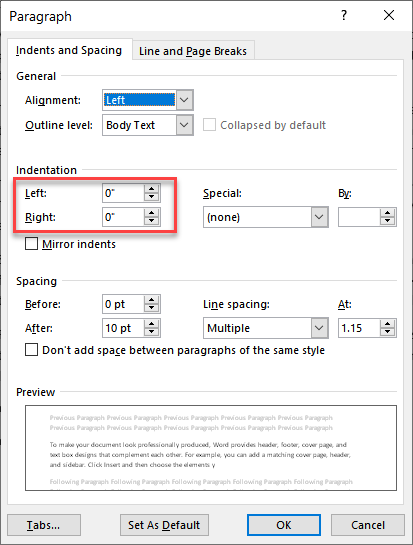
Figure 2. You can adjust paragraph indent in the Paragraph dialog box.
Note the Left and Right controls near the middle-left of the dialog box. These control the indent for the entire paragraph (the one in which your insertion point is located or the ones you selected before displaying the dialog box). These values can be negative as well as positive. They are "added to" whatever your margin setting is. Thus, if your right margin is 1 inch, setting a right indent of -0.3 means you can go 0.3 inches into that right margin area—the paragraph will wrap text at a point 0.7 inches from the right edge of the paper.
You should note that you can set either the Left or Right values to just about any negative value you want. For instance, you could set the Right value to -3.4. If you have a 1-inch right margin, this means your text for that paragraph would wrap at 2.4 inches beyond the right edge of your paper. (Remember that the wrapping point is determined by adding the paragraph indent to the margin, thus 1 (the margin) plus -3.4 (the right paragraph indent) equals -2.4, which is 2.4 inches beyond the right edge of the paper.)
Your printer obviously cannot print beyond the right edge of your paper. In fact, there is a very good chance that your printer cannot print all the way to the edge of your paper. This has to do with the fact that most printers have a "dead zone" at the left and right edges of the paper where it mechanically grips the paper as it moves it through the printer. It is impossible for most printers to physically print in this grip area. Because of this, you'll want to be careful how you set both your page margins and your paragraph indents so that you don't exceed what your printer can physically do.
There is one other capability of Word that has no correspondence with old typewriters—you can insert a text box in your document. A text box can be placed anywhere on the page, independent of the paragraphs in your main document. Thus, if you wanted to put a note or small block of text into the right margin, you could do so using a text box that would be independent of your actual text. (These are often used for what is called a "sidebar" or a "margin note" in publishing circles.)
WordTips is your source for cost-effective Microsoft Word training. (Microsoft Word is the most popular word processing software in the world.) This tip (7813) applies to Microsoft Word 2007, 2010, 2013, 2016, 2019, and 2021.

Learning Made Easy! Quickly teach yourself how to format, publish, and share your content using Word 2021 or Microsoft 365. With Step by Step, you set the pace, building and practicing the skills you need, just when you need them! Check out Microsoft Word Step by Step today!
Undoubtedly you will want to format your document so that headings stay with the paragraph that follows the heading. ...
Discover MoreParagraphs can be aligned in four different ways. This tip examines those alignment methods.
Discover MoreIf the line spacing in a paragraph appears uneven it may result of the combination of a larger character or object pasted ...
Discover MoreFREE SERVICE: Get tips like this every week in WordTips, a free productivity newsletter. Enter your address and click "Subscribe."
There are currently no comments for this tip. (Be the first to leave your comment—just use the simple form above!)
Got a version of Word that uses the ribbon interface (Word 2007 or later)? This site is for you! If you use an earlier version of Word, visit our WordTips site focusing on the menu interface.
Visit the WordTips channel on YouTube

FREE SERVICE: Get tips like this every week in WordTips, a free productivity newsletter. Enter your address and click "Subscribe."
Copyright © 2026 Sharon Parq Associates, Inc.
Comments