Please Note: This article is written for users of the following Microsoft Word versions: 2007, 2010, 2013, 2016, 2019, and 2021. If you are using an earlier version (Word 2003 or earlier), this tip may not work for you. For a version of this tip written specifically for earlier versions of Word, click here: Make AutoCorrect Pay Attention to Character Case.
Written by Allen Wyatt (last updated November 9, 2019)
This tip applies to Word 2007, 2010, 2013, 2016, 2019, and 2021
AutoCorrect is a handy feature that helps compensate for "poor typing." (It has helped me tremendously when my fingers get mixed up on which keys should be pressed when. :>)) There are some instances when AutoCorrect can cause problems, however.
Consider the situation when you have acronyms that are the same as a commonly mistyped word. For instance, "hsa" is recognized by AutoCorrect as a mistyping, and it is automatically corrected to "has." However, HSA is also an acronym for Health Savings Account. If you really meant to type the acronym, you don't want Word to assume you made a typing error and correct it for you.
Unfortunately, there is no way to instruct AutoCorrect to ignore "mistyped" words that are typed in all uppercase. There are, however, two workarounds you can use.
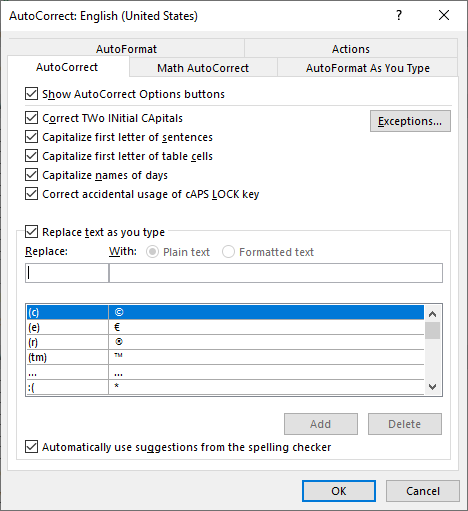
The first workaround is to create a brand-new AutoCorrect entry that handles just instances where you want HSA. Follow these steps:

Figure 1. The AutoCorrect tab of the AutoCorrect dialog box.
At this point, every time you type "hsaa" it is replaced with HSA, and every time you type "hsa" it is replaced with "has." This works because the replacement only occurs when Word determines you've finished the word (pressing a space or punctuation mark), and once a replacement is made, Word doesn't go back and make additional replacements. Thus, HSA, as a replacement for "hsaa," is not automatically corrected to HAS.
The second workaround is to allow AutoCorrect to do its work, dutifully changing all instances of HSA to HAS. You can then create a macro that will use Find and Replace to locate all instances of the uppercase word HAS and change them to HSA. The following macro will do just that:
Sub ReplaceHAS()
    Selection.Find.ClearFormatting
    Selection.Find.Replacement.ClearFormatting
    With Selection.Find
        .Text = "HAS"
        .Replacement.Text = "HSA"
        .Forward = True
        .Wrap = wdFindContinue
        .Format = False
        .MatchCase = True
        .MatchWholeWord = True
        .MatchWildcards = False
        .MatchSoundsLike = False
        .MatchAllWordForms = False
    End With
    Selection.Find.Execute Replace:=wdReplaceAll
End Sub
The macro works on the entire document. You could assign it to a shortcut key or a toolbar button so that you could use it as one of the finishing steps in your editing process.
Note:
WordTips is your source for cost-effective Microsoft Word training. (Microsoft Word is the most popular word processing software in the world.) This tip (7549) applies to Microsoft Word 2007, 2010, 2013, 2016, 2019, and 2021. You can find a version of this tip for the older menu interface of Word here: Make AutoCorrect Pay Attention to Character Case.

Learning Made Easy! Quickly teach yourself how to format, publish, and share your content using Word 2021 or Microsoft 365. With Step by Step, you set the pace, building and practicing the skills you need, just when you need them! Check out Microsoft Word Step by Step today!
Word has a feature called AutoComplete which is helpful when typing some comment things, such as month names. This tip ...
Discover MoreLike to add a smiley or two to your writing? Word makes it easy through creative use of the AutoCorrect feature.
Discover MoreAutoCorrect is a great help when writing, as it can allow you to create regular blocks of text easily. This can cause ...
Discover MoreFREE SERVICE: Get tips like this every week in WordTips, a free productivity newsletter. Enter your address and click "Subscribe."
There are currently no comments for this tip. (Be the first to leave your comment—just use the simple form above!)
Got a version of Word that uses the ribbon interface (Word 2007 or later)? This site is for you! If you use an earlier version of Word, visit our WordTips site focusing on the menu interface.
Visit the WordTips channel on YouTube
FREE SERVICE: Get tips like this every week in WordTips, a free productivity newsletter. Enter your address and click "Subscribe."
Copyright © 2026 Sharon Parq Associates, Inc.
Comments