Please Note: This article is written for users of the following Microsoft Word versions: 2007, 2010, 2013, 2016, 2019, and 2021. If you are using an earlier version (Word 2003 or earlier), this tip may not work for you. For a version of this tip written specifically for earlier versions of Word, click here: Emoticons in Word.
Written by Allen Wyatt (last updated January 25, 2020)
This tip applies to Word 2007, 2010, 2013, 2016, 2019, and 2021
Emoticons are those funny little faces people love to put in their e-mails. You know the type, made with colons, dashes, and other characters. For instance, :-) is an emoticon for a smiley face. (Look at it sideways and you see two eyes, a nose, and a smiling mouth.)
If you type an emoticon in Word, it is automatically transformed into a "dingbat" character that shows the smiling face, frowning face, or neutral face. The following are the different emoticons and how they are converted:
| Emoticon | Equivalent Dingbat | |
|---|---|---|
| :) | smiling face | |
| :-) | smiling face | |
| :( | frowning face | |
| :-( | frowning face | |
| ;)| | winking face | |
| ;-) | winking face | |
| :| | neutral face | |
| :-| | neutral face |
(Note that the winking face emoticon does not convert into an equivalent dingbat in Word 2019 or Word in Office 365.)
The actual conversion of the emoticons to their dingbat equivalents is done through the AutoCorrect feature of Word. If you don't want the conversion to take place, you can do the following:
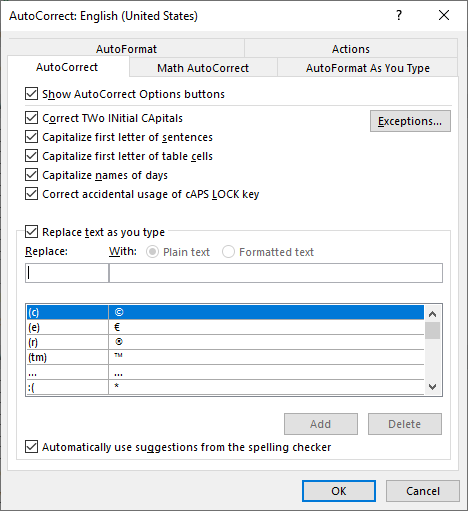
Figure 1. The AutoCorrect tab of the AutoCorrect dialog box.
WordTips is your source for cost-effective Microsoft Word training. (Microsoft Word is the most popular word processing software in the world.) This tip (6051) applies to Microsoft Word 2007, 2010, 2013, 2016, 2019, and 2021. You can find a version of this tip for the older menu interface of Word here: Emoticons in Word.

The First and Last Word on Word! Bestselling For Dummies author Dan Gookin puts his usual fun and friendly candor back to work to show you how to navigate Word 2019. Spend more time working and less time trying to figure it all out! Check out Word 2019 For Dummies today!
When you select some text in your document and then display the AutoCorrect dialog box, it can seem a bit odd that ...
Discover MoreAutoCorrect is a great help when writing, as it can allow you to create regular blocks of text easily. This can cause ...
Discover MoreIf you need to delete all the entries in your AutoCorrect list, the easiest way to do so is with a macro. This tip ...
Discover MoreFREE SERVICE: Get tips like this every week in WordTips, a free productivity newsletter. Enter your address and click "Subscribe."
2021-09-06 06:12:51
Kiwerry
@ mslonik: Thank you for comment 1.😊👍
2020-01-27 04:30:05
mslonik
Well, yes, you can add "smileys" to your Word documents this way and apply AutoCorrect mechanism, but...
1. Emoticons are not only smileys and these two notions are not completely interchangable, but this is probably just matter of definition. More importantly, to enter ANY emoticon in ANY Windows 10 oriented application (not only Microsoft Word) one have to just press shortcut # (Windows key) + . (dot key) 👍🎁.
2. AutoCorrect mechanism is kinda useful, but only within Microsoft Word. What if one would like to use the same set of hotstrings in ANY Windows application? Then I strongly recommend AHK (Autohotkey.com): free (as in word freedom), flexible, great application.
Cheers!
Got a version of Word that uses the ribbon interface (Word 2007 or later)? This site is for you! If you use an earlier version of Word, visit our WordTips site focusing on the menu interface.
Visit the WordTips channel on YouTube

FREE SERVICE: Get tips like this every week in WordTips, a free productivity newsletter. Enter your address and click "Subscribe."
Copyright © 2026 Sharon Parq Associates, Inc.
 Please Note:
This article is written for users of the following Microsoft Word versions: 2007, 2010, 2013, 2016, 2019, and 2021. If you are using an earlier version (Word 2003 or earlier), this tip may not work for you. For a version of this tip written specifically for earlier versions of Word, click here:
Please Note:
This article is written for users of the following Microsoft Word versions: 2007, 2010, 2013, 2016, 2019, and 2021. If you are using an earlier version (Word 2003 or earlier), this tip may not work for you. For a version of this tip written specifically for earlier versions of Word, click here:
Comments