Please Note: This article is written for users of the following Microsoft Word versions: 2007, 2010, 2013, 2016, 2019, 2021, and Word in Microsoft 365. If you are using an earlier version (Word 2003 or earlier), this tip may not work for you. For a version of this tip written specifically for earlier versions of Word, click here: Accurately Setting Tabs Using the Ruler.
You probably know that Word allows you to set tabs in a paragraph by clicking on the Ruler at the top of the document window. The tab that is inserted depends on the tab type selected at the left side of the Ruler. You can then click on the tab and drag it to the location desired.
Sometimes, however, accurately placing the tabs using the Ruler and the mouse can be a pain. In fact, you may notice that the tabs seem to "jump" from one location to another as you are dragging them. If this is the case, and you long for a way to more accurately set the tabs using the mouse on the Ruler, there are a couple of things you can check out.
First, you should understand that the grid settings on the drawing layer can affect the dragging behavior for tabs. (Nobody seems to know why this is the case; it just is.) Word, by default, is configured so that "snap to grid" is turned on, and the grid is set for 1/16-inch increments. Thus, when you drag a tab stop, it seems to "jump" in increments of 1/16 inch. If you don't need the drawing grid, you can turn it off by following these steps:
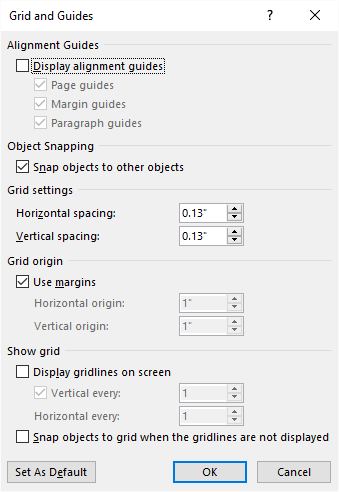
Figure 1. The Grid and Guides dialog box.
You should now be able to drag tabs along the Ruler smoothly and precisely. If you want to see the precise placement of the tabs, just hold down the Alt key as you drag them.
If you still have problems placing the tabs accurately, you might try increasing the zoom setting for viewing the document, and you should make sure that your mouse is clean. (If your mouse uses a mechanical ball for positioning, and there is lint or dirt in the ball housing, that can affect the ability of the mouse to move smoothly.)
WordTips is your source for cost-effective Microsoft Word training. (Microsoft Word is the most popular word processing software in the world.) This tip (5930) applies to Microsoft Word 2007, 2010, 2013, 2016, 2019, 2021, and Word in Microsoft 365. You can find a version of this tip for the older menu interface of Word here: Accurately Setting Tabs Using the Ruler.

Create Custom Apps with VBA! Discover how to extend the capabilities of Office 365 applications with VBA programming. Written in clear terms and understandable language, the book includes systematic tutorials and contains both intermediate and advanced content for experienced VB developers. Designed to be comprehensive, the book addresses not just one Office application, but the entire Office suite. Check out Mastering VBA for Microsoft Office 365 today!
Need to adjust the position of tab stops in a paragraph? One simple way to do it is to just drag them around on the ruler.
Discover MoreNeed to have some text at the left margin and some at the right, all on the same line? It's easy to do if you use your ...
Discover MoreTab stops allow you to modify the horizontal position at which text is positioned on a line. If you want to get rid of ...
Discover MoreFREE SERVICE: Get tips like this every week in WordTips, a free productivity newsletter. Enter your address and click "Subscribe."
There are currently no comments for this tip. (Be the first to leave your comment—just use the simple form above!)
Got a version of Word that uses the ribbon interface (Word 2007 or later)? This site is for you! If you use an earlier version of Word, visit our WordTips site focusing on the menu interface.
Visit the WordTips channel on YouTube

FREE SERVICE: Get tips like this every week in WordTips, a free productivity newsletter. Enter your address and click "Subscribe."
Copyright © 2026 Sharon Parq Associates, Inc.
 Please Note:
This article is written for users of the following Microsoft Word versions: 2007, 2010, 2013, 2016, 2019, 2021, and Word in Microsoft 365. If you are using an earlier version (Word 2003 or earlier), this tip may not work for you. For a version of this tip written specifically for earlier versions of Word, click here:
Please Note:
This article is written for users of the following Microsoft Word versions: 2007, 2010, 2013, 2016, 2019, 2021, and Word in Microsoft 365. If you are using an earlier version (Word 2003 or earlier), this tip may not work for you. For a version of this tip written specifically for earlier versions of Word, click here:
Comments