Written by Allen Wyatt (last updated May 23, 2025)
This tip applies to Word 2007, 2010, 2013, 2016, 2019, and 2021
Drawing shapes are a great way to add common graphic flourishes to your document. The drawing capabilities of Word allow you to define connectors that link different shapes together. These connectors are available if you create your drawing within the drawing canvas, and they are dynamic in nature. This means that even if you move the connected shapes around on the canvas, the connectors stretch, bend, and move as necessary to keep the links valid.
To see how connectors work, try this:
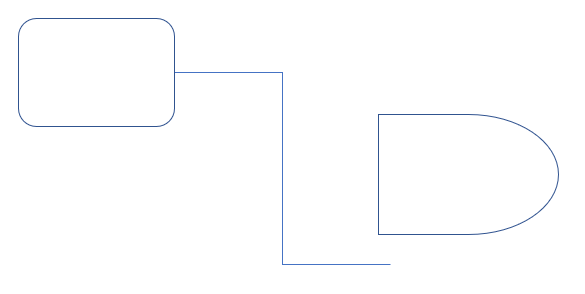
Figure 1. One end of the connector is anchored.
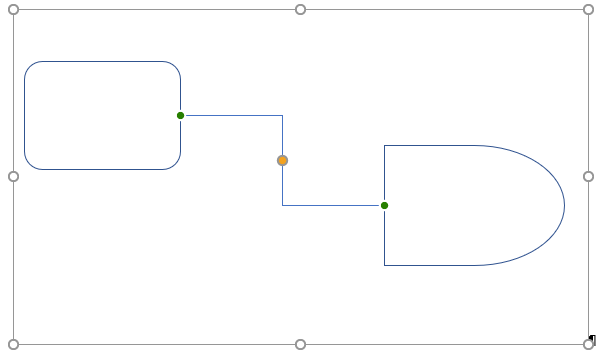
Figure 2. Both ends of the connector is anchored to both shapes.
Note that in step 9 you may not see any connector dots by moving the mouse pointer over one of the shapes. If that is the case, click on one end of the connector line and drag it to the perimeter of the shape. The mouse pointer changes to a large plus sign and at least one connector dot appears on the perimeter of the shape. "Drop" the end of the connector line on a connection point and that end of the connector line is anchored to the shape. Repeat this process with the other end of the connector line to anchor it to the other shape.
Now you can move the original shapes around, and the connector remains connected to the two connection points you selected. You can add additional shapes, as desired, with any connectors you desire.
You should be aware that connectors are only available between shapes placed on the drawing canvas. If you try to create a connector involving a shape that is outside of the drawing canvas, connectors are no longer available from the menus or ribbon.
WordTips is your source for cost-effective Microsoft Word training. (Microsoft Word is the most popular word processing software in the world.) This tip (6277) applies to Microsoft Word 2007, 2010, 2013, 2016, 2019, and 2021.

Learning Made Easy! Quickly teach yourself how to format, publish, and share your content using Word 2021 or Microsoft 365. With Step by Step, you set the pace, building and practicing the skills you need, just when you need them! Check out Microsoft Word Step by Step today!
Want to fill a drawing shape with more than just a color? Word allows you to use all sorts of fills, as described in this ...
Discover MoreWhen you need to move a drawing object around your document, you use the mouse after you select the object. This tip ...
Discover MorePlace a drawing object in your document, and it doesn't have to stay that way. You can flip a drawing object in either of ...
Discover MoreFREE SERVICE: Get tips like this every week in WordTips, a free productivity newsletter. Enter your address and click "Subscribe."
2020-11-20 15:20:34
ChristoF01
Allen,
When I copy a canvas with linked objects from one page to another in an MS Word document, the connector disconnects from both objects, even though the green dots are shown at either end of the connector.
When re-attaching it to one of the objects, it automatically attaches itself to the other object.
I am using MS Office 365 and have re-loaded the software, so it would seem unlikely to be locally corrupted software.
2020-04-14 20:09:40
Rai , Basanta
Hi
I first inserted the rectangle shape . I type some text inside shape . I also inserted circle inside rectangle. Now I am trying to move rectangle along with text and circle , but I circle is left behind. How can I move all this as single shape .
2020-03-06 14:49:20
CityKidz
I tried doing this, but had no success until I learned that you must first create the connector & group it with the shapes then you must stretch the connector to size in order for the connection points to appear. Then I could move the points around and see the telltale green dots that indicated I successfully connected the lines. After this, I can move the shapes and the connecting lines stay connected.
Got a version of Word that uses the ribbon interface (Word 2007 or later)? This site is for you! If you use an earlier version of Word, visit our WordTips site focusing on the menu interface.
Visit the WordTips channel on YouTube

FREE SERVICE: Get tips like this every week in WordTips, a free productivity newsletter. Enter your address and click "Subscribe."
Copyright © 2025 Sharon Parq Associates, Inc.
Comments