David notes that in earlier versions of Word, when you selected "Save As" you immediately got the Save As dialog box, which defaulted to the current folder, but allowed you to select a folder and a file type before clicking Save. In the latest versions of Word, after clicking "Save A Copy," you have to click on the "More Options" link after the file type selector (or on the path name above the document name) to get to this dialog box. David wonders if there is any way to have "Save As," once again, directly display the Save As dialog box.
There are a few ways you can go about this. First, you can change how you initiate "Save As." The quickest way to do so is to simply press F12, which fortunately still brings up the classic Save As dialog box. (This is my preferred method of saving the current document under a new name or in a new location.)
You might also try these steps to implement a configuration change:
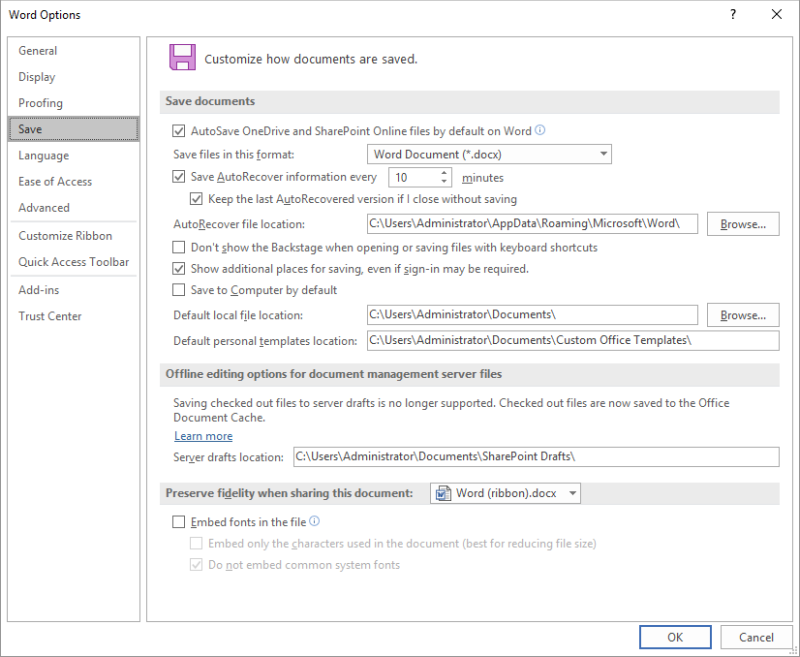
Figure 1. The Save options in the Word Options dialog box.
This should instruct Word to not show any of the areas that David finds problematic, opting instead to show the traditional Save As dialog box.
WordTips is your source for cost-effective Microsoft Word training. (Microsoft Word is the most popular word processing software in the world.) This tip (13685) applies to Microsoft Word 2013, 2016, 2019, and 2021.

The First and Last Word on Word! Bestselling For Dummies author Dan Gookin puts his usual fun and friendly candor back to work to show you how to navigate Word 2019. Spend more time working and less time trying to figure it all out! Check out Word 2019 For Dummies today!
What do you do when a ribbon tool you rely upon suddenly disappears? That's the situation addressed in this tip, where ...
Discover MoreThe Developer tab of the ribbon is the gateway to many advanced features in Word, including those features related to ...
Discover MoreWord allows you to configure how your document is displayed rather extensively. One configuration that has been around ...
Discover MoreFREE SERVICE: Get tips like this every week in WordTips, a free productivity newsletter. Enter your address and click "Subscribe."
2024-04-10 09:38:16
Beepee
Hi.
Whichever combination of the three options I check (all, none, 2 of 3) I still always get the Backstage view NOT the Save as dialog!!!
Guess I just need to remember the shortcut F12
Beepee
2024-04-08 07:34:51
HS Noble
Adding the Save As (F12) command to the Ribbon is another solution.
2023-12-03 12:21:03
Dan
In the latest version of Word (as of Dec. 2023), I had to check "Don't Show the Backstage" and uncheck "Show Additional Places for Saving," which took care of both of the unnecessary additional steps that were bothering me. Hope this helps somebody!
2022-09-23 08:21:19
Travis
I think 4. should be "Check the Don't show the Backstage...".
I got further frustrated when this page didn't provide the solution - then I decided to try checking that box also, since it wasn't already checked and sounded like what I wanted. I have both "Don't show..." and "Save to Computer..." checked now and, OMG, my sanity won't be taking such constant hits anymore.
2022-09-14 11:37:00
John
F12, clutch. Thanks
2022-04-19 04:10:15
Lincoln
@Ed Nelson: Why not save the templates in DOTX/DOTM format, that way whenever you open the document template, you'll have to save it with a new name in the preferred location. Alternatively, if you are forced to use DOCX formats, mark the file as Read-Only and then you won't be able to save any changes to the template and will have to save it with a new name in a preferred location.
2022-04-18 18:20:55
Ed Nelson
The third time I used "F12" to bring up "Save As" dialog, Windows saved my changes to the 3rd version to my original file.
I've read elsewhere Windows Autosave changes the behavior of "Save As" and "Save a Copy" to overwrite the original file.
Many years ago I used "Save As" to use documents as DeFacto templates. "Save As" and autosave did not modify your original file.
I am so confused. I have lost > 10 hours of work by unintentionally overwriting files with "Save a Copy" and/or Windows autosave.
Can you point me to a Youtube video that explains and demonstrates how to use "Save a Copy" in Word 2016 to:
1) Ooen an existing file,
2) Save a copy of the file to a new name or location WITHOUT modifying the original file?
Thanks!
2022-03-28 14:10:49
Lincoln
This tip didn't help me, also my F12 button on my home keyboard is not functioning, so I resorted to setting up the shortcut key Alt+F, A to the SaveAs dialog box and it works perfectly.
2021-12-08 11:10:20
William ALLBERRY
Thank you so much - this irritating feature (which I hadn't asked for) was driving me mad!
Got a version of Word that uses the ribbon interface (Word 2007 or later)? This site is for you! If you use an earlier version of Word, visit our WordTips site focusing on the menu interface.
Visit the WordTips channel on YouTube

FREE SERVICE: Get tips like this every week in WordTips, a free productivity newsletter. Enter your address and click "Subscribe."
Copyright © 2026 Sharon Parq Associates, Inc.
Comments