Kath has a contract document that is 30 pages long. She can mail merge this document with approximately 50-60 client names. In the resulting merged document, the page numbering is consecutive across all the merged pages. She wonders how she can ensure that the page numbering restarts in each of the merged documents so that she has 50-60 customized contracts, each having pages numbered 1-30.
In doing some testing with this, my page numbering came out correctly. I created a 30-page mail-merge document and made sure it had page numbers. I then merged it with a 40-member client list. The result was a single document of 1,200 pages (30 x 40). Word automatically separated each of the merged documents with a section break, and the page numbering for each document (each new section) began with 1, as it should.
I then went back to my source document and inserted a few section breaks in it, thinking that this might affect the final merged document. I made sure that the page numbering was set to "continuous" for each section in the source document. When I did the merge, Word still handled the page numbering correctly in the merged document. Even though the merged document was still 1,200 pages, the page numbering was correct for each individual 30-page document in that merged document.
If you are not seeing these results with your merged document, you'll want to go to the beginning of each contract in the merged document and place the insertion point somewhere simple, like in the first line of the contract. Then, follow these steps:
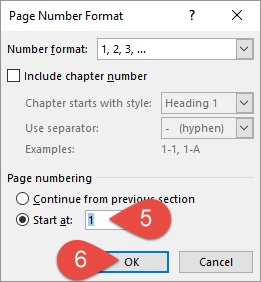
Figure 1. The Page Number Format dialog box.
Make sure you repeat these steps for each of the contracts in the merged document. When completed, the page numbering should be correct in the full merged document.
If you have to do this process quite often, you may be interested in using a macro to reset the starting page number for each section of the merged document. This short macro will do the trick:
Sub RestartPageNumbering()
    Dim oSection As Section
    Dim oHeader As HeaderFooter
    Dim oFooter As HeaderFooter

    For Each oSection In ActiveDocument.Sections
        For Each oHeader In oSection.Headers
            oHeader.PageNumbers.RestartNumberingAtSection = True
            oHeader.PageNumbers.startingNumber = 1
        Next oHeader
        For Each oFooter In oSection.Footers
            oFooter.PageNumbers.RestartNumberingAtSection = True
            oFooter.PageNumbers.startingNumber = 1
        Next oFooter
    Next oSection
End Sub
Note that you should only use this macro if your source document did not have any section breaks in it.
WordTips is your source for cost-effective Microsoft Word training. (Microsoft Word is the most popular word processing software in the world.) This tip (13546) applies to Microsoft Word 2007, 2010, 2013, 2016, 2019, 2021, 2024, and Word in Microsoft 365.

Do More in Less Time! An easy-to-understand guide to the more advanced features available in the Microsoft 365 version of Word. Enhance the quality of your documents and boost productivity in any field with this in-depth resource. Complete your Word-related tasks more efficiently as you unlock lesser-known tools and learn to quickly access the features you need. Check out Microsoft 365 Word For Professionals For Dummies today!
When you merge data from Excel into a Word document, you may need to do some conditional processing based on the data you ...
Discover MoreWhen you use the mail-merge capabilities of Word, the information merged takes on the formatting of your source document, ...
Discover MoreIf you are filtering a mail merge in Excel, and you get blank labels in the printout in Word, chances are good that ...
Discover MoreFREE SERVICE: Get tips like this every week in WordTips, a free productivity newsletter. Enter your address and click "Subscribe."
There are currently no comments for this tip. (Be the first to leave your comment—just use the simple form above!)
Got a version of Word that uses the ribbon interface (Word 2007 or later)? This site is for you! If you use an earlier version of Word, visit our WordTips site focusing on the menu interface.
Visit the WordTips channel on YouTube

FREE SERVICE: Get tips like this every week in WordTips, a free productivity newsletter. Enter your address and click "Subscribe."
Copyright © 2026 Sharon Parq Associates, Inc.
Comments