Please Note: This article is written for users of the following Microsoft Word versions: 2007, 2010, 2013, 2016, 2019, and 2021. If you are using an earlier version (Word 2003 or earlier), this tip may not work for you. For a version of this tip written specifically for earlier versions of Word, click here: Changing AutoFormatting Rules.
Written by Allen Wyatt (last updated July 17, 2021)
This tip applies to Word 2007, 2010, 2013, 2016, 2019, and 2021
There are two types of AutoFormatting that can be done with Word. The first, AutoFormat As You Type, is done (you guessed it) while you type. The second, plain old AutoFormat, is done when you call the feature into action explicitly.
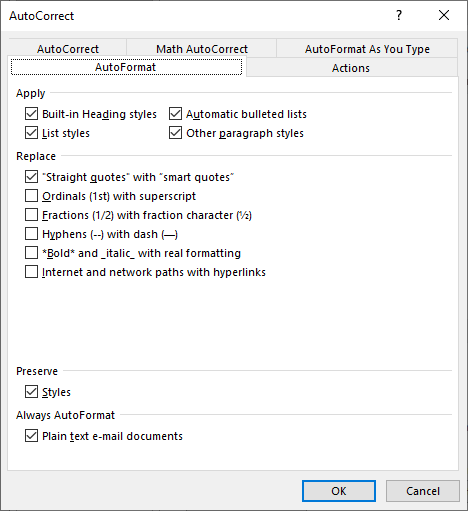
Word allows you to control the type of actions taken by AutoFormat when processing a document. If you want to change the way AutoFormat works, you do so by using the AutoFormat tab of the AutoCorrect dialog box. To display it, follow these steps:

Figure 1. The AutoFormat tab of the AutoCorrect dialog box.
The dialog box contains a list of formatting actions that can be applied by AutoFormat. Each action has a check box associated with it; if you select a check box, the associated action is performed. Clear the check box to prohibit AutoFormat from taking an action.
Remember that this simply configured AutoFormat; you'll still need to explicitly invoke Word's AutoFormatting capabilities to have the settings applied to your document.
Also, be aware that if you display the AutoFormat As You Type tab of the dialog box, you can adjust similar settings that Word applies as you are typing in your document.
WordTips is your source for cost-effective Microsoft Word training. (Microsoft Word is the most popular word processing software in the world.) This tip (13251) applies to Microsoft Word 2007, 2010, 2013, 2016, 2019, and 2021. You can find a version of this tip for the older menu interface of Word here: Changing AutoFormatting Rules.

Learning Made Easy! Quickly teach yourself how to format, publish, and share your content using Word 2021 or Microsoft 365. With Step by Step, you set the pace, building and practicing the skills you need, just when you need them! Check out Microsoft Word Step by Step today!
Have you ever had a line appear on your document that you can't seem to get rid of? It could be due to a built-in ...
Discover MoreThe AutoFormat feature of Word can be configured to make changes to a variety of conditions in your document. Here's how ...
Discover MoreWant an easy way to add lines in your document? You can do it by making sure Word is using one of its AutoFormat features.
Discover MoreFREE SERVICE: Get tips like this every week in WordTips, a free productivity newsletter. Enter your address and click "Subscribe."
There are currently no comments for this tip. (Be the first to leave your comment—just use the simple form above!)
Got a version of Word that uses the ribbon interface (Word 2007 or later)? This site is for you! If you use an earlier version of Word, visit our WordTips site focusing on the menu interface.
Visit the WordTips channel on YouTube
FREE SERVICE: Get tips like this every week in WordTips, a free productivity newsletter. Enter your address and click "Subscribe."
Copyright © 2026 Sharon Parq Associates, Inc.
Comments