Please Note: This article is written for users of the following Microsoft Word versions: 2007, 2010, 2013, 2016, 2019, and 2021. If you are using an earlier version (Word 2003 or earlier), this tip may not work for you. For a version of this tip written specifically for earlier versions of Word, click here: Differing Column Widths when Pasting.
When working with tables, it is not uncommon to cut rows from one table and paste them into another. The result of such actions may not be what you expect, however. The pasted rows—even if they have the same number of columns as the target table—may look "out of balance," with the cell borders not lining up with the row now above or below it.
There are a couple of ways you can fix this situation. The first solution involves making a change to how you actually paste the rows into the target table. Try this the next time you want to do the pasting:
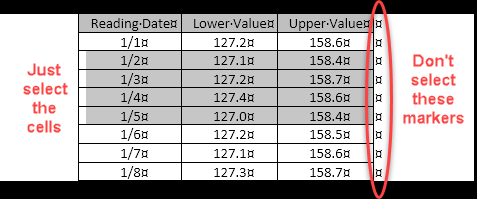
Figure 1. What to select in the table.
If you follow this process, then the content from the source table is copied into cells in the target table. New rows are created, as necessary, and these rows have the same cell widths as the other rows in the table.
There is one gottcha here. Notice that this technique involves adding a blank row at the end of the table (step 2). This is because when you paste into the last row, Word automatically adds as many rows as you need. If you want to paste the source information in some other location within the table, then you may end up overwriting information already in the table—unless you add enough blank rows to accommodate the data that will be pasted into the table.
If you are working with a table that already has messed-up column widths on individual rows, then you obviously cannot use the above technique. Instead, you may want to use the AutoFit feature of Word. Follow these steps:
If desired, you can also use AutoFit by just double-clicking on the left border of the table. This approach affects any columns that contain information but doesn't change the width of any empty columns.
Another approach is to do a table-to-text-to-table conversion process, which ends up in allowing Word to define new column widths. Follow these general steps:
Finally, if you have quite a few tables with messed-up column widths, you can create a macro that will go through and essentially perform an AutoFit on each table in the document.
Sub AutoFitAllTables()
    Dim oTbl As Table
    For Each oTbl In ActiveDocument.Tables
        oTbl.Columns.AutoFit
    Next oTbl
End Sub
Note:
WordTips is your source for cost-effective Microsoft Word training. (Microsoft Word is the most popular word processing software in the world.) This tip (13245) applies to Microsoft Word 2007, 2010, 2013, 2016, 2019, and 2021. You can find a version of this tip for the older menu interface of Word here: Differing Column Widths when Pasting.

Discover the Power of Microsoft Office This beginner-friendly guide reveals the expert tips and strategies you need to skyrocket your productivity and use Office 365 like a pro. Mastering software like Word, Excel, and PowerPoint is essential to be more efficient and advance your career. Simple lessons guide you through every step, providing the knowledge you need to get started. Check out Microsoft Office 365 For Beginners today!
Tired of that old table taking up space in your document? You can get rid of it using a variety of techniques, some of ...
Discover MoreWhen you insert a table into your document, it uses a standard-weight line around each cell in the table. If you want to ...
Discover MoreWhen creating a table, it is possible that adding row or cell shading can affect how cell borders are displayed. This ...
Discover MoreFREE SERVICE: Get tips like this every week in WordTips, a free productivity newsletter. Enter your address and click "Subscribe."
There are currently no comments for this tip. (Be the first to leave your comment—just use the simple form above!)
Got a version of Word that uses the ribbon interface (Word 2007 or later)? This site is for you! If you use an earlier version of Word, visit our WordTips site focusing on the menu interface.
Visit the WordTips channel on YouTube

FREE SERVICE: Get tips like this every week in WordTips, a free productivity newsletter. Enter your address and click "Subscribe."
Copyright © 2026 Sharon Parq Associates, Inc.
 Please Note:
This article is written for users of the following Microsoft Word versions: 2007, 2010, 2013, 2016, 2019, and 2021. If you are using an earlier version (Word 2003 or earlier), this tip may not work for you. For a version of this tip written specifically for earlier versions of Word, click here:
Please Note:
This article is written for users of the following Microsoft Word versions: 2007, 2010, 2013, 2016, 2019, and 2021. If you are using an earlier version (Word 2003 or earlier), this tip may not work for you. For a version of this tip written specifically for earlier versions of Word, click here:
Comments