Goldie wants to know if there is a way to underline table cells but not underline the spacing between cells. This would affect a break in the underlining between cells and not have just one continuous line across all the cells. (Goldie is referring to the actual cells here, not the words within the cells.) She added .05 spacing between the cells because she thought this would do it, but instead it just increased the length of the underlining for each cell so that the lines meet and create on big line.
The key to successfully doing this is to remember that there is a difference between cell borders and borders applied to contents within a cell. This means that there are multiple ways you can go about doing the formatting. Assuming you already have a table, follow these steps to see one way:
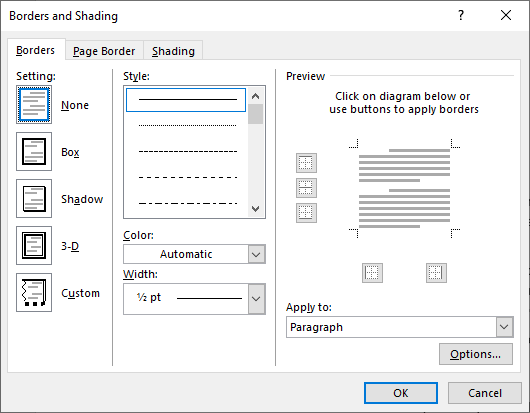
Figure 1. The Borders tab of the Borders and Shading dialog box.
Word applies a bottom border the width of the text area within each cell. If you later adjust the cell margins (as Goldie did), the width of the text within the cell changes, as does the width of the border.
For simple tables, this approach works great. The problem occurs when you have differing amounts of text in the cells in the table. Since the border always appears at the bottom of the text, this can lead to some funky results. (See Figure 2.)
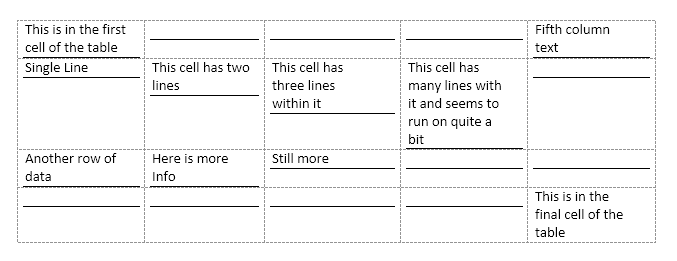
Figure 2. Applying a bottom border to the paragraphs within a cell.
Of course, you could get around this funkiness a bit by formatting the cell contents so that they all are vertically aligned to the bottom of each cell. Besides moving all the text to the bottom of the cell (vertically), this also moves all the lines down to the bottom of each cell.
If you do a bit of inspecting in the Borders and Shading dialog box, you'll see that borders can be applied to Text, Paragraph, Cell, or Table. The Paragraph option is the only one that behaves as described so far. Further, it is the only one that responds to changes in the cell margins.
If, instead, you want the actual border to apply to the cells themselves, then the only way we've discovered to get the desired effect is to add "spacer columns" between your data columns. These columns can be very thin, but the idea is that they wouldn't contain any information at all—you would just use them to provide a buffer area between columns that would otherwise be abutting. You can then add bottom borders to all the cells in the table but remove them from the cells in the spacer columns.
WordTips is your source for cost-effective Microsoft Word training. (Microsoft Word is the most popular word processing software in the world.) This tip (13179) applies to Microsoft Word 2007, 2010, 2013, 2016, 2019, and 2021.

Learning Made Easy! Quickly teach yourself how to format, publish, and share your content using Word 2021 or Microsoft 365. With Step by Step, you set the pace, building and practicing the skills you need, just when you need them! Check out Microsoft Word Step by Step today!
Need to align numbers around their decimal point within a table? It's easy to do by using the three simple steps provided ...
Discover MoreOne of the most common ways to format information in a table is to apply some sort of alignment to the contents of table ...
Discover MoreNeed to make sure that your smaller tables stay on a single page? Here's a handy trick you can use to enforce this rule.
Discover MoreFREE SERVICE: Get tips like this every week in WordTips, a free productivity newsletter. Enter your address and click "Subscribe."
2021-06-17 18:57:45
Elena
Thank you Thank you Thank you!! This was exactly what I was trying to do by myself for 5 hours!
Got a version of Word that uses the ribbon interface (Word 2007 or later)? This site is for you! If you use an earlier version of Word, visit our WordTips site focusing on the menu interface.
Visit the WordTips channel on YouTube

FREE SERVICE: Get tips like this every week in WordTips, a free productivity newsletter. Enter your address and click "Subscribe."
Copyright © 2026 Sharon Parq Associates, Inc.
Comments