Please Note: This article is written for users of the following Microsoft Word versions: 2007, 2010, 2013, 2016, 2019, and 2021. If you are using an earlier version (Word 2003 or earlier), this tip may not work for you. For a version of this tip written specifically for earlier versions of Word, click here: Creating One-time Labels.
Word is a versatile program that allows you to create all sorts of documents. One potential use of Word is to create mailing labels. Many people create mailing labels using the Mail Merge feature of Word, which pulls names and addresses from a data source and formats them for printing on labels.
But what if you need to create labels that aren't originating from a data source? What if you need only a few labels to go on a small mailing, and you never need the labels again? There is a quick way to handle this situation in Word, as well. Simply follow these steps:
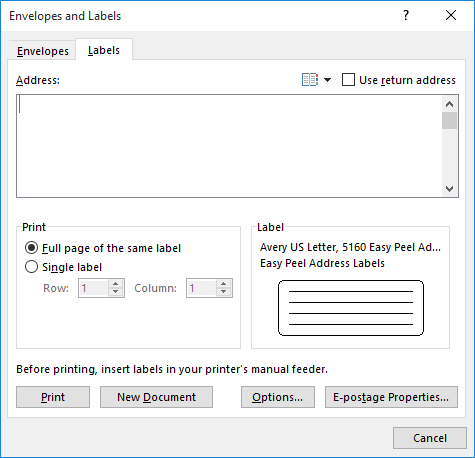
Figure 1. The Labels tab of the Envelopes and Labels dialog box.
Word creates a new document that shows your labels. Word formats labels using tables. Each cell of the table corresponds to a single label. To enter your label information, just position the insertion point in the desired cell (label) and start typing.
Word formats a table that represents an entire sheet of labels. Some types of labels are continuous in nature, such as those for the old dot-matrix printers. If that is the type of label stock you are using, Word formats a single-cell table that represents a single label. In this case you will need to add additional cells to represent each additional label you need to print. One way you can add the cells/labels is to position the insertion point in the existing cell/label and press the Tab key. Word adds a new cell/label below the old one.
Once you are done entering and formatting your label information, you can print your document on your label stock. Save the labels, if desired, or simply discard the document.
WordTips is your source for cost-effective Microsoft Word training. (Microsoft Word is the most popular word processing software in the world.) This tip (13070) applies to Microsoft Word 2007, 2010, 2013, 2016, 2019, and 2021. You can find a version of this tip for the older menu interface of Word here: Creating One-time Labels.

Do More in Less Time! An easy-to-understand guide to the more advanced features available in the Microsoft 365 version of Word. Enhance the quality of your documents and boost productivity in any field with this in-depth resource. Complete your Word-related tasks more efficiently as you unlock lesser-known tools and learn to quickly access the features you need. Check out Microsoft 365 Word For Professionals For Dummies today!
Information formatted for one type of label may someday need to be printed on a different type of label. Here are some ...
Discover MoreWant an easy way to create your own return address labels? Word provides the tool as a feature of the program.
Discover MoreOnce you create a custom label layout it is a good idea to backup the layout on a different hard drive in the event of a ...
Discover MoreFREE SERVICE: Get tips like this every week in WordTips, a free productivity newsletter. Enter your address and click "Subscribe."
2026-02-09 12:29:14
Timothy J. McGowan
@David in Mississippi:
Word can print to a printer that Windows recognizes as an installed printer. In Word, go to File, Print and see whether you can select that printer. However, "Right now we need to use the dedicated Dymo software" suggests that Word might not be able to print to it.
2026-02-09 05:59:51
David in Mississippi
What about printing labels from a Dymo thermal continuous-feed labelmaker? Right now we need to use the dedicated Dymo software, which greatly limits us in placement, fonts, adding line drawings, etc.
These Dymo labels are hugely useful in labeling everyth8ing from pill bottles to food storage containers to boxes of stowed-away Christmas ornaments or utility room gadgets, but having the flexibility of Word to create these labels would make these labels even more useful.
Since these labels are thermal, they are monochrome, so any WordTip you give us on using these labelmakers should also accommodate the need to recognize this.
Got a version of Word that uses the ribbon interface (Word 2007 or later)? This site is for you! If you use an earlier version of Word, visit our WordTips site focusing on the menu interface.
Visit the WordTips channel on YouTube

FREE SERVICE: Get tips like this every week in WordTips, a free productivity newsletter. Enter your address and click "Subscribe."
Copyright © 2026 Sharon Parq Associates, Inc.
 Please Note:
This article is written for users of the following Microsoft Word versions: 2007, 2010, 2013, 2016, 2019, and 2021. If you are using an earlier version (Word 2003 or earlier), this tip may not work for you. For a version of this tip written specifically for earlier versions of Word, click here:
Please Note:
This article is written for users of the following Microsoft Word versions: 2007, 2010, 2013, 2016, 2019, and 2021. If you are using an earlier version (Word 2003 or earlier), this tip may not work for you. For a version of this tip written specifically for earlier versions of Word, click here:
Comments