Please Note: This article is written for users of the following Microsoft Word versions: 2007, 2010, 2013, 2016, 2019, and Word in Microsoft 365. If you are using an earlier version (Word 2003 or earlier), this tip may not work for you. For a version of this tip written specifically for earlier versions of Word, click here: Hyphenating a Selection.
Written by Allen Wyatt (last updated July 4, 2020)
This tip applies to Word 2007, 2010, 2013, 2016, 2019, and Word in Microsoft 365
Hyphenation is the process of adding hyphens to words at the beginning of lines so the hyphenated part will fit at the end of the previous line. The hyphens are inserted between syllables in a word. Word offers two types of hyphenation: automatic and manual. If you choose the first, you can only hyphenate your entire document. If you choose the latter, you can hyphenate your entire document or any portion thereof. To hyphenate just a selection of your document, follow these steps:
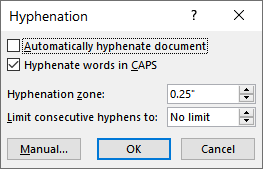
Figure 1. The Hyphenation dialog box.
Again, there is no automatic way to hyphenate just a selection. There is a way to get around this, however—provided the portion you want to hyphenate is an entire paragraph. All you need to do is select the portions of the document you don't want to hyphenate, and then follow these steps:
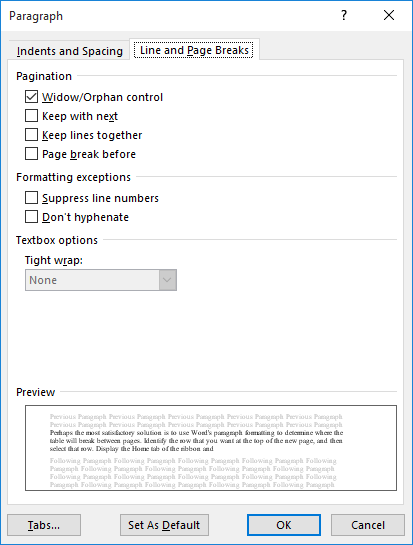
Figure 2. The Line and Page Breaks tab of the Paragraph dialog box.
Now, when you choose to do an automatic hyphenation, all the paragraphs formatted for no hyphenation are skipped, and only those paragraphs that are not formatted that way are hyphenated. If you use styles, of course, you can make this even easier by setting up some sort of paragraph style that has the hyphenation setting turned on or off according to your needs.
WordTips is your source for cost-effective Microsoft Word training. (Microsoft Word is the most popular word processing software in the world.) This tip (13009) applies to Microsoft Word 2007, 2010, 2013, 2016, 2019, and Word in Microsoft 365. You can find a version of this tip for the older menu interface of Word here: Hyphenating a Selection.
The First and Last Word on Word! Bestselling For Dummies author Dan Gookin puts his usual fun and friendly candor back to work to show you how to navigate Word 2013. Spend more time working and less time trying to figure it all out! Check out Word 2013 For Dummies today!
Antonyms are words that have opposite meanings. The grammar tools available in Word can suggest antonyms for some words. ...
Discover MoreIf you need to change information in dozens or even hundreds of documents, the task can seem insurmountable. Here's a way ...
Discover MoreIf you have a word that includes punctuation as part of the word itself, then you may be frustrated by how Word treats ...
Discover MoreFREE SERVICE: Get tips like this every week in WordTips, a free productivity newsletter. Enter your address and click "Subscribe."
There are currently no comments for this tip. (Be the first to leave your comment—just use the simple form above!)
Got a version of Word that uses the ribbon interface (Word 2007 or later)? This site is for you! If you use an earlier version of Word, visit our WordTips site focusing on the menu interface.
Visit the WordTips channel on YouTube

FREE SERVICE: Get tips like this every week in WordTips, a free productivity newsletter. Enter your address and click "Subscribe."
Copyright © 2024 Sharon Parq Associates, Inc.
 Please Note:
This article is written for users of the following Microsoft Word versions: 2007, 2010, 2013, 2016, 2019, and Word in Microsoft 365. If you are using an earlier version (Word 2003 or earlier), this tip may not work for you. For a version of this tip written specifically for earlier versions of Word, click here:
Please Note:
This article is written for users of the following Microsoft Word versions: 2007, 2010, 2013, 2016, 2019, and Word in Microsoft 365. If you are using an earlier version (Word 2003 or earlier), this tip may not work for you. For a version of this tip written specifically for earlier versions of Word, click here:
Comments