Lynda has been using Word for more years than she would care to count. A while back she updated to Microsoft 365, and noticed that when she goes to save a new document, Word defaults to save the file to OneDrive. This drives Lynda crazy, as she doesn't use OneDrive. She would like Word to default to allow her to save to her PC, rather than having to go through a click-fest to actually do so. So, she wonders how she can change this default.
Before getting into the answer for Lynda's specific question, it is interesting to note that Word provides several different ways to initiate a "Save As" operation. These are the three major methods:
If you try each of these methods, you'll quickly find that they don't lead to the same result. To paraphrase an old Sesame Street song, "one of these things is not like the other; one of these things doesn't belong." Displaying the File tab of the ribbon and clicking Save As results in a different experience than the other two. In fact, it is this approach that results in the display of the OneDrive location; the other two do not. On our testing system, pressing F12 or using the Save As tool ignored OneDrive completely and displayed the traditional Save As dialog box, offering to save on the local system.
So, how do you make the File tab method work like the other two? Here are the quick steps:
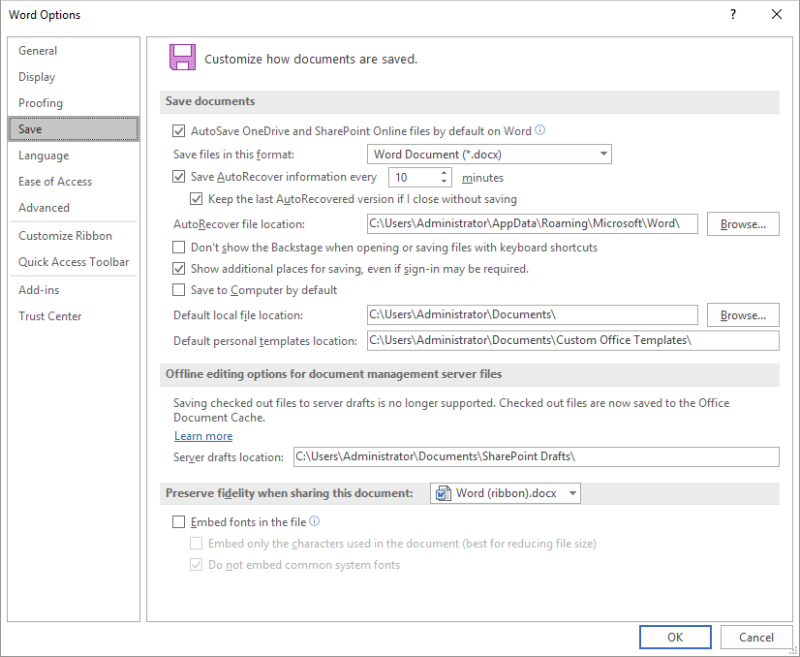
Figure 1. The Save options in the Word Options dialog box.
This doesn't really change what is displayed when you use the Save As option from the File tab of the ribbon, but it does change what is selected (by default) in that screen. You can, in the steps detailed above, also change the path specified in the Default Local File Location field. (In Word 2007 it is the Default File Location field.) This can help make saving your files in a desired location easier.
That being said, for saving on your local system (once the above change is implemented), the most direct route is to forgo the Save As option on the File tab of the ribbon and use one of the other two methods described earlier.
WordTips is your source for cost-effective Microsoft Word training. (Microsoft Word is the most popular word processing software in the world.) This tip (12674) applies to Microsoft Word 2007, 2010, 2013, 2016, 2019, and 2021.

Create Custom Apps with VBA! Discover how to extend the capabilities of Office 365 applications with VBA programming. Written in clear terms and understandable language, the book includes systematic tutorials and contains both intermediate and advanced content for experienced VB developers. Designed to be comprehensive, the book addresses not just one Office application, but the entire Office suite. Check out Mastering VBA for Microsoft Office 365 today!
If you need to move between two different folders quite regularly in the Open dialog box, you'll find the technique ...
Discover MoreWhat are you to do if you try to open a document and Word automatically closes your previous document? Word is not ...
Discover MoreWant to control the name and location of your document backup? Here are some ideas that may help.
Discover MoreFREE SERVICE: Get tips like this every week in WordTips, a free productivity newsletter. Enter your address and click "Subscribe."
2023-10-13 11:28:24
Connie G.
Thank you so much. This is one of the best and most useful tips ever. Microsoft's relentless attempts to push us to the cloud has caused a lot of lost productivity for many of us as we spend half our day navigating the file system just to save our work!
2023-10-12 18:43:45
Eric
Just the fix I needed!
That's twice you've helped me. THANKS!
2021-12-13 03:16:55
Ed
Really useful tip. It was driving me crazy too.
2021-12-11 23:09:17
MW
I am also frustrated daily by the same default options when I save a new document (or ANY other file type).
1. As suggested in the Tip above, I have also linked my most utilized folders in the "Quick Access" folder that is always accessible at the top of the "Save As" option when you try to save a file. This is very easy to do and will save you many of those frustrations.
2. However, I usually create new documents (or other file types) in response to an item within one of my existing folders, and my desire is to save that new file within that same folder -- which isn't typically shown in my Quick Access options.
An easy step by step solution to this situation:
a. Open that preferred folder destination on your desktop using File Manager (in my case described above, it is usually already open).
b. In File Manager, click AFTER the very end of the path displayed for the destination folder -- and the entire path will be highlighted
c. Right click and copy the path
d. In the "File Save As" dialog folder for your new file, click after the very end of the auto presented file path at the top, highlighting the auto presented file path
e. Right click on that highlighted path and select "Paste" and THEN PRESS ENTER -- don't skip this Enter step! This takes your save-as dialog box to that destination folder.
f. Now click on the Save button at the bottom of the dialog box for your new file.
g. Bingo - Bango! Your file is saved within the desired folder.
h. With minimal practice, the above steps take only a few seconds to perform.
I use it many times daily and it works and saves time. It will for you too!
Got a version of Word that uses the ribbon interface (Word 2007 or later)? This site is for you! If you use an earlier version of Word, visit our WordTips site focusing on the menu interface.
Visit the WordTips channel on YouTube

FREE SERVICE: Get tips like this every week in WordTips, a free productivity newsletter. Enter your address and click "Subscribe."
Copyright © 2026 Sharon Parq Associates, Inc.
Comments