Please Note: This article is written for users of the following Microsoft Word versions: 2007, 2010, 2013, 2016, 2019, 2021, 2024, and Word in Microsoft 365. If you are using an earlier version (Word 2003 or earlier), this tip may not work for you. For a version of this tip written specifically for earlier versions of Word, click here: Changing the Return Address Location.
Written by Allen Wyatt (last updated July 19, 2025)
This tip applies to Word 2007, 2010, 2013, 2016, 2019, 2021, 2024, and Word in Microsoft 365
Word includes an Envelopes feature that makes it pretty easy to create your own professional-looking envelopes. The feature makes certain assumptions about where different parts of the envelope should be printed, but what if you want to change the positioning of the return address?
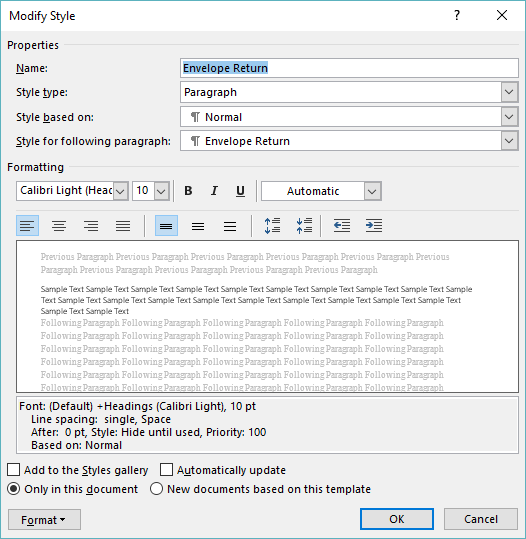
The Envelopes and Labels tool in Word depends on a predefined style when creating an envelope. The style used for the return address, appropriately enough, is named Envelope Return. When you click on either the Print or Add to Document buttons in the Envelopes and Labels dialog box, this style is grabbed and used for the return address area itself.
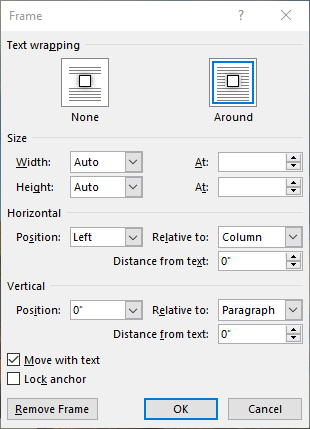
The style is defined to use a frame, and that frame is defined to appear at a very specific location on the envelope. If you want to change where the return address appears, simply change where the frame is defined to appear. To do this, use these steps:

Figure 1. The Modify Style dialog box.

Figure 2. The Frame dialog box.
Now, when you save your document or close Word, you are asked if you want to save your changes to the template. Make sure you do this. Your envelopes, when created in a document that uses this template, should now have your return address exactly where you specified.
WordTips is your source for cost-effective Microsoft Word training. (Microsoft Word is the most popular word processing software in the world.) This tip (12437) applies to Microsoft Word 2007, 2010, 2013, 2016, 2019, 2021, 2024, and Word in Microsoft 365. You can find a version of this tip for the older menu interface of Word here: Changing the Return Address Location.

Do More in Less Time! An easy-to-understand guide to the more advanced features available in the Microsoft 365 version of Word. Enhance the quality of your documents and boost productivity in any field with this in-depth resource. Complete your Word-related tasks more efficiently as you unlock lesser-known tools and learn to quickly access the features you need. Check out Microsoft 365 Word For Professionals For Dummies today!
When you create a letter, you may want to have Word print a single envelope for that letter. You can do so by following ...
Discover MoreWant to save a bunch of envelopes in a single document so that you can print them all out as a group? Here's how to ...
Discover MoreUsing the Envelopes and Labels dialog box to print envelopes is quick and easy. It can also be frustrating, however, ...
Discover MoreFREE SERVICE: Get tips like this every week in WordTips, a free productivity newsletter. Enter your address and click "Subscribe."
There are currently no comments for this tip. (Be the first to leave your comment—just use the simple form above!)
Got a version of Word that uses the ribbon interface (Word 2007 or later)? This site is for you! If you use an earlier version of Word, visit our WordTips site focusing on the menu interface.
Visit the WordTips channel on YouTube
FREE SERVICE: Get tips like this every week in WordTips, a free productivity newsletter. Enter your address and click "Subscribe."
Copyright © 2026 Sharon Parq Associates, Inc.
Comments