Please Note: This article is written for users of the following Microsoft Word versions: 2007, 2010, 2013, 2016, 2019, 2021, and Word in Microsoft 365. If you are using an earlier version (Word 2003 or earlier), this tip may not work for you. For a version of this tip written specifically for earlier versions of Word, click here: Using Optional Hyphens.
Written by Allen Wyatt (last updated January 13, 2024)
This tip applies to Word 2007, 2010, 2013, 2016, 2019, 2021, and Word in Microsoft 365
Hyphens are often used to split words that appear at the end of a line, allowing the first part of a word to appear at the end of the line and the rest of the word to appear at the beginning of the next line. Word includes tools that allow you to hyphenate your document, as describe in other WordTips.
An optional hyphen is a special character that Word allows you to insert in your document. For instance, you can put an optional hyphen in a word at a normal hyphenation point. Through the course of editing your document, if the word falls at the end of a line, it will be hyphenated as you direct. If the word does not fall at the end of a line, the hyphen is not used and the word remains unhyphenated.
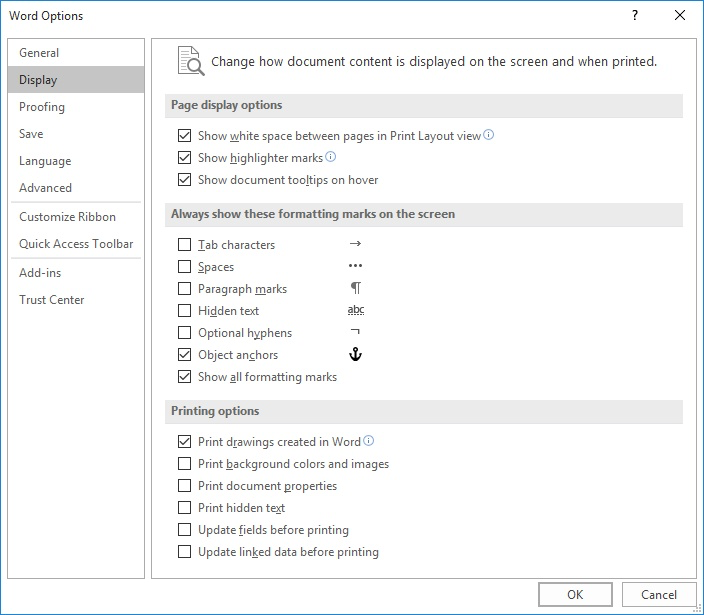
Optional hyphens are created by pressing Ctrl+- (Ctrl and the hyphen or dash key). Word typically doesn't display optional hyphens unless it appears at the end of a line, as described above. If you want to see all your optional hyphens, regardless of their position in a document, follow these steps:

Figure 1. The Display options of the Word Options dialog box.
WordTips is your source for cost-effective Microsoft Word training. (Microsoft Word is the most popular word processing software in the world.) This tip (11921) applies to Microsoft Word 2007, 2010, 2013, 2016, 2019, 2021, and Word in Microsoft 365. You can find a version of this tip for the older menu interface of Word here: Using Optional Hyphens.

Discover the Power of Microsoft Office This beginner-friendly guide reveals the expert tips and strategies you need to skyrocket your productivity and use Office 365 like a pro. Mastering software like Word, Excel, and PowerPoint is essential to be more efficient and advance your career. Simple lessons guide you through every step, providing the knowledge you need to get started. Check out Microsoft Office 365 For Beginners today!
Part of the job of an editor is to apply standards of grammar to text written by someone else. One standard that may need ...
Discover MoreWord allows you to add several types of "breaks" into your document. If you later want to remove any of them, you can use ...
Discover MoreWhen working in Draft or Normal view, you may want to view the area just to the left of the document's left margin. ...
Discover MoreFREE SERVICE: Get tips like this every week in WordTips, a free productivity newsletter. Enter your address and click "Subscribe."
There are currently no comments for this tip. (Be the first to leave your comment—just use the simple form above!)
Got a version of Word that uses the ribbon interface (Word 2007 or later)? This site is for you! If you use an earlier version of Word, visit our WordTips site focusing on the menu interface.
Visit the WordTips channel on YouTube
FREE SERVICE: Get tips like this every week in WordTips, a free productivity newsletter. Enter your address and click "Subscribe."
Copyright © 2026 Sharon Parq Associates, Inc.
Comments