Please Note: This article is written for users of the following Microsoft Word versions: 2007, 2010, 2013, 2016, 2019, Word in Microsoft 365, and 2021. If you are using an earlier version (Word 2003 or earlier), this tip may not work for you. For a version of this tip written specifically for earlier versions of Word, click here: Setting Up Your Printer.

Setting Up Your Printer

Written by Allen Wyatt (last updated September 2, 2023)
This tip applies to Word 2007, 2010, 2013, 2016, 2019, Word in Microsoft 365, and 2021


You can change the settings Word uses when printing through your printer. How you make the changes depends on the version of Word you are using. If you are using Word 2010 or a later version of the program, follow these steps:
  1. Display the File tab of the ribbon.
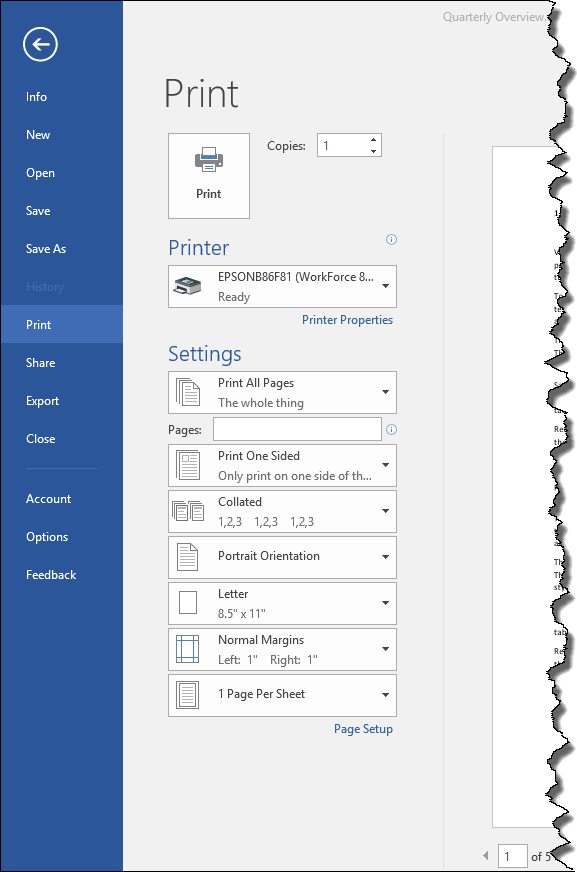
  2. Click Print at the left side of the dialog box. Word displays the printing options at the right side of the dialog box. (See Figure 1.) (You can also display these options by simply pressing Ctrl+P.)
  3. Figure 1. The printing options on the File tab of the ribbon.

  4. Using the Printer drop-down list, select the printer you want to use. (It is common to have more than one printer available if you are working in a networked environment.)
  5. Click on the Printer Properties button. Word displays the Properties dialog box for the printer you selected in step 3. The exact appearance of the dialog box, and the controls it contains, depends on the printer driver you have installed for your printer.
  6. Using the tabs and other controls in the dialog box, specify the printer settings you want to use.
  7. Click on OK to close the Properties dialog box.
  8. Click the Print button to print your document.

If you are using Word 2007 the steps are different:

  1. Click the Office button and then click Print. Word displays the Print dialog box. (You can also display the dialog box by simply pressing Ctrl+P.)
  2. Using the Name drop-down list, select the printer you want to use. (It is common to have more than one printer available if you are working in a networked environment.)
  3. Click on the Properties button. Word displays the Properties dialog box for the printer you selected in step 2. The exact appearance of the dialog box, and the controls it contains, depends on the printer driver you have installed for your printer.
  4. Using the tabs and other controls in the dialog box, specify the printer settings you want to use.
  5. Click on OK to close the Properties dialog box.
  6. Click on OK from the Print dialog box. Your document will be printed.

WordTips is your source for cost-effective Microsoft Word training. (Microsoft Word is the most popular word processing software in the world.) This tip (11695) applies to Microsoft Word 2007, 2010, 2013, 2016, 2019, Word in Microsoft 365, and 2021. You can find a version of this tip for the older menu interface of Word here: Setting Up Your Printer.

Author Bio

Allen Wyatt

With more than 50 non-fiction books and numerous magazine articles to his credit, Allen Wyatt is an internationally recognized author. He is president of Sharon Parq Associates, a computer and publishing services company. ...

MORE FROM ALLEN

Automatically Updating Styles

When you add formatting to some text in your document, Word may apply your formatting to every other part of your ...

Discover More

Quick AutoFill Variations

The AutoFill feature can be used for more than just incrementing information into cells. This tip explains how to access ...

Discover More

Pulling Apart Cells

Separating text values in one cell into a group of other cells is a common need when dealing with text. Excel provides a ...

Discover More

Comprehensive VBA Guide Visual Basic for Applications (VBA) is the language used for writing macros in all Office programs. This complete guide shows both professionals and novices how to master VBA in order to customize the entire Office suite for their needs. Check out Mastering VBA for Office 2010 today!

More WordTips (ribbon)

Using Only Odd Page Numbers

Do you need to number the pages of your document using only odd page numbers? Word doesn't provide a way to do this, but ...

Discover More

Printing Outside the Boundaries All the Time

If Word thinks you are going to print in an area of the page that isn't printable, it will let you know. If you don't ...

Discover More

Remembering Copies to Print

If you routinely need to print more than one copy of a document, you'll love the ideas presented in this tip. There's ...

Discover More
Subscribe

FREE SERVICE: Get tips like this every week in WordTips, a free productivity newsletter. Enter your address and click "Subscribe."

View most recent newsletter.

Comments

If you would like to add an image to your comment (not an avatar, but an image to help in making the point of your comment), include the characters [{fig}] (all 7 characters, in the sequence shown) in your comment text. You’ll be prompted to upload your image when you submit the comment. Maximum image size is 6Mpixels. Images larger than 600px wide or 1000px tall will be reduced. Up to three images may be included in a comment. All images are subject to review. Commenting privileges may be curtailed if inappropriate images are posted.

What is two more than 7?

There are currently no comments for this tip. (Be the first to leave your comment—just use the simple form above!)


This Site

Got a version of Word that uses the ribbon interface (Word 2007 or later)? This site is for you! If you use an earlier version of Word, visit our WordTips site focusing on the menu interface.

Videos
Subscribe

FREE SERVICE: Get tips like this every week in WordTips, a free productivity newsletter. Enter your address and click "Subscribe."

(Your e-mail address is not shared with anyone, ever.)

View the most recent newsletter.