Jesse uses Word in Draft view. In most documents when he inserts a page break by hitting Ctrl-Enter it appears as a visible line across the page with the words "page break" in the line. This is normal. In some documents, however, hitting Ctrl+Enter simply skips a line and there's no indication a page break has been inserted. If Jesse then hits Backspace, the page break line appears in the skipped line. Jesse wonders what is causing the Backspace to be required to see the page break.
Jesse has noticed one of the odd behaviors of the newest versions of Word. When you insert a page beak in your document, what you see depends on whether you have non-printing characters displayed on the screen or not. Try this out:
At this point, you should see no indication that a page break has been inserted in the document, other than a "skipped" line, which Jessie referred to. With your insertion point still at the beginning of that second paragraph, press the Backspace key. You will then see the traditional margin-to-margin page break indication appear.
Now, immediately press Ctrl+Z to undo the effects of pressing Backspace. Now go ahead and turn on the display of all non-printing characters in the document. (Again, press Shift+Ctrl+8.) When you do, you should see the page break indicator appear. (See Figure 1.)
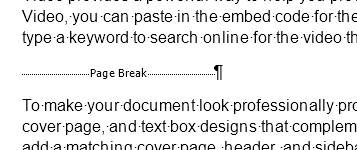
Figure 1. Page break indicators in a Word document
Note that the indicator does not extend across the whole page and it also includes a paragraph mark at the right side. If you again press Backspace (assuming your insertion point is at the left side of the screen), then the old-style indicator (margin-to-margin) again appears.
What you've done when you hit Backspace is to delete the paragraph mark. In the latest versions of Word, every time you insert a page break, it places that page break in its own paragraph. The inserted paragraph uses the Normal style. The deletion gets rid of the paragraph mark, but leaves the page break, which is displayed in the traditional way that page breaks are displayed.
If you prefer that Word behave in the old-style way (where it doesn't add page breaks on their own paragraph, but instead puts them in the paragraph in which the insertion point is located), then follow these steps:
These steps do not work in Word 2013. Microsoft did a major overhaul, in this version, on the way it displays documents and removed many of what were previously considered compatibility options. In Word 2013 there is no option to turn off "split apart page break and paragraph mark." It is always on and thus Microsoft removed the check box. The technique described earlier (pressing the Backspace key to delete the paragraph mark) still works in Word 2013, however.
WordTips is your source for cost-effective Microsoft Word training. (Microsoft Word is the most popular word processing software in the world.) This tip (10621) applies to Microsoft Word 2007, 2010, 2013, 2016, 2019, and 2021.

The First and Last Word on Word! Bestselling For Dummies author Dan Gookin puts his usual fun and friendly candor back to work to show you how to navigate Word 2019. Spend more time working and less time trying to figure it all out! Check out Word 2019 For Dummies today!
Word allows you to specify the starting page number for a document, which comes in handy if you have multiple documents ...
Discover MoreGetting your document onto paper is the whole purpose of word processing. Here are some concepts that are important when ...
Discover MoreWant to print your document only on odd-numbered pages in a printout? There are a couple of things you can try, as ...
Discover MoreFREE SERVICE: Get tips like this every week in WordTips, a free productivity newsletter. Enter your address and click "Subscribe."
2024-03-22 09:19:50
Paul Stregevsky
Peter Johnson wrote: "Many style sheets require a new page before Heading 1. In which case this can be added to the Heading 1 style so that all Heading 1s start a new page without even having to think about it."
If I want Chapter 2 to start on page 2-1, and Appendix D to start on D-1, I need to create a section break anyway and embed the "new page" setting in the section properties. If I also select "Page break before" in the Heading 1 style, I'm asking for trouble. (see Figure 1 below)
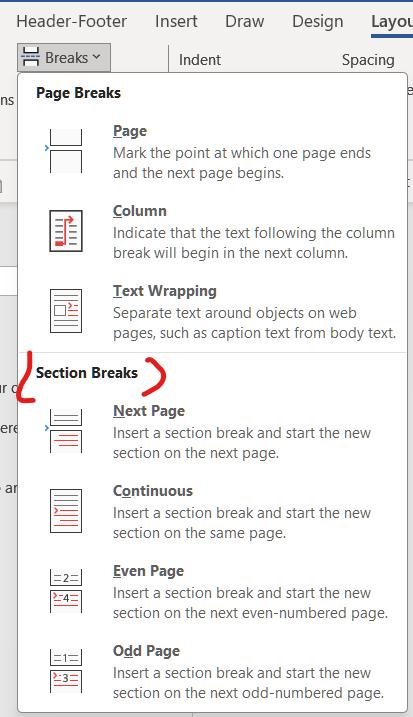
Figure 1. Use a section break to start Heading 1 on a new page or new odd page
2024-03-21 11:58:54
George
Thank you for sharing your knowledge!
2020-12-15 05:48:33
Peter Johnson
There is a better way to control page breaks.
Put the insertion point anywhere in the paragraph that needs to start on a new page. Display the paragraph properties dialogue (Command-Option-M on a Mac) – I don’t know of a shortcut on Windows you need to open it from the Paragraph group on the Home tab. On the ‘Line and Page Breaks’ tab ensure that ‘Page break before’ is ticked.
(see Figure 1 below)
Many style-sheets require a new page before Heading 1. In which cased this can be added to the Heading 1 style so that all Heading 1s start a new page without even having to think about it.
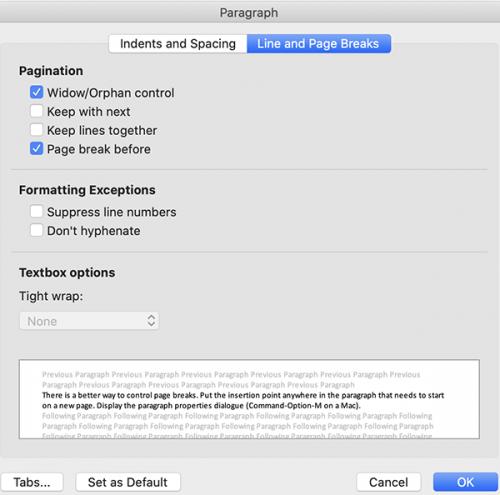
Figure 1. Paragraph Dialog Box
Got a version of Word that uses the ribbon interface (Word 2007 or later)? This site is for you! If you use an earlier version of Word, visit our WordTips site focusing on the menu interface.
Visit the WordTips channel on YouTube

FREE SERVICE: Get tips like this every week in WordTips, a free productivity newsletter. Enter your address and click "Subscribe."
Copyright © 2026 Sharon Parq Associates, Inc.
Comments