Please Note: This article is written for users of the following Microsoft Word versions: 2007, 2010, 2013, 2016, 2019, and 2021. If you are using an earlier version (Word 2003 or earlier), this tip may not work for you. For a version of this tip written specifically for earlier versions of Word, click here: Stopping Text from Jumping Around.

Stop Graphics and Text from Jumping Around

Written by Allen Wyatt (last updated February 13, 2021)
This tip applies to Word 2007, 2010, 2013, 2016, 2019, and 2021


1

Deborah had some problems with a drawing object (a block arrow) placed behind the text of a table with rows of fixed width. When Deborah would try to nudge the arrow into position, the text would jump around, even after setting the Wrapping Style for the object to Behind Text.

The first thing to check, of course, is that the wrapping style didn't somehow get inadvertently changed. Select the block arrow, display the Shape Format tab of the ribbon, click the down-arrow at the right of the Send Backward tool (in the Arrange group), then choose Send Behind Text. If this is the setting that was already made, then the next thing to check is where the object is anchored. Follow these steps if you are using Word 2010 or a later version:

  1. Display the File tab of the ribbon, then click Options. Word displays the Word Options dialog box.
  2. Click Display at the left side of the dialog box. (See Figure 1.)
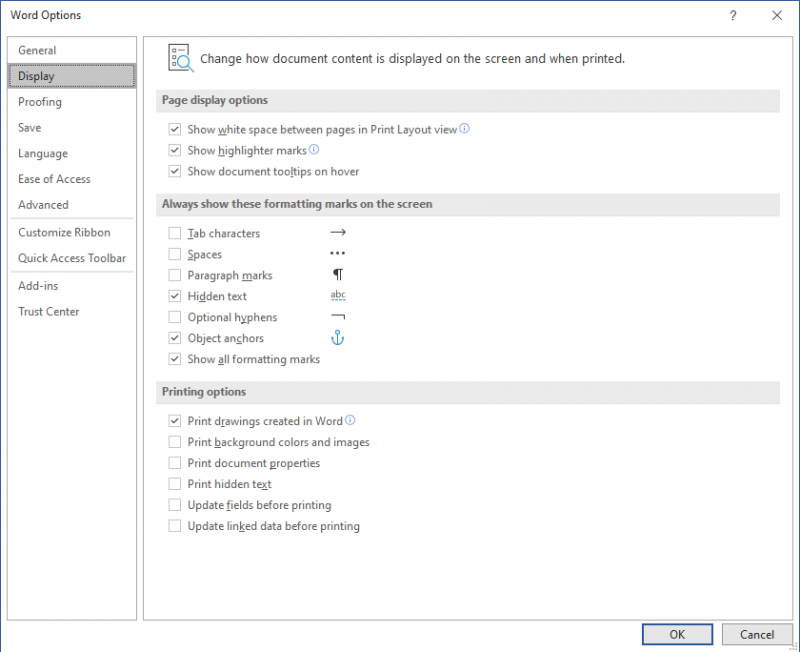
  3. Figure 1. The Display options of the Word Options dialog box.

  4. Select the Object Anchors check box.
  5. Click on OK.
  6. In Print Layout view, select the shape (the block arrow). The object anchor for the shape should appear—it looks like an anchor.
  7. Click on the object anchor—not the actual block arrow—and move the anchor until it is located to the left of a paragraph that will remain constant in the document. A good choice would be to place it to the left of the paragraph just before the table or just after the table, depending on which one will be on the same page as the table.
  8. Right-click the object (the block arrow) and choose More Layout Options from the resulting Context menu. Word displays the Layout dialog box.
  9. Make sure the Position tab is selected. (See Figure 2.)
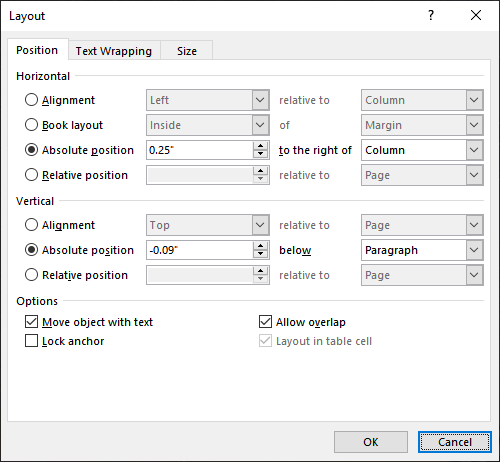
  10. Figure 2. The Position tab of the Layout dialog box.

  11. Make sure the Move Object With Text check box is selected.
  12. Make sure the Lock Anchor check box is selected.
  13. Make sure the Allow Overlap check box is selected.
  14. Click on OK to close the Layout dialog box.

If you are using Word 2007, the steps are slightly different:

  1. Click the Office button and then click Word Options. Word displays the Word Options dialog box.
  2. Click Display at the left side of the dialog box. (See Figure 3.)
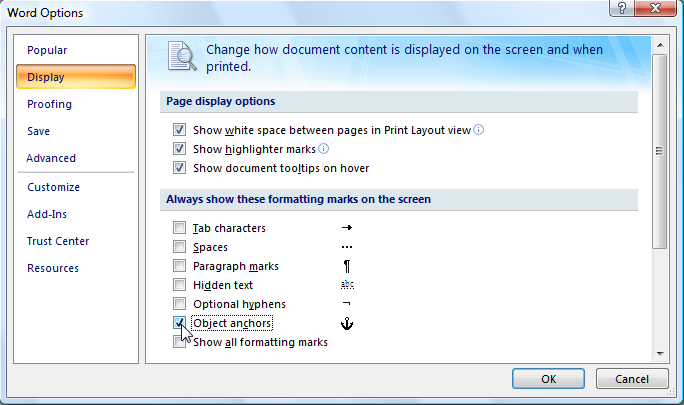
  3. Figure 3. The Display options of the Word Options dialog box.

  4. Select the Object Anchors check box.
  5. Click on OK.
  6. In Print Layout view, select the shape (the block arrow). The object anchor for the shape should appear—it looks like an anchor.
  7. Click on the object anchor—not the actual block arrow—and move the anchor until it is located to the left of a paragraph that will remain constant in the document. A good choice would be to place it to the left of the paragraph just before the table or just after the table, depending on which one will be on the same page as the table.
  8. Right-click the object (the block arrow) and choose Format AutoShape from the resulting Context menu. Word displays the Format AutoShape dialog box.
  9. Make sure the Layout tab is selected. (See Figure 4.)
  10. Figure 4. The Layout tab of the Format AutoShape dialog box.

  11. Click Advanced. Word displays the Advanced Layout dialog box. (See Figure 5.)
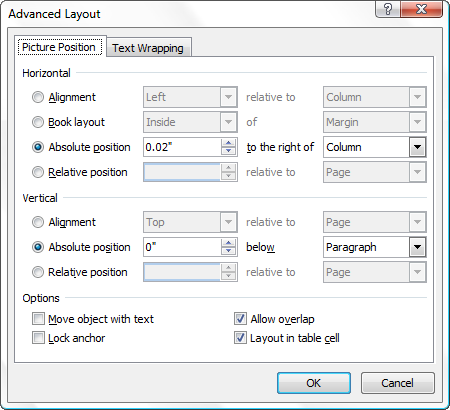
  12. Figure 5. The Advanced Layout dialog box.

  13. Make sure the Move Object With Text check box is selected.
  14. Make sure the Lock Anchor check box is selected.
  15. Make sure the Allow Overlap check box is selected.
  16. Click OK to dismiss the Advanced Layout dialog box.
  17. Click on OK to close the Format AutoShape dialog box.

At this point you should still see the object anchor, but a little padlock appears next to it to indicate that it is locked. Now you should be able to adjust the positioning of the block arrow itself without your text jumping around.

WordTips is your source for cost-effective Microsoft Word training. (Microsoft Word is the most popular word processing software in the world.) This tip (10075) applies to Microsoft Word 2007, 2010, 2013, 2016, 2019, and 2021. You can find a version of this tip for the older menu interface of Word here: Stopping Text from Jumping Around.

Author Bio

Allen Wyatt

With more than 50 non-fiction books and numerous magazine articles to his credit, Allen Wyatt is an internationally recognized author. He is president of Sharon Parq Associates, a computer and publishing services company. ...

MORE FROM ALLEN

Automatically Determining a Due Date

When you are doing a mail merge in Word, you may need to calculate a date sometime in the future. Word doesn't include an ...

Discover More

Searching for Leading Apostrophes

Take a look at the Formula bar when you select a cell that contains text, and you may see an apostrophe at the beginning ...

Discover More

Changing Default Row Height

Changing the default row height used for a worksheet is relatively easy, as long as you don't mind the row height never ...

Discover More

Learning Made Easy! Quickly teach yourself how to format, publish, and share your content using Word 2013. With Step by Step, you set the pace, building and practicing the skills you need, just when you need them! Check out Microsoft Word 2013 Step by Step today!

More WordTips (ribbon)

A Picture Is Worth a Thousand Words

Nothing beats a screen shot when you are trying to convey information about using the computer. With just a couple of ...

Discover More

Gradient Prints as Stripes

When you print a graphic that includes a gradient, you may not get exactly the output you expect. This tip examines two ...

Discover More

Saving Embedded Images to Individual Files

Word has long allowed you to embed pictures or images in the documents you create. What if you want to get those pictures ...

Discover More
Subscribe

FREE SERVICE: Get tips like this every week in WordTips, a free productivity newsletter. Enter your address and click "Subscribe."

View most recent newsletter.

Comments

If you would like to add an image to your comment (not an avatar, but an image to help in making the point of your comment), include the characters [{fig}] (all 7 characters, in the sequence shown) in your comment text. You’ll be prompted to upload your image when you submit the comment. Maximum image size is 6Mpixels. Images larger than 600px wide or 1000px tall will be reduced. Up to three images may be included in a comment. All images are subject to review. Commenting privileges may be curtailed if inappropriate images are posted.

What is 8 + 5?

2022-05-04 17:30:16

PG

in the beginning of the article it talks about going to the Print Layout view OK WHERE IS THIS? Your article assumes that people know where this is? I Have no idea where this is and have wasted time with this advice

I learned a long time ago, write these posts as if you are writing to someone in grave 6, though these days with kids getting computers early - maybe write to someone in grade 1 so anyone over 40 or so can understand this.

K.I.S.S.


This Site

Got a version of Word that uses the ribbon interface (Word 2007 or later)? This site is for you! If you use an earlier version of Word, visit our WordTips site focusing on the menu interface.

Videos
Subscribe

FREE SERVICE: Get tips like this every week in WordTips, a free productivity newsletter. Enter your address and click "Subscribe."

(Your e-mail address is not shared with anyone, ever.)

View the most recent newsletter.