Please Note: This article is written for users of the following Microsoft Word versions: 2007, 2010, 2013, 2016, 2019, 2021, and Word in Microsoft 365. If you are using an earlier version (Word 2003 or earlier), this tip may not work for you. For a version of this tip written specifically for earlier versions of Word, click here: Finding an Invisible Text Box.
When Vanessa prints her document, the printout includes a text box with text in it. When she looks at the document on-screen, she can't see the text box or the text it contains. Vanessa wants to delete the text box and wonders, since she can't see the text box, how she can find it to get rid of it.
There are a few things you should try. First, make sure you know the page on which the text box is located. This is a simple determination—just look at the printout to see on which page it occurs. You should make note of any surrounding text or elements that can help you to narrow down where to look in the document itself.
Now, make sure you are viewing your document in Print Layout view. If you are viewing your document in some other view, then you won't be able to see some of your graphics, including text boxes.
If the text box is still not visible, then you should check to make sure that the display of drawings hasn't been turned off. Follow these steps:
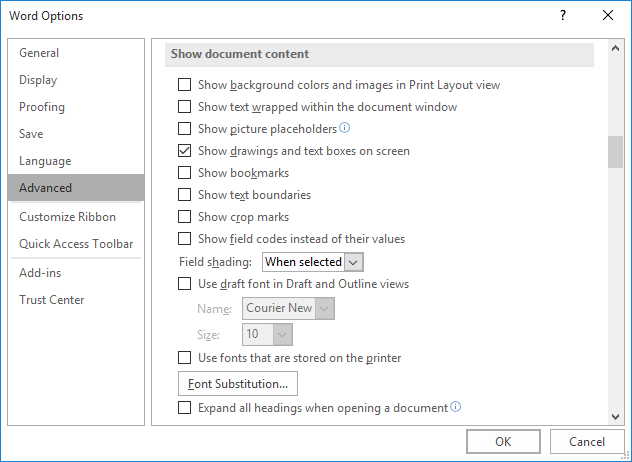
Figure 1. The advanced options of the Excel Options dialog box.
Provided you are still viewing the document in Print Layout view, you should be able to see any text boxes. If you still can't see it, it could be possible that the text box is formatted for no line and no fill and that the text it contains is formatted as hidden (and you have the display of hidden text turned off). If you suspect this is the case, try these general steps:
When you release the mouse button, any objects on the page should be selected. You can then delete them by simply pressing the Delete key.
Word also includes a great way to see the objects in your document. Follow these steps:
If you are still having problems locating and getting rid of the text box, you can try a macro approach. The following macro will step through all the shapes defined in the document and delete them. This is a great approach if the offending text box is the only shape in your entire document.
Sub Remove_Boxes()
    Dim aShape As Shape
    For Each aShape In ActiveDocument.Shapes
        If aShape.Type = msoTextBox Then
            aShape.Delete
        End If
    Next
End Sub
Finally, if the text box still appears on the printout, it could be that you aren't dealing with a text box at all. It could be that what you are seeing is actually a comment box (or, if you prefer, a "note," as Microsoft calls them in Microsoft 365) that is configured to print but not display on the screen.
Note:
WordTips is your source for cost-effective Microsoft Word training. (Microsoft Word is the most popular word processing software in the world.) This tip (10074) applies to Microsoft Word 2007, 2010, 2013, 2016, 2019, 2021, and Word in Microsoft 365. You can find a version of this tip for the older menu interface of Word here: Finding an Invisible Text Box.

Discover the Power of Microsoft Office This beginner-friendly guide reveals the expert tips and strategies you need to skyrocket your productivity and use Office 365 like a pro. Mastering software like Word, Excel, and PowerPoint is essential to be more efficient and advance your career. Simple lessons guide you through every step, providing the knowledge you need to get started. Check out Microsoft Office 365 For Beginners today!
Many people use text boxes to help organize and layout information on the page. Here's how you can add text boxes to your ...
Discover MoreWant to change how a text box is oriented on the page? You can't do it, but you can adjust the dimensions of the box ...
Discover MoreWhen laying out your document, you may want to use a text box that appears to be positioned over your text, but to be ...
Discover MoreFREE SERVICE: Get tips like this every week in WordTips, a free productivity newsletter. Enter your address and click "Subscribe."
2025-03-29 15:28:46
Gloria
Thank you - the Selection Pane let me find the hidden text box that was overprinting my content!
2023-12-15 06:53:41
CSB
Thank you for this, I've just had to chase down an invisible text box that was driving me nuts. Used the Select Objects tool. Still no idea where it was why it couldn't be seen.
Got a version of Word that uses the ribbon interface (Word 2007 or later)? This site is for you! If you use an earlier version of Word, visit our WordTips site focusing on the menu interface.
Visit the WordTips channel on YouTube

FREE SERVICE: Get tips like this every week in WordTips, a free productivity newsletter. Enter your address and click "Subscribe."
Copyright © 2026 Sharon Parq Associates, Inc.
 Please Note:
This article is written for users of the following Microsoft Word versions: 2007, 2010, 2013, 2016, 2019, 2021, and Word in Microsoft 365. If you are using an earlier version (Word 2003 or earlier), this tip may not work for you. For a version of this tip written specifically for earlier versions of Word, click here:
Please Note:
This article is written for users of the following Microsoft Word versions: 2007, 2010, 2013, 2016, 2019, 2021, and Word in Microsoft 365. If you are using an earlier version (Word 2003 or earlier), this tip may not work for you. For a version of this tip written specifically for earlier versions of Word, click here:
Comments