Written by Allen Wyatt (last updated December 10, 2024)
This tip applies to Word 2007, 2010, 2013, 2016, 2019, and 2021
Martha is a court reporter, and she is typing a deposition. She must get exactly 25 lines on a letter-sized page, double spaced (Courier New), 12 pitch. She is supposed to have a one-inch margin all the way around but must decrease the bottom margin to get 25 lines. There are two pages that will not allow her to get 25, just 24. The other pages she's been able to play around with, but these two won't budge. Martha has the show/hide button on and doesn't see anything out of the ordinary. She wonders how she can ensure that each page has the requisite number of lines.
There are many settings within a Word document that factor into how Word flows your text on a page and throughout a document. In order to understand how Word determines the number of lines on a page, you need to understand the workings of each of these settings.
The first thing to check—which Martha has apparently done—is the margin settings. If you set the margins for one inch on all sides and you are using a standard letter-size sheet of paper, that will leave you nine inches of vertical space on a page. (Eleven inches minus one inch at the top and one inch at the bottom leaves nine inches.)
At this point it is a bit handy to start working in points (no pun intended). In Word there are 72 points per inch, which means your nine inches of vertical space is equivalent to 648 points. Divide this by the number of lines you want on the page (25), and you end up with 25.92 points per line. This is your line spacing and is a very important number to know; you'll use it in a moment.
You now need to change some of your paragraph settings. You can do this explicitly, if you want, by selecting paragraphs and making the settings. It is much more versatile, however, to make the changes in the styles you'll use in your document. That way they can be easily applied to new text that you add. Regardless of which you choose—explicit or styled—making the actual changes has been discussed in other issues of WordTips. The important thing for this tip is to understand which settings you actually need to change.
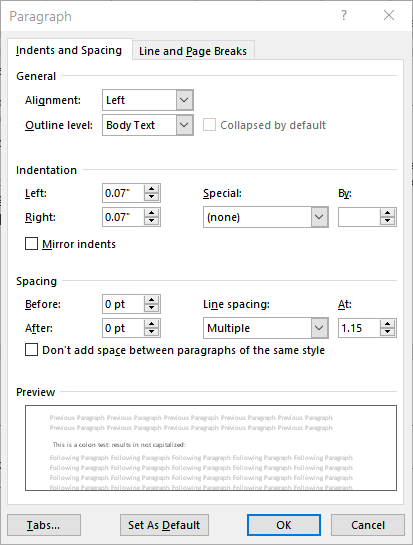
Start by displaying the Paragraph dialog box. (Again, this could either be for explicit formatting or by modifying a style.) Start with the Indents and Spacing tab. (See Figure 1.)

Figure 1. The Indents and Spacing tab of the Paragraph dialog box.
On this tab, you want to pay attention to the settings in the Spacing area. Set both Before and After to 0 points, as you don't want Word adding any additional spacing to what you type. (If your document requirements are that you add a blank line between paragraphs, you may want to set After to your calculated size of a blank line: 25.9 points. Word only allows you to have a single digit after the decimal point for this setting, and you must type it into the box directly.)
Now pay attention to the Line Spacing setting. Use the drop-down list to choose Exactly, and then in the box to the right of the drop-down list enter your calculated line spacing of 25.9 points. You should also make sure that the Don't Add Space check box is clear if you put anything in the After box; if you set the After box to 0 then the Don't Add Space check box doesn't really matter.
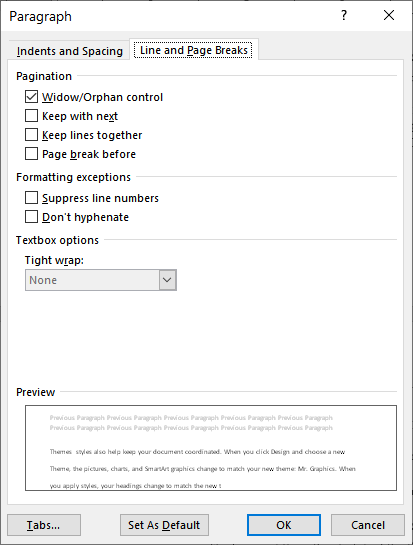
Next, click over to the Line and Page Breaks tab of the dialog box. (See Figure 2.)

Figure 2. The Line and Page Breaks tab of the Paragraph dialog box.
The settings of interest on this tab are in the Pagination area. Essentially, you want all four check boxes in this area to be clear. Normally these settings adjust how a paragraph "breaks" across pages. You don't want any modification in page breaking, however, because that can affect how many lines of text appear on any given page.
At this point you should be able to print and have exactly 25 lines per page. This presumes that all your text is set to the 12-point Courier New, as specified by Martha. The fact that your paragraphs have a line spacing of 25.9 points means that it will be double-spaced, as desired.
There is one potential drawback to this approach, and it has to do with how Word places text on each line in a paragraph. With line spacing of 25.92 points, the text is placed at the bottom of that vertical space. That means that there is approximately 14 points of blank space above your first line of text. This may make your top margin seem a bit large. If this is the case, simply decrease the top margin of your page by those 14 points, and you may get a page layout that looks a bit more pleasing. The only way you'll know if this is the case, of course, is to try it out to see how it looks.
WordTips is your source for cost-effective Microsoft Word training. (Microsoft Word is the most popular word processing software in the world.) This tip (9948) applies to Microsoft Word 2007, 2010, 2013, 2016, 2019, and 2021.

Do More in Less Time! An easy-to-understand guide to the more advanced features available in the Microsoft 365 version of Word. Enhance the quality of your documents and boost productivity in any field with this in-depth resource. Complete your Word-related tasks more efficiently as you unlock lesser-known tools and learn to quickly access the features you need. Check out Microsoft 365 Word For Professionals For Dummies today!
If you are creating small flyers (two per page), you may want to include a watermark graphic in the background of each of ...
Discover MoreWant to add a page, with a different page number, in Word without affecting the entire document? The solution is a bit ...
Discover MoreEnter a page break in Word, and that page break may not appear on the screen as you expect it to appear. This has to do ...
Discover MoreFREE SERVICE: Get tips like this every week in WordTips, a free productivity newsletter. Enter your address and click "Subscribe."
2023-12-29 14:16:32
Barbie
On my computer, if the last line on a page ends in a word that is hyphenated (broken between two lines), it will put both lines on the next page. The way I've found to get around this is to type a dash where the hyphen break is; this usually makes the word be marked as an incorrect spelling, but that can be ignored.
Got a version of Word that uses the ribbon interface (Word 2007 or later)? This site is for you! If you use an earlier version of Word, visit our WordTips site focusing on the menu interface.
Visit the WordTips channel on YouTube
FREE SERVICE: Get tips like this every week in WordTips, a free productivity newsletter. Enter your address and click "Subscribe."
Copyright © 2026 Sharon Parq Associates, Inc.
Comments