Written by Allen Wyatt (last updated October 21, 2023)
This tip applies to Word 2007, 2010, 2013, 2016, 2019, 2021, and Word in Microsoft 365
Recently, several of Robert's Word shortcut keys have stopped functioning in their expected manner. For instance, Shift+F9 no longer toggles field codes and Alt+F3 calls up a digital signature, rather than creating a Building Block entry from a selection. Robert wonders why these changes would have happened and how to get things back to normal.
Situations like this, where unwanted changes happen for no apparent reason, always take a bit of detective work to track down. The first step is to figure out if this behavior is the "new norm." In other words, shut down your computer system entirely, wait a bit, restart the computer, and then restart Word. Is the behavior still there? If so, then you have a good idea that it wasn't some fluke within Windows that caused the issue, but there is something else at play.
The second thing to check out is whether your keyboard has some sort of alternate behavior that is evident. This is often, for instance, the case with keyboards on laptop computers. They often have a Fn key that modifies how the regular function keys behave. If this Fn key is sticking, or it is locked in an "on position," then that may be the root of your problem. Get the key unstuck (or unlock it), and your function keys may return to normal behavior.
The third thing to do is to check to see if you have any add-ins installed that may be causing issues. It is possible, even, that if you have multiple add-ins, they are conflicting with each other in some way that causes the problem. To start with no add-ins, the easiest way is to get out of Word entirely and then, within Windows, open a command prompt window. Enter the following on the command line:
winword.exe /a
That should start Word without any add-ins or without loading your Normal template. If you try your function keys and they work properly, then you know that the problem lies with one (or more) add-ins or with your Normal template, and you can try to track down which one it is.
The next possible problem area is macros that run automatically when you start Word. Using the same command-window technique, you can check out if macros are causing the problem by starting Word using this command:
winword.exe /m
If the function key issue goes away after starting in this manner, then you know that the issue is macro-based and you can track down the culprit.
Next, take a look at the Startup folder for Word. This is a special folder whose contents are automatically loaded by Word whenever it starts. There may be something in the folder that is causing issues with the program. You can can locate the Startup folder by following these steps:
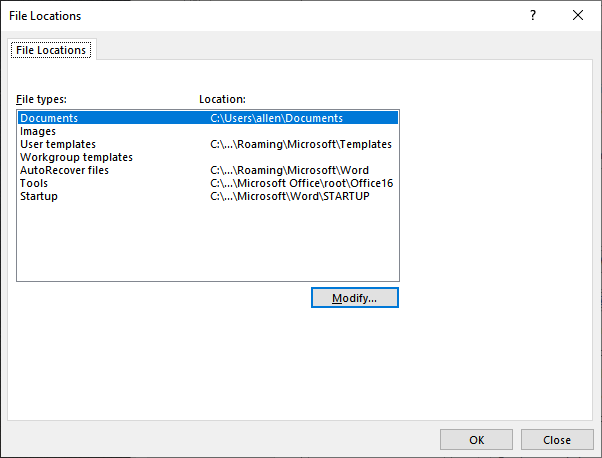
Figure 1. The File Locations dialog box.
The resulting dialog box indicates the location of the Startup folder being used by Word. Once you have the location of the Startup folder, close Word and use Windows to examine the contents of that folder. Move any programs or templates out of the folder and then restart Word. If the problem goes away, then you've found your culprit.
It is also possible that there is some other software on your system that is causing the problem. This type of problem is notoriously hard to track down, but I'll provide just one example. Lots of people use a popular screen capture (and video) program called Snagit. A few versions ago, they changed the default video capture hot key to Shift+F9. This was done at a Windows level, which means that it overrode the behavior of the key within Word. You can see information about this type of problem here:
https://www.tm1forum.com/viewtopic.php?t=8527
The solution in this case, of course, was to change the hot key being used by Snagit. However, Snagit is only an example, and if you have hot key conflicts with other programs, the only solution is to figure out which program it is. This means disabling any programs that may be automatically starting up in Windows and testing to see if the problem goes away. This can be quite laborious as you dig around in Windows to figure out what is happening.
If you haven't figured out where the problem is yet, then you should try deleting all the temporary files that Word may have left strewn across your system. I say this like it happens all the time. It doesn't, as Word normally creates them and deletes them as it works. However, if Word ends abnormally, it could be that you'll have a bunch of temporary files left on your drive.
To locate temporary files, just close down any programs running in Windows and then do a search, using Windows, for any files that use the TMP filename extension (*.tmp) and any files that match the pattern "~*.doc?" (without the quote marks). Any files you find can be safely deleted. Then, restart Word and see if the problem goes away.
Next, check to see if your key bindings have somehow gotten messed up. This is relatively easy to do; just start Word and jump over to the Visual Basic Editor (press Alt+F11). In the Immediate window, enter the following two lines, pressing Enter at the end of each:
CustomizationContext = NormalTemplate
KeyBindings.ClearAll
Close the Visual Basic Editor and then check to see if your function keys are working as they should.
Finally, you may find it necessary to repair your installation of Word. You can do this by following the instructions on this Microsoft support page:
https://support.microsoft.com/en-us/office/repair-an-office-application-7821d4b6-7c1d-4205-aa0e-a6b40c5bb88b
WordTips is your source for cost-effective Microsoft Word training. (Microsoft Word is the most popular word processing software in the world.) This tip (9889) applies to Microsoft Word 2007, 2010, 2013, 2016, 2019, 2021, and Word in Microsoft 365.

The First and Last Word on Word! Bestselling For Dummies author Dan Gookin puts his usual fun and friendly candor back to work to show you how to navigate Word 2019. Spend more time working and less time trying to figure it all out! Check out Word 2019 For Dummies today!
Need to get rid of a keyboard shortcut key you previously defined? It's easy to do if you follow these steps.
Discover MoreAt some point you might want to wipe out all the custom shortcut keys you've created in Word. This is easy to do by ...
Discover MoreWant to assign some fancy characters to keyboard keys for characters you seldom use? There are a couple of ways you can ...
Discover MoreFREE SERVICE: Get tips like this every week in WordTips, a free productivity newsletter. Enter your address and click "Subscribe."
2023-10-23 16:43:00
Jason Bernstein
Another potential solution is to do a Repair of Microsoft Office via the Programs control panel. This usually fixes the occasional shortcut failures I have.
Jason Bernstein
Got a version of Word that uses the ribbon interface (Word 2007 or later)? This site is for you! If you use an earlier version of Word, visit our WordTips site focusing on the menu interface.
Visit the WordTips channel on YouTube

FREE SERVICE: Get tips like this every week in WordTips, a free productivity newsletter. Enter your address and click "Subscribe."
Copyright © 2026 Sharon Parq Associates, Inc.
Comments