Please Note: This article is written for users of the following Microsoft Word versions: 2007, 2010, 2013, 2016, 2019, and 2021. If you are using an earlier version (Word 2003 or earlier), this tip may not work for you. For a version of this tip written specifically for earlier versions of Word, click here: Smart Quotes are Incorrectly Replaced.
Written by Allen Wyatt (last updated August 7, 2023)
This tip applies to Word 2007, 2010, 2013, 2016, 2019, and 2021
Matt has a long document in which he needs to convert straight quotes to smart quotes. The original document used straight quotes, and Matt used the Find and Replace method (described in other issues of WordTips) to do the conversion. The problem is that in about 20% of the cases, Word replaced the smart quotes incorrectly. Sometimes he got opening quotes where closing quotes should have been, and vice versa.
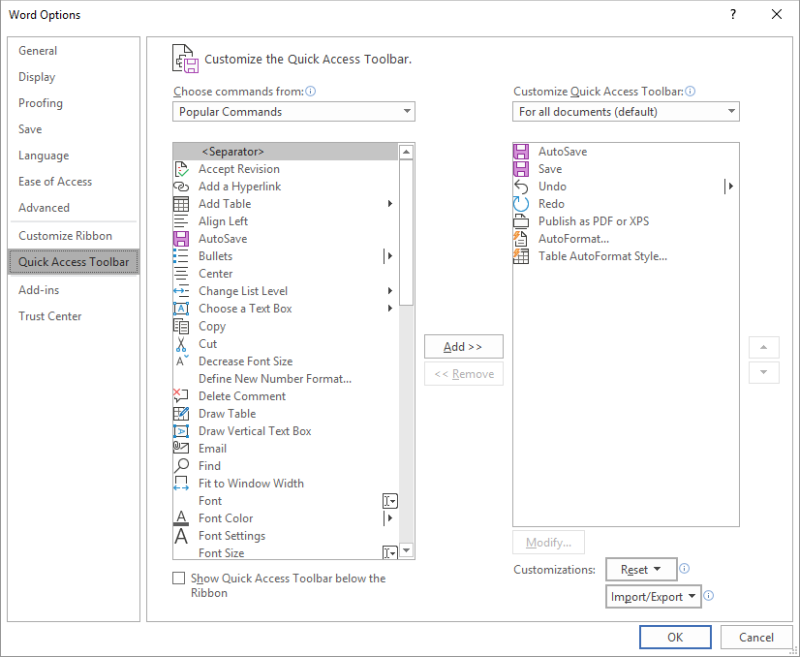
Other Word users reported that they ran into the same problem and concluded that perhaps the Find and Replace method is not the best way to make the changes. Instead, these users rely on the AutoFormat feature in Word. Using this method requires a bit of forethought, as the AutoFormat tool is not natively available in the ribbon-based interface. Instead, you need to add the tool to the Quick Access Toolbar. To add it, follow these steps:

Figure 1. The Customize options of the Word Options dialog box.
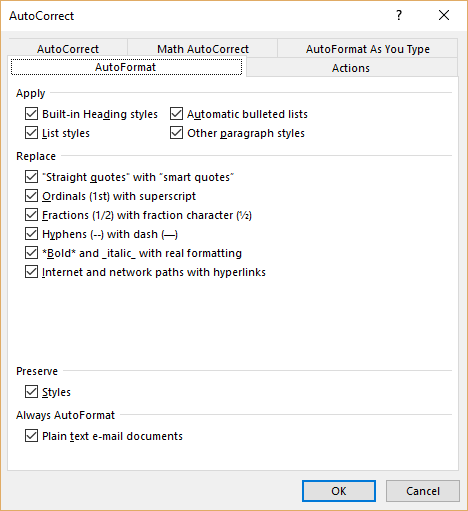
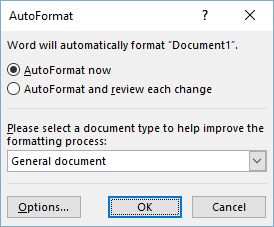
With the tool in place, you are ready to instruct Word how you want AutoFormat to do its work and then to do the actual changes. Follow these steps:

Figure 2. The AutoFormat tab of the AutoCorrect dialog box.

Figure 3. The AutoFormat dialog box.
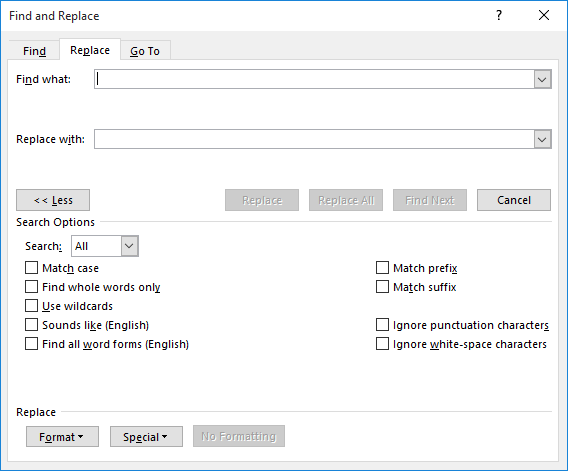
Word then goes through and makes the changes to the quotes, as you directed. If you still get some of the quotes that are wrong, or if your original document had a mix of straight quotes and incorrect smart quotes, then you can use the Find and Replace tool in Word. Follow these steps:

Figure 4. The Replace tab of the Find and Replace dialog box.
What you did here was to replace any closing quotes (^0148) that occur at the beginning of a word (<) with the opening quote (^0147). You should repeat the above steps, but replace closing apostrophes at the beginning of a word (^0146<) with opening apostrophes (^0145), then replace opening quotes at the end of a word (^0147>) with a closing quote (^0148), and finally opening apostrophes at the end of a word (^0145>) with closing apostrophes (^0146).
If this still fails to give the right results, you may need to analyze what characters are surrounding your quotes and apostrophes. If you, for instance, have a space before what should be a closing quote, then Word will more than likely assume that the quote should be an opening quote. If this is the case, you may need to make some edits to your document to get rid of the spaces that are causing Word to misinterpret your document.
WordTips is your source for cost-effective Microsoft Word training. (Microsoft Word is the most popular word processing software in the world.) This tip (9194) applies to Microsoft Word 2007, 2010, 2013, 2016, 2019, and 2021. You can find a version of this tip for the older menu interface of Word here: Smart Quotes are Incorrectly Replaced.

Create Custom Apps with VBA! Discover how to extend the capabilities of Office 365 applications with VBA programming. Written in clear terms and understandable language, the book includes systematic tutorials and contains both intermediate and advanced content for experienced VB developers. Designed to be comprehensive, the book addresses not just one Office application, but the entire Office suite. Check out Mastering VBA for Microsoft Office 365 today!
In some documents it can be critical to locate and remove duplicate words. This tip examines several ways you can ...
Discover MoreNeed to swap two adjacent paragraphs? Your editing arsenal can include a command to do this if you use the macro in this tip.
Discover MoreWhen you copy information from one document and paste it into another, you may not always get what you expect. If the ...
Discover MoreFREE SERVICE: Get tips like this every week in WordTips, a free productivity newsletter. Enter your address and click "Subscribe."
2024-01-31 07:31:48
Tony Goodwin
Thank you - I was using a macro to cut and paste stuff to develop an SQL statement and the ' was being replaced with smart quoted - unticking the
change options/proofing/autocorrect options/autoformat as you type/, and make sure the 'straight quotes with smart quotes' is NOT CHECKED worked for me for this.
2023-04-28 10:07:59
Karen NYC
Thanks very much for your site and this post. For me, in Office 365, I needed to turn off the Autoformat replace quotes as you type before this (or any other solution, including multiple VBA scripts) would work.
2022-10-17 12:51:33
Melanie
Thank you so much for this post. You can't imagine how much stress you've removed from my life!
Got a version of Word that uses the ribbon interface (Word 2007 or later)? This site is for you! If you use an earlier version of Word, visit our WordTips site focusing on the menu interface.
Visit the WordTips channel on YouTube
FREE SERVICE: Get tips like this every week in WordTips, a free productivity newsletter. Enter your address and click "Subscribe."
Copyright © 2026 Sharon Parq Associates, Inc.
Comments