 Please Note:
This article is written for users of the following Microsoft Word versions: 2007, 2010, 2013, 2016, 2019, and 2021. If you are using an earlier version (Word 2003 or earlier), this tip may not work for you. For a version of this tip written specifically for earlier versions of Word, click here: Sequentially Numbered Labels.
Please Note:
This article is written for users of the following Microsoft Word versions: 2007, 2010, 2013, 2016, 2019, and 2021. If you are using an earlier version (Word 2003 or earlier), this tip may not work for you. For a version of this tip written specifically for earlier versions of Word, click here: Sequentially Numbered Labels.
Sequentially Numbered Labels
If you work in a business where you need to sequentially number items, you might be wondering if there is a way you can use Word to create the labels for you. Word has many ways you can implement some type of numbering in your documents. For instance, you can use different fields for numbering, or use numbered lists, the captioning feature, or you can use mail merging. While all of these features (and more) use some type of numbering in them, they are not all well suited to creating labels.
Perhaps the easiest way to set up labels that have sequential numbers is to use the Envelopes and Labels capability of Word in concert with the SEQ field. Simply follow these steps:
- Display the Mailings tab of the ribbon.
- Click the Labels tool, in the Create group. Word displays the Labels tab of the Envelopes and Labels dialog box. (See Figure 1.)
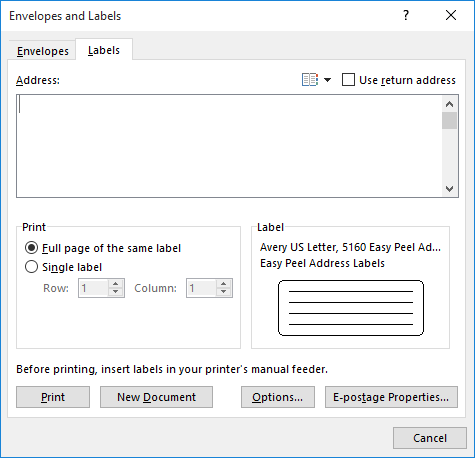
Figure 1. The Labels tab of the Envelopes and Labels dialog box.
- Erase whatever is within the Address box; it should be blank.
- Make sure Full Page of the Same Label (in the Print area) is selected.
- Click in the Label area if you need to change which label stock you are using.
- Click the New Document button. Word creates a sheet of blank labels. These labels are nothing but a Word table, with each cell in the table being one of the labels you will print.
- In the top-left label, type the word Exhibit, followed by a space.
- Press Ctrl+F9. Word inserts a pair of field braces in the label.
- Type SEQ and a space.
- Type a name for this sequence of numbers, such as "exhibit" (without the quote marks). (See Figure 2.)
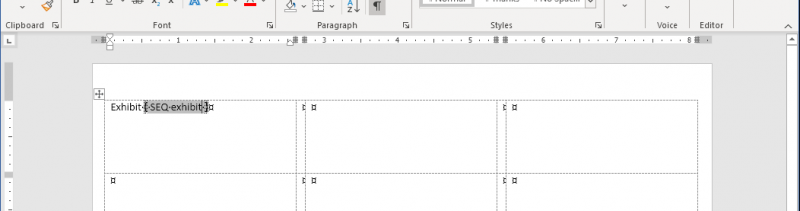
Figure 2. The sequence field, ready to be collapsed.
- Press F9. The field is collapsed, and a number appears in your label.
- Format the contents of this first label any way you desire—bold, italic, different color, etc.
- Copy the first label by selecting all the text in the table cell and pressing Ctrl+C. (The text in the table cell consists of everything you typed in step 7 and the field you created in steps 8–11.)
- Place the insertion point in each of the other labels in the first row, in turn, and press Ctrl+V. You should now have a complete row of the labels. (See Figure 3.)
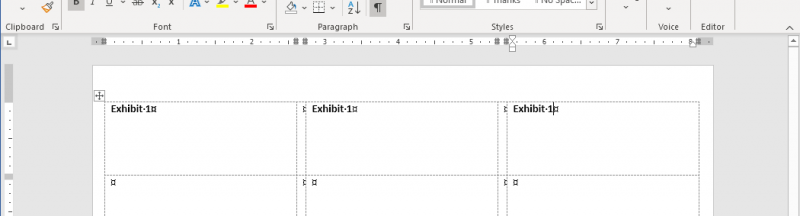
Figure 3. A row of completed labels.
- Select the other, blank rows of labels and delete them. (Remember—you are working in a table, so just select the blank rows and use the Delete tool on the Table Layout tab of the ribbon.)
- Select the entire first row of labels and press Ctrl+C.
- Press the right arrow, which should place your insertion point immediately after (beneath) the first row of labels.
- Press Ctrl+V to paste a new row of labels. You should now have two rows of labels, correctly formatted. (Don't worry yet that they have the same numbers on them.)
- Press Ctrl+V for each additional row of labels you want. You want enough rows of labels to meet your entire needs. Thus, if you need a total of 125 labels, and you can get 3 labels per line, you should end up with 42 rows of labels.
- Press Ctrl+A to select everything in the document.
- Press F9. This updates all the fields in what you selected. All your numbering should now be correct.
If you need your labels to have leading zeros in their numbering, you can replace steps 9 and 10 with whatever is necessary to type the following. (I use the sequence name "exhibit" here, as is done in the main steps; you can use a different sequence name, if desired.)
SEQ exhibit \# "00000"
This is all typed within the field you created in step 8 and then collapsed into the final number in step 11. It results in a number that is five digits long, front-padded with leading zeros, as necessary.
Note that step 19 tells you to paste as many rows as you want. This isn't just for the single page—if you keep pressing Ctrl+V, your table (that's what the labels are—a table) will extend to multiple pages just fine. The idea is to just keep pasting until you have as many rows as necessary for the number of labels you want.
Note that the above steps work great if you need to have your label sequence begin with 1. If you need to have them begin with a different number (say, 57), then the steps are a bit different:
- Display the Mailings tab of the ribbon.
- Click the Labels tool, in the Create group. Word displays the Labels tab of the Envelopes and Labels dialog box.
- Erase whatever is within the Address box; it should be blank.
- Make sure Full Page of the Same Label (in the Print area) is selected.
- Click in the Label area if you need to change which label stock you are using.
- Click the New Document button. Word creates a sheet of blank labels. These labels are nothing but a Word table, with each cell in the table being one of the labels you will print.
- In the top-left label, type the word Exhibit, followed by a space.
- Press Ctrl+F9. Word inserts a pair of field braces in the label.
- Type SEQ and a space.
- Type a name for this sequence of numbers, such as "exhibit" (without the quote marks), followed by a space.
- Type \r 57.
- Press F9. The field is collapsed, and the number 57 appears in your label.
- Format the contents of this first label any way you desire—bold, italic, different color, etc.
- Place the insertion point in the label just to the right of the label you just completed.
- Type the word Exhibit, followed by a space.
- Press Ctrl+F9. Word inserts a pair of field braces in the label.
- Type SEQ and a space.
- Type a name for this sequence of numbers, such as "exhibit" (without the quote marks). This should be the exact same name you entered in step 10.
- Press F9. The field is collapsed, and a number appears in your label. (It doesn't really matter what the number is at this point.)
- Format the contents of this second label any way you desire—bold, italic, different color, etc.
- Copy the second label by selecting all the text in the table cell and pressing Ctrl+C. (The text in the table cell consists of everything you typed in step 15 and the field you created in steps 16–20.)
- Place the insertion point in each of the other labels in the first row, in turn, and press Ctrl+V. You should now have a complete row of the labels.
- Select the other, blank rows of labels and delete them. (Remember—you are working in a table, so just delete all the table rows except the first one.)
- Select the entire first row of labels and press Ctrl+C.
- Press the right arrow, which should place your insertion point immediately after (beneath) the first row of labels.
- Press Ctrl+V to paste a new row of labels. You should now have two rows of labels, correctly formatted. (Don't worry yet that they have the same numbers on them.)
- Press Ctrl+V for each additional row of labels you want. You want enough rows of labels to meet your entire needs. Thus, if you need a total of 125 labels, and you can get 3 labels per line, you should end up with 42 rows of labels.
- Press Ctrl+A to select everything in the document.
- Press F9. This updates all the fields in what you selected. All your numbering should now be correct.
There are two big differences between this set of steps and the previous one. First, you are creating two labels instead of one. Second, the field in the first label includes the \r switch (step 11) to set the beginning sequence number.
If you prefer to not use the SEQ field to create the labels, you can also create them doing a mail merge. Conceptually, you only need to do the following:
- Create an Excel worksheet that has as many numbers in it as you need. For instance, if you need 175 labels, you will place a title in cell A1 (such as "Number") and the 175 numbers you need in cells A2 through A176. Make sure you save the workbook.
- Display the Mailings tab of the ribbon.
- Use the tools in the Start Mail Merge group to create a new document consisting of labels and specifying your data source (the worksheet you created in step 1).
- Create the sample label so that it has the word Exhibit followed by a merge field that represents the number being pulled from the Excel worksheet. Make sure the label contents are formatted the way you need them.
- Merge the information to a new document. You should now have a document that has all your labels in it, and you can print them as desired.
Of course, there are third-party solutions that are available for creating sequentially numbered labels. One such product is Bates Labels (https://bateslabels.com/) This product allows you to easily create as many labels as you need for a specific purpose.
WordTips is your source for cost-effective Microsoft Word training.
(Microsoft Word is the most popular word processing software in the world.)
This tip (8694) applies to Microsoft Word 2007, 2010, 2013, 2016, 2019, and 2021. You can find a version of this tip for the older menu interface of Word here: Sequentially Numbered Labels.
Author Bio
Allen Wyatt
With more than 50 non-fiction books and numerous magazine articles to his credit, Allen Wyatt is an internationally recognized author. He is president of Sharon Parq Associates, a computer and publishing services company. Learn more about Allen...
Chapter Numbers in Indexes and TOAs
Word allows you to define prefixes for page numbers. These are often used for chapter or section numbers in a large ...
Discover More
Importing AutoCorrect Entries
The AutoCorrect feature in Word can be very helpful not just for correcting misspellings, but also for expanding short ...
Discover More
Copying Comments to Cells
Need to copy whatever is in a comment (a "note") into a cell on your worksheet? If you have lots of comments, manually ...
Discover More


Comments