Please Note: This article is written for users of the following Microsoft Word versions: 2007, 2010, 2013, 2016, 2019, and 2021. If you are using an earlier version (Word 2003 or earlier), this tip may not work for you. For a version of this tip written specifically for earlier versions of Word, click here: Combining First and Second Numbered Levels on One Paragraph.
Written by Allen Wyatt (last updated January 1, 2025)
This tip applies to Word 2007, 2010, 2013, 2016, 2019, and 2021
Alan uses the numbering feature in Word to create two-level paragraph numbering. He would like to create a numbering system that combines the first and second levels in the same paragraph so that the numbering appears as 1. a) and then the second paragraph as b), then c), and so on. He wonders how to accomplish this.
The bullets and numbering feature in Word allow you to automatically create numbered paragraphs where you can specify the format for the numbering, 1. 2. 3., or a. b. c. The Outline tab in the Bullets and Numbering dialog box makes this easy. Creating a custom outline can be done in several different ways. We'll discuss a couple of them. Each option assumes that you have not yet entered any text and that you are beginning with a clean, blank document.
Your first option requires making some changes in the Outline Numbering dialog box.

Figure 1. The Define New Multilevel List dialog box.
From here you can enter the text you want in the paragraph. When you press Enter, the next level of the outline will appear, in this case, c). Note: When you have finished the outline level for your first number, you will need to repeat these steps for the next section. To do this, just place the insertion point in the document where you will begin your second section (number 2) and repeat the steps.
You probably noticed that this option is based on having a brand-new document. This is because in Word numbered lists are extremely "automated." For instance, if you have a numbered list on page 2 and then insert another list on page 10 that is not related to the first one, Word does not know that they are not the same and will automatically insert the numbers as if they are one list. This can cause all sorts of problems that can, if left unchecked, mess up your document entirely.
Another option, if you want to avoid the automated aspects of numbered lists in Word, is to use the SEQ field. You could use SEQ fields for all of the numbering, or for one level and use the auto numbering feature for the other. You can create the SEQ fields using the menus. However, in this case it is much more cumbersome than it needs to be. Here is how to accomplish the task more quickly. In this case, we are assuming that the text is already in the document and just needs to be numbered.
You can enter this field for each new paragraph that needs the numbering. Word keeps track of which letter comes next and will insert the correct one, assuming you are numbering your paragraphs in alphabetical order.
WordTips is your source for cost-effective Microsoft Word training. (Microsoft Word is the most popular word processing software in the world.) This tip (8096) applies to Microsoft Word 2007, 2010, 2013, 2016, 2019, and 2021. You can find a version of this tip for the older menu interface of Word here: Combining First and Second Numbered Levels on One Paragraph.

Create Custom Apps with VBA! Discover how to extend the capabilities of Office 365 applications with VBA programming. Written in clear terms and understandable language, the book includes systematic tutorials and contains both intermediate and advanced content for experienced VB developers. Designed to be comprehensive, the book addresses not just one Office application, but the entire Office suite. Check out Mastering VBA for Microsoft Office 365 today!
Want to make sure your paragraph numbering looks the same on different computer systems? It's a harder task in Word than ...
Discover MoreHave you ever been frustrated by the automatic numbering feature in Word? You are not alone. Fortunately, there are a few ...
Discover MoreNumbered lists provide a 1-2-3 way of organizing your document. You can create numbered lists very easily using the ...
Discover MoreFREE SERVICE: Get tips like this every week in WordTips, a free productivity newsletter. Enter your address and click "Subscribe."
2021-01-31 20:01:11
Veronica
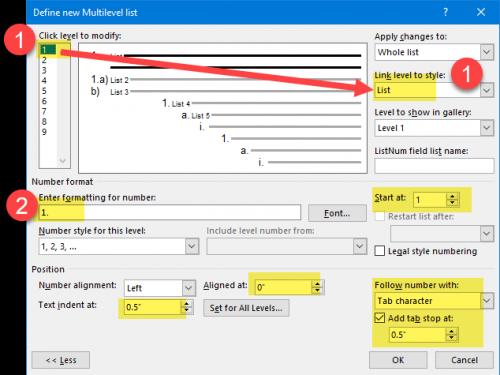
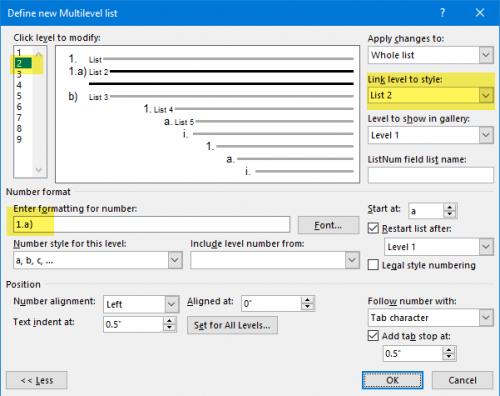
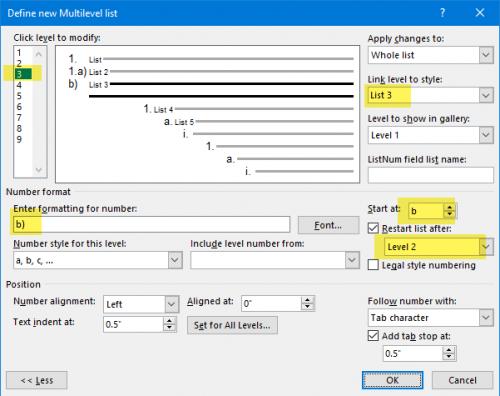
Link numbering levels 1, 2 and 3 to the built-in styles named List, List 2 and List 3.
The configuration for each level is as follows:
(see Figure 1 below)
(see Figure 2 below)
(see Figure 3 below)

Figure 1. Level 1

Figure 2. Level 2

Figure 3. Level 3
2020-09-04 11:16:59
Janet Schiller
I often have multiple lists in the same document. If Word treats them as one list, all I do is right-click where I want the numbering to restart, and click "restart at..." If the list is numerical, Word will show that I can restart at 1. If it's alphabetic, it will show "restart at a" If necessary, you can also choose an arbitrary letter or number to restart at.
2020-08-24 03:56:47
Richard Price
I followed the above instructions carefully, but they didn't work for me. There's a minor issue with step 4, where if you have the usual AutoCorrect option "Capitalize first letter of sentences" turned on, the a) is converted to A), but I left that as it was, so after step 5 the document looked like this:
1. A)
2.
At step 8 the Multilevel List tool looked slightly different to the screenshot above: the main (top right) pane had 2. on the first line instead of 1) and a. on the third line instead of a). At step 11 after clicking on More the Start At field was already b, but I changed the Enter Formatting for Number field from b. to b) to match what I'd typed (before AutoCorrect). After clicking OK the document looked like this:
a) A)
b)
In case the problem was AutoCorrect, I tried turning off "Capitalize first letter of sentences" but in this case the end result was:
a) a)
b)
What am I doing wrong? The only odd thing I've noticed about the instructions above is that they say "Your first option requires making some changes in the Outline Numbering dialog box", but then go on to describe the Multilevel List tool - is this the same as Outline Numbering?
Got a version of Word that uses the ribbon interface (Word 2007 or later)? This site is for you! If you use an earlier version of Word, visit our WordTips site focusing on the menu interface.
Visit the WordTips channel on YouTube
FREE SERVICE: Get tips like this every week in WordTips, a free productivity newsletter. Enter your address and click "Subscribe."
Copyright © 2026 Sharon Parq Associates, Inc.
Comments