Please Note: This article is written for users of the following Microsoft Word versions: 2007, 2010, 2013, 2016, 2019, and 2021. If you are using an earlier version (Word 2003 or earlier), this tip may not work for you. For a version of this tip written specifically for earlier versions of Word, click here: Using Non-Printing Notes.
Written by Allen Wyatt (last updated May 14, 2025)
This tip applies to Word 2007, 2010, 2013, 2016, 2019, and 2021
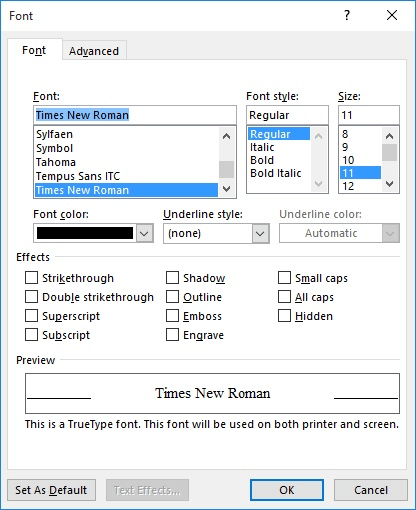
Word has a text attribute that has been around since the early days of Word for DOS. Hidden text is an attribute that allows you to enter information that you can easily suppress. You can turn it off so it does not appear on the screen, or you can turn it off, so it doesn't print. To format text as hidden, follow these steps:

Figure 1. The Font tab of the Font dialog box.
Hidden text shows on the screen with a dotted underline. Unfortunately, this is easy to miss as you are reading the document on the screen, so it is a good idea to use a text color to highlight your hidden text. For instance, it could be green as well as hidden. In this way, your notes and messages are much harder to miss. You can even define a character or paragraph style that has the hidden attribute set, along with the color attribute to make the text more noticeable.
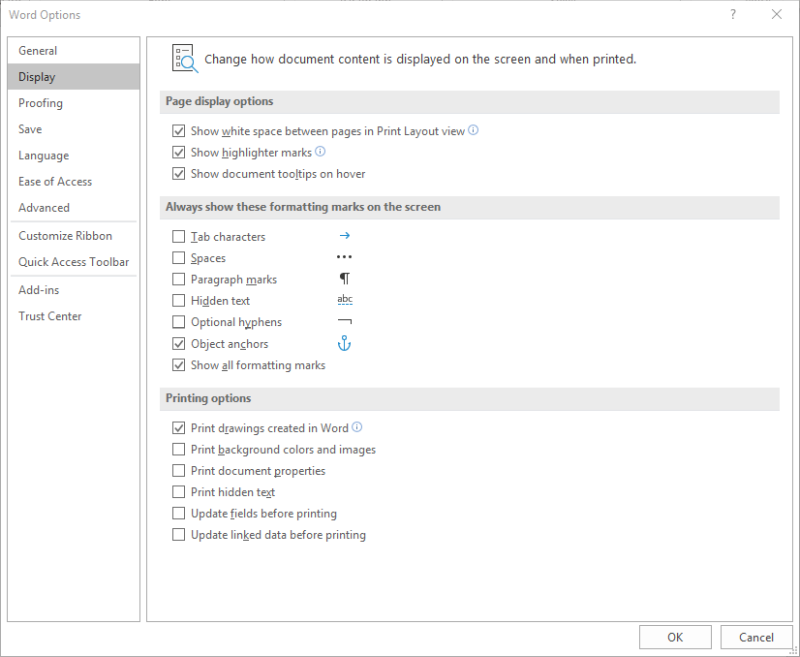
You can control whether hidden text is displayed or printed by following these steps:

Figure 2. The Display options of the Word Options dialog box.
You should note that since there are two separate controls for Hidden text—one for screen display and one for printing. This means that you can control display and printing of the text independently from each other.
WordTips is your source for cost-effective Microsoft Word training. (Microsoft Word is the most popular word processing software in the world.) This tip (8056) applies to Microsoft Word 2007, 2010, 2013, 2016, 2019, and 2021. You can find a version of this tip for the older menu interface of Word here: Using Non-Printing Notes.

Create Custom Apps with VBA! Discover how to extend the capabilities of Office 365 applications with VBA programming. Written in clear terms and understandable language, the book includes systematic tutorials and contains both intermediate and advanced content for experienced VB developers. Designed to be comprehensive, the book addresses not just one Office application, but the entire Office suite. Check out Mastering VBA for Microsoft Office 365 today!
If you need to remove any explicit character formatting from some text, you'll want to commit the shortcut in this tip to ...
Discover MoreIf you need to format a number so that it appears as currency, it is not as easy to do in Word as it is in Excel. You can ...
Discover MoreOne common type of formatting is strikethrough, which is normally applied from the Font dialog box. There is no built-in ...
Discover MoreFREE SERVICE: Get tips like this every week in WordTips, a free productivity newsletter. Enter your address and click "Subscribe."
2020-04-24 18:56:00
Cindy
Many thanks! This was exactly what I was looking for and it works perfectly in 2019. I appreciate you taking the time for clarity on newer versions.
2019-08-24 11:17:49
Edward Hill
Follow up on hidden notes. It seems that hidden notes is a good way for me to create a record of the reason for a provision being in or out of a document. Is it possible for a recipient to reverse the hiding process and see the text of the notes? How can that result be avoided?
Got a version of Word that uses the ribbon interface (Word 2007 or later)? This site is for you! If you use an earlier version of Word, visit our WordTips site focusing on the menu interface.
Visit the WordTips channel on YouTube
FREE SERVICE: Get tips like this every week in WordTips, a free productivity newsletter. Enter your address and click "Subscribe."
Copyright © 2026 Sharon Parq Associates, Inc.
Comments