Please Note: This article is written for users of the following Microsoft Word versions: 2007, 2010, 2013, 2016, 2019, and 2021. If you are using an earlier version (Word 2003 or earlier), this tip may not work for you. For a version of this tip written specifically for earlier versions of Word, click here: Moving Object Anchors.
Written by Allen Wyatt (last updated September 28, 2023)
This tip applies to Word 2007, 2010, 2013, 2016, 2019, and 2021
There are two ways that objects such as pictures or images can be inserted in your document: they can either be inline or floating. How you work with inline objects is discussed elsewhere in WordTips. This particular tip deals only with floating objects; those around which your text can flow. These objects must, by design, be anchored to something—typically to a paragraph. You can see where an object is anchored by configuring Word so it displays object anchors.
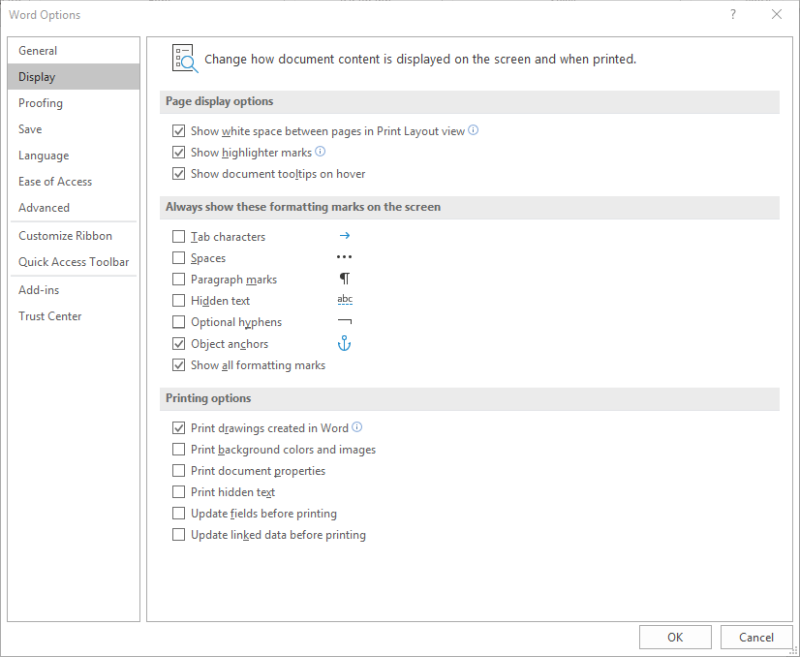
An object anchor is an indicator that shows the document paragraph with which a floating object is associated. You can see where object anchors are located by following these steps:

Figure 1. The Display options of the Word Options dialog box.
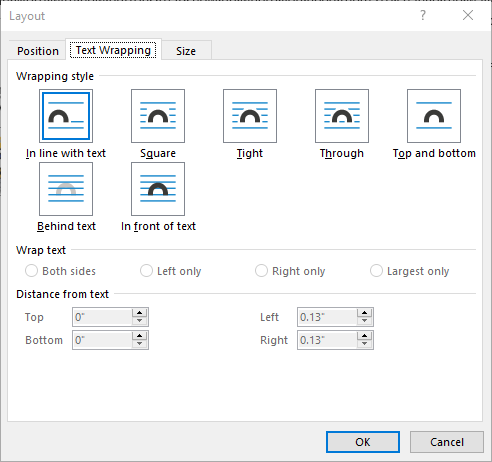
Object anchors can be moved (more on that in a moment), but they cannot be deleted without changing how the object is inserted in the document. You can make that change by right-clicking on the object and choosing Size and Position from the resulting Context menu. Word displays the Advanced Layout dialog box (Word 2007) or the Layout dialog box (Word 2010 and later versions). The controls you want are on the Text Wrapping tab. (See Figure 2.)

Figure 2. The Text Wrapping tab of the Layout dialog box.
In the Wrapping Style area at the top of the dialog box, click on In Line with Text, and then click on OK. How the object is inserted is immediately changed and the object anchor is deleted since it is no longer needed.
Changing how the object is inserted in your document is a drastic step, though, and it should not be used unless you really want your graphic to be inline with text. Assuming you don't—assuming you want text to flow around your object in some manner—you may want to change the paragraph to which it is anchored. Why would you want to do this? Because, in general, an object anchored to a paragraph will "flow" with the paragraph to which it is anchored. Thus, if you add or delete text in your document and that causes a paragraph to move from one page to another, if an object is anchored to that paragraph, then the object will move to whatever page that paragraph is on.
To move the object anchor to a different paragraph, follow these steps:
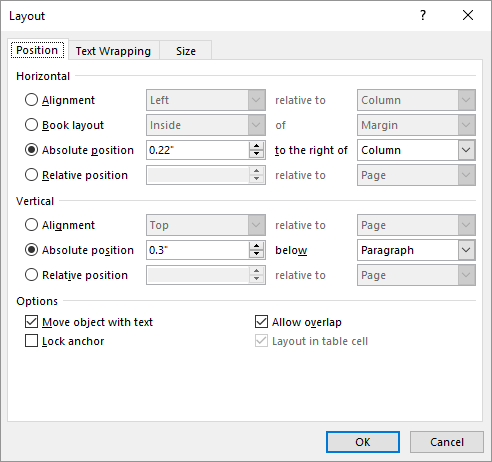
Note that I said, earlier, that "in general" an object anchored to a paragraph will flow with the paragraph to which it is anchored. This may not be the case, however. In fact, moving an object anchor doesn't necessarily move the object associated with the anchor—it all depends on what the objects positioning is related (or relative) to. Instead, Word adjusts the positioning information for the object. If you want to actually move the object's position, you need to display the object's Advanced Layout dialog box (Word 2007) or Layout dialog box (Word 2010 or later versions) and change the settings on the Position tab. (See Figure 3.)

Figure 3. The Position tab of the Layout dialog box.
Going into how to adjust these settings is too in-depth for the purposes of this tip, but you'll want to pay particular attention to the right-hand drop-down lists in both the Horizontal and Vertical areas of the dialog box. These control what the positioning is relative to (for instance, relative to the paragraph to which the object is anchored) and changing the settings here is how you adjust the positioning of the object.
WordTips is your source for cost-effective Microsoft Word training. (Microsoft Word is the most popular word processing software in the world.) This tip (7984) applies to Microsoft Word 2007, 2010, 2013, 2016, 2019, and 2021. You can find a version of this tip for the older menu interface of Word here: Moving Object Anchors.

Discover the Power of Microsoft Office This beginner-friendly guide reveals the expert tips and strategies you need to skyrocket your productivity and use Office 365 like a pro. Mastering software like Word, Excel, and PowerPoint is essential to be more efficient and advance your career. Simple lessons guide you through every step, providing the knowledge you need to get started. Check out Microsoft Office 365 For Beginners today!
Word has long allowed you to embed pictures or images in the documents you create. What if you want to get those pictures ...
Discover MoreDo you like to add pictures to your document just by dragging and dropping? What are you to do if it appears the ...
Discover MoreYou may have a lot of linked images in a document, and then one day need to change the links if the location of the ...
Discover MoreFREE SERVICE: Get tips like this every week in WordTips, a free productivity newsletter. Enter your address and click "Subscribe."
2023-11-19 06:56:25
Tine F
Thanks! It helps me from the first step only
2021-11-20 21:00:54
Tomek
@Allen and Wilkins:
Correction: I was wrong: Dragging the picture does move the anchor icon and may even change picture association with a line to association with a paragraph.
Keep in mind also hat things change when you move anchors or object to other pages.
2021-11-20 20:53:14
Tomek
@Allen and Wilkins:
Generally, that is true with the default setting. You can however change the positioning of the object for its vertical position to be aligned with a line (top, centered, bottom, inside or outside) or to be positioned absolute below the line (use negative numbers for distance above the line). This will position the anchor beside a line within a paragraph, whether lines in a paragraph break automatically or by using Shift+Enter. Then you can drag the anchor icon to any line in that or any other paragraph. Dragging the anchor icon afterwards does not move the object. Dragging the object does not move the anchor icon. Both actions result in adjustment of distances specified in the Object Layout dialog box.
I don't see much need for this type of anchoring, unless you need to anchor the picture to a paragraph that spills to the next page, ***and*** you need the picture on that next page ***and*** you need to associate the picture with text that is in the spilled part of the paragraph.
2021-11-18 08:16:55
Allen
Yes, object anchors are attached only to paragraphs. It makes sense that they cannot be attached to line breaks because line breaks don't terminate paragraphs -- only pressing Enter, with the resulting "hard return" will terminate a paragraph. In other words, line breaks are a part of paragraphs.
-Allen
2021-11-17 19:20:49
Wilkins
FYI, if you have "line breaks" in your document along with "paragraphs", it seems you can't move the anchor to one of the "line breaks". It will only anchor to a paragraph.
Got a version of Word that uses the ribbon interface (Word 2007 or later)? This site is for you! If you use an earlier version of Word, visit our WordTips site focusing on the menu interface.
Visit the WordTips channel on YouTube
FREE SERVICE: Get tips like this every week in WordTips, a free productivity newsletter. Enter your address and click "Subscribe."
Copyright © 2026 Sharon Parq Associates, Inc.
Comments