Please Note: This article is written for users of the following Microsoft Word versions: 2007, 2010, 2013, 2016, 2019, and 2021. If you are using an earlier version (Word 2003 or earlier), this tip may not work for you. For a version of this tip written specifically for earlier versions of Word, click here: Inserting the Date in a Header or Footer.
Written by Allen Wyatt (last updated November 5, 2025)
This tip applies to Word 2007, 2010, 2013, 2016, 2019, and 2021
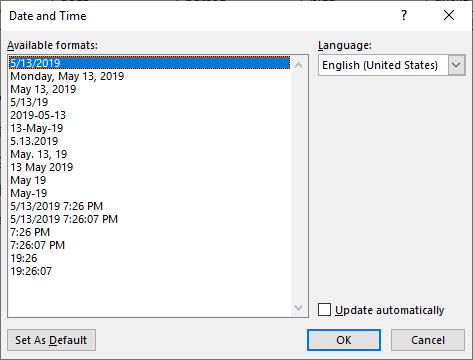
When creating headers or footers for your document, it is very common to insert the date into them. In this way, the date is printed on every page of your document. To insert the date, you can follow these steps if you are using Word 2019 or Word in Office 365:

Figure 1. The Date and Time dialog box.
The steps are a bit different if you are using an earlier version of Word:
By default, the date inserted in step 7 is the current date, meaning that the date used is dynamic. Today it shows today's date and tomorrow it will show tomorrow's date. When you use the Insert Date tool, Word actually inserts a DATE field into the header or footer. You can see the makeup of the DATE field by simply selecting it in the header or footer and pressing Shift+F9. The field is expanded, and you can make changes to the field, as desired.
The Insert Date tool isn't the only way to insert a date in the header or footer, of course. Once you position the insertion point where you want it (step 4 in the above steps), you can choose the Date and Time tool in the Text group from the Insert tab of the ribbon and select the format you want used for the date.
WordTips is your source for cost-effective Microsoft Word training. (Microsoft Word is the most popular word processing software in the world.) This tip (7751) applies to Microsoft Word 2007, 2010, 2013, 2016, 2019, and 2021. You can find a version of this tip for the older menu interface of Word here: Inserting the Date in a Header or Footer.

Do More in Less Time! An easy-to-understand guide to the more advanced features available in the Microsoft 365 version of Word. Enhance the quality of your documents and boost productivity in any field with this in-depth resource. Complete your Word-related tasks more efficiently as you unlock lesser-known tools and learn to quickly access the features you need. Check out Microsoft 365 Word For Professionals For Dummies today!
Want the margins used in your footers (or headers) to be wider than the margins used in the rest of your document? There ...
Discover MoreHeaders and footers can add a final, professional touch to your printed document. Here's the quick way to add the headers ...
Discover MoreNeed some specific text to appear just below the end of the text on the last page of your document? You can accomplish ...
Discover MoreFREE SERVICE: Get tips like this every week in WordTips, a free productivity newsletter. Enter your address and click "Subscribe."
There are currently no comments for this tip. (Be the first to leave your comment—just use the simple form above!)
Got a version of Word that uses the ribbon interface (Word 2007 or later)? This site is for you! If you use an earlier version of Word, visit our WordTips site focusing on the menu interface.
Visit the WordTips channel on YouTube
FREE SERVICE: Get tips like this every week in WordTips, a free productivity newsletter. Enter your address and click "Subscribe."
Copyright © 2026 Sharon Parq Associates, Inc.
Comments