Please Note: This article is written for users of the following Microsoft Word versions: 2007, 2010, 2013, 2016, 2019, and 2021. If you are using an earlier version (Word 2003 or earlier), this tip may not work for you. For a version of this tip written specifically for earlier versions of Word, click here: Meaningless Text.
Written by Allen Wyatt (last updated May 1, 2021)
This tip applies to Word 2007, 2010, 2013, 2016, 2019, and 2021
If you are looking for a quick way to put meaningless tripe in your document, then Word is only too happy to oblige. Why would you need meaningless tripe? Perhaps to do some testing, fill some space., or to see how text looks in a given page format. Whatever the reason, Word provides a number of quick way to do this. Try the following:
Word replaces this text with several paragraphs of text. The number of paragraphs and the number of sentences in each paragraph will vary, depending on your version of Word. (In some versions it is 3 paragraphs, in others it is 4 or 5. In all the versions I tested, each paragraph consists of 3 sentences each.)
The sentences consist of helpful hints on how to change the appearance of your document. You can vary the number of sentences per paragraph, as well as the number of paragraphs, by using the format =rand(p,s) in step 2. In this format, p is replaced with the number of paragraphs you want and s is replaced with the number of sentences per paragraph. Thus, if you wanted 9 paragraphs of 7 sentences each, you could use =rand(9,7) in step 2. You can leave out the sentence count parameter, if desired, and Word will resort to the default number of sentences per paragraph.
Another way to add meaningless text is to use the LOREM function. If you type =lorem() at the start of a new paragraph and then press Enter, Word inserts three paragraphs of the common lorem ipsum text. This is meaningless, Latin-looking text that is used by those in the printing and publishing business to simulate real text. You can also generate this type of text (and get more information about it) by visiting the following site:
https://www.lipsum.com
You can adjust what the LOREM function generates by adding parameters, just as you do with the RAND function. The first parameter indicates the number of paragraphs you want and the second indicates the number of sentences in each paragraph.
It is important to note that the inserted lorem ipsum text will default to Do Not Check Spelling Or Grammar in the Language dialog box to avoid all the words being flagged as misspelled. If the text is used in a document, any new text typed into the paragraphs will also have the spelling and grammar checks turned off. To turn spelling and grammar checks back on, make sure the Do Not Check Spelling Or Grammar check box is clear in the Language dialog box.
If you are a long-time user of Word, you may remember that in previous versions using =rand() returned sentences about "the quick brown fox." If you are sentimentally attached to that old brown fox, you can instead use the command =rand.old() and Word uses the old sentences as filler. The parameters that can be used with the command are the same as they are for the =rand() command.
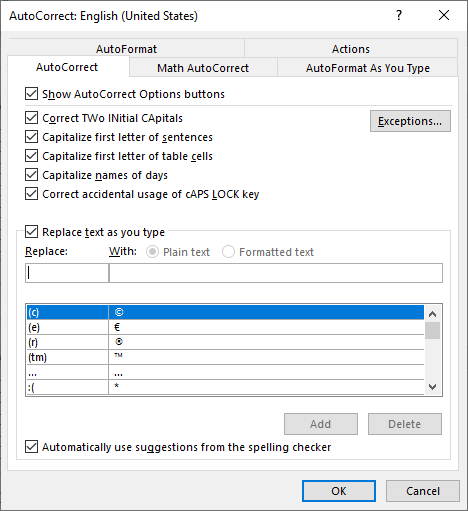
If creating meaningless text using RAND, LOREM, or RAND.OLD don't work for you, there is a very good chance that you have AutoCorrect turned off. Follow these steps:

Figure 1. The AutoCorrect tab of the AutoCorrect dialog box.
It is interesting to note that if you look through AutoCorrect replacement text entries in the AutoCorrect dialog box, you will find nothing there about this feature. It seems, instead, to be built into Word "behind the scenes."
WordTips is your source for cost-effective Microsoft Word training. (Microsoft Word is the most popular word processing software in the world.) This tip (7112) applies to Microsoft Word 2007, 2010, 2013, 2016, 2019, and 2021. You can find a version of this tip for the older menu interface of Word here: Meaningless Text.

Create Custom Apps with VBA! Discover how to extend the capabilities of Office 365 applications with VBA programming. Written in clear terms and understandable language, the book includes systematic tutorials and contains both intermediate and advanced content for experienced VB developers. Designed to be comprehensive, the book addresses not just one Office application, but the entire Office suite. Check out Mastering VBA for Microsoft Office 365 today!
For certain types of writing, you may want to make sure that the sentences in your document do not exceed a certain ...
Discover MoreWord allows you to add several types of "breaks" into your document. If you later want to remove any of them, you can use ...
Discover MoreNeed to jump a certain percentage of the way through a document? You can do it using the familiar Go To tab of the Find ...
Discover MoreFREE SERVICE: Get tips like this every week in WordTips, a free productivity newsletter. Enter your address and click "Subscribe."
2021-05-01 21:16:00
Aprile Morgan
Is there a way to insert meaningless text on a Mac in PAGES
Got a version of Word that uses the ribbon interface (Word 2007 or later)? This site is for you! If you use an earlier version of Word, visit our WordTips site focusing on the menu interface.
Visit the WordTips channel on YouTube
FREE SERVICE: Get tips like this every week in WordTips, a free productivity newsletter. Enter your address and click "Subscribe."
Copyright © 2026 Sharon Parq Associates, Inc.
Comments