Please Note: This article is written for users of the following Microsoft Word versions: 2007, 2010, 2013, 2016, 2019, and 2021. If you are using an earlier version (Word 2003 or earlier), this tip may not work for you. For a version of this tip written specifically for earlier versions of Word, click here: Printing Unwanted Blank Envelopes.
Written by Allen Wyatt (last updated September 29, 2018)
This tip applies to Word 2007, 2010, 2013, 2016, 2019, and 2021
Gay wrote with a problem concerning the printing of blank envelopes by Word. This, despite the fact that a return address was highlighted and the built-in envelope features of Word were used.
Trying to track down problems (and their attendant solutions) with the envelope features can be confusing and time-consuming. Perhaps the best place to start is to change how you are printing the envelopes. Instead of choosing to print directly to the printer, choose to add the envelope to the document. (Remember, this is just for troubleshooting. After the problem is solved, you can go back to directly printing.)
With the envelope added to your document (it is in its own section at the beginning of your document) you can check a couple of things. Basically, you are checking what you see on the screen to see if it makes sense and is what you expect. After all, what you see there is the basis for what is printed. You will want to check the following:
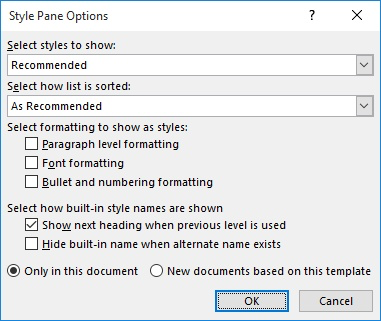
The parameters by which an envelope is created are controlled by the styles defined within a template or a document. What this means is that if you find you need to change any of the above items, you need to change the styles on which that envelope is based. To do this, follow these steps:

Figure 1. The Style Pane Options dialog box.
Now, when you save your document or close Word, you are asked if you want to save your changes to the template. Make sure you do this.
With these changes to the styles and template necessary, you may be wondering what good the settings are in the Envelope Options dialog box. (The Envelope Options dialog box is displayed when you click on the Options button in the Envelopes and Labels dialog box.) Good question—those settings are for single-use changes. This means that the settings you make in the dialog box are for the current Word document or session only, not for permanent changes. To make permanent changes, you must follow the steps outlined above.
Another thing to check out is to make sure that you have the latest and greatest printer driver installed for your printer. This is a very important item to check, particularly if you recently changed printers or had some sort of a system upgrade that might have affected the relationship of your computer to your printer. (For instance, a repair to the main board in the printer, a change in printer interfaces, or an upgrade of your operating system version.)
If, after trying everything outlined in this tip, you still cannot get the envelopes to print properly, it may be due to some other weird quirk with the envelope features. To find out some of the more obscure problems, check out Microsoft Support, and search for Envelope or Envelope and the name of your printer. The fact that such a search typically returns in excess of 100 hits may give an indication of the problems inherent in the way that Microsoft implements the envelope features.
WordTips is your source for cost-effective Microsoft Word training. (Microsoft Word is the most popular word processing software in the world.) This tip (6101) applies to Microsoft Word 2007, 2010, 2013, 2016, 2019, and 2021. You can find a version of this tip for the older menu interface of Word here: Printing Unwanted Blank Envelopes.

Discover the Power of Microsoft Office This beginner-friendly guide reveals the expert tips and strategies you need to skyrocket your productivity and use Office 365 like a pro. Mastering software like Word, Excel, and PowerPoint is essential to be more efficient and advance your career. Simple lessons guide you through every step, providing the knowledge you need to get started. Check out Microsoft Office 365 For Beginners today!
One of the switches you can use with the index field allows you to specify how index entries should be separated from the ...
Discover MoreWhen you create envelopes in Word, you may want to adjust where the return address and main address are printed. Doing so ...
Discover MoreWhen you add an envelope to a document, Word adds it to the beginning of the document. Printing just the envelope can be ...
Discover MoreFREE SERVICE: Get tips like this every week in WordTips, a free productivity newsletter. Enter your address and click "Subscribe."
There are currently no comments for this tip. (Be the first to leave your comment—just use the simple form above!)
Got a version of Word that uses the ribbon interface (Word 2007 or later)? This site is for you! If you use an earlier version of Word, visit our WordTips site focusing on the menu interface.
Visit the WordTips channel on YouTube
FREE SERVICE: Get tips like this every week in WordTips, a free productivity newsletter. Enter your address and click "Subscribe."
Copyright © 2026 Sharon Parq Associates, Inc.
Comments