Gary can't make Word handle formatted text in AutoCorrect entries like it used to. He'd like to have "ch" converted into "Champion" where the text is formatted as small caps. He can copy the properly formatted "Champion" to the Clipboard, but when he pastes it into the "With" field when creating the AutoCorrect entry, the text is all caps and the "Formatted Text" radio button is unavailable.
The problem isn't necessarily with the AutoCorrect function, but with the way in which you are trying to create the AutoCorrect entry. If you don't use the Clipboard in your creation process, you shouldn't run into the problem. Try these steps:
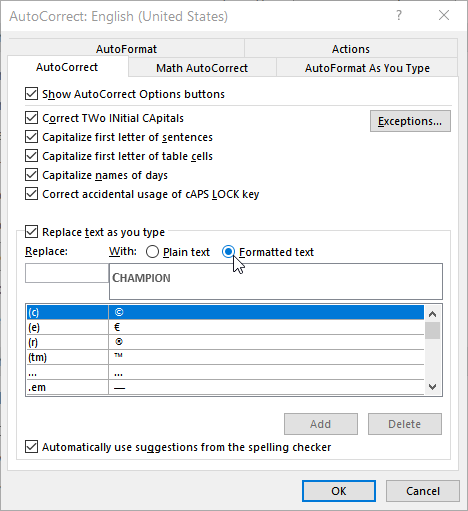
Figure 1. The AutoCorrect dialog box.
Of course, the question still remains—why doesn't using the Clipboard to paste the text into the AutoCorrect dialog box work? The reason is because the dialog box cannot seem to handle receiving any formatting information that may be contained in the Clipboard; it can receive only the text.
WordTips is your source for cost-effective Microsoft Word training. (Microsoft Word is the most popular word processing software in the world.) This tip (6097) applies to Microsoft Word 2007, 2010, 2013, 2016, 2019, and 2021.

The First and Last Word on Word! Bestselling For Dummies author Dan Gookin puts his usual fun and friendly candor back to work to show you how to navigate Word 2019. Spend more time working and less time trying to figure it all out! Check out Word 2019 For Dummies today!
Word used to provide a fast way to add misspelled words to your AutoCorrect list. That method has been long removed, but ...
Discover MoreIf you want to print a list of all the AutoCorrect entries in your document, Word doesn't provide a method. You can use ...
Discover MoreAs you are typing, AutoCorrect provides a "check" that what you are entering doesn't match some pre-defined error ...
Discover MoreFREE SERVICE: Get tips like this every week in WordTips, a free productivity newsletter. Enter your address and click "Subscribe."
2025-03-14 13:46:43
Patricia Eichhorn
I have used the autocorrect feature for years for lots of common words and phrases needed in my letters. Recently some of the acronyms I type will NOT produce the autocorrect phrase. Not sure why. The info is properly typed into the options, as I've always done, but simply will not function in my actual document. Wondering if there is a fix for this random problem that doesn't always happen? I'm using M/S 365 for Enterprise.
2022-05-04 14:49:11
airton
Great great tip! I'm using office 2007 and I couldn't use formatted auto corrections as I used before. The trick, as you have said, is only to select the formatted words (with pictures or symbols, if necessary), but not copying it, just let it selected. Opening word options, and auto correction options, the formatted word is in the bracket, you need only to accept, giving a word to remember Word to make the substitution, respecting the format. Thank you very much.
2021-08-23 09:07:38
Denis Bomfim Pereira Pinto
Hi, Allen and readers. I like so much your site, but I couldn't agree less with your comments. The implementation Microsoft did is awkward and counterintuitive. Why on earth did they decide one should first select a formated text to enable it to be used as an autocorrect entry? If I were they, I would make it possible to copy a formated text and paste into the "With" field or even to format it right inside that field. That would make our lives easier.
Nevertheless, keep up the good work.
2021-04-13 10:52:00
Deborah Patricia Ferolito
Why is the option to use formatted text grayed out on my Word document? I'm in Word 365
Got a version of Word that uses the ribbon interface (Word 2007 or later)? This site is for you! If you use an earlier version of Word, visit our WordTips site focusing on the menu interface.
Visit the WordTips channel on YouTube

FREE SERVICE: Get tips like this every week in WordTips, a free productivity newsletter. Enter your address and click "Subscribe."
Copyright © 2026 Sharon Parq Associates, Inc.
Comments