Please Note: This article is written for users of the following Microsoft Word versions: 2007, 2010, 2013, 2016, 2019, 2021, and Word in Microsoft 365. If you are using an earlier version (Word 2003 or earlier), this tip may not work for you. For a version of this tip written specifically for earlier versions of Word, click here: The Line that Won't Go Away.
Written by Allen Wyatt (last updated August 3, 2024)
This tip applies to Word 2007, 2010, 2013, 2016, 2019, 2021, and Word in Microsoft 365
Word, by default, takes some liberties with what you type. One such liberty is the adding of borders to paragraphs based on what you type. For instance, if you type three underlines on a new line, and then press Enter, you get a solid line that extends the width of your document. This is not the only three characters that result in this type of replacement—characters for lines—but if you don't know the source of the line, it can be frustrating.
This feature of Word is controlled by following these steps:
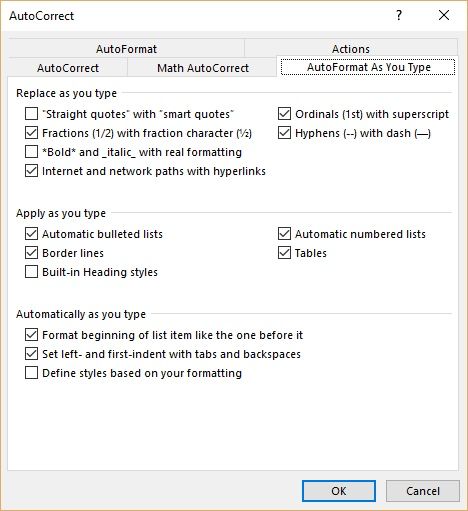
Figure 1. The AutoFormat As You Type tab of the AutoCorrect dialog box.
Now that you know what causes the lines, you may be wondering how to get rid of them once they are in your document.
As with any AutoFormat that is applied by Word, you can undo the change by pressing Ctrl+Z right after the change is made. For instance, if you press three underlines and then Enter, Word changes the underlines to a line. You can undo this by immediately pressing Ctrl+Z.
If you later want to delete the line, there are two things you can do that will help you. First, remember that the "line" added by Word is really a paragraph border; it is not a real line. Second, you need to display Word's non-printing characters. (You do this by displaying the Home tab of the ribbon and clicking on the Show/Hide tool, which looks like a backwards P.)
Now you are ready to get rid of the lines. Start by positioning the insertion point at the beginning of the paragraph that has the border and pressing Ctrl+Q. This resets the paragraph's formatting back to its default, which usually does not include the border. If this does not do what you want, you can always select the entire paragraph that contains the border and simply delete it.
There is something else to remember when getting rid of borders created by AutoFormat: They can affect multiple paragraphs. For instance, consider the following scenario, which you can try in a document:
Why did this happen? The reason is quite simple. Since the "line" is really a paragraph border, it appears at the bottom of the last paragraph that has that format. When you pressed Enter twice, in step 3, you ended up with three paragraphs, each formatted with a border underneath. However, Word only displays the border of the last paragraph formatted with that border, even though all three have it. (Word translates the border as one that appears under the group of like-formatted paragraphs, not one that appears under each individual paragraph.) When you performed step 4, the border was removed from the last of the three paragraphs, but it still remained on the other two. Thus, the border appeared to "jump up" a line. All that really happened was that Word dutifully displayed the bottom border on the last paragraph with that format, which now happens to be the second of the original three paragraphs.
To get rid of the border on all the paragraphs, you need to select all the paragraphs and press Ctrl+Q. If you don't want to do this (perhaps you don't want to remove some other explicit paragraph formatting you have), you can follow these steps:
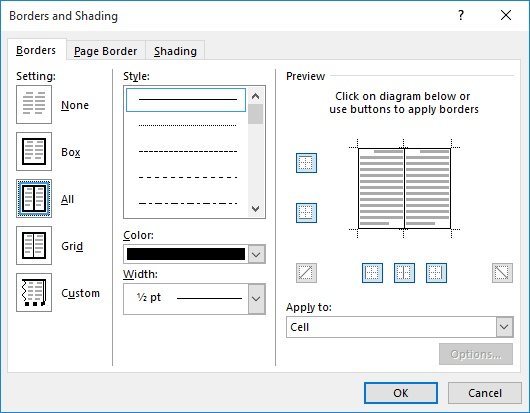
Figure 2. The Borders tab of the Borders and Shading dialog box.
These steps remove all borders from all paragraphs and tables within the document. If there are some borders you really want to keep, then you should simply modify step 1 so that you select only those paragraphs that have borders you want to get rid of.
For more information on getting rid of stubborn lines that Word automatically adds to your document, see the following page at Suzanne Barnhill's site:
http://wordfaqs.ssbarnhill.com/TroublesomeLines.htm
WordTips is your source for cost-effective Microsoft Word training. (Microsoft Word is the most popular word processing software in the world.) This tip (6067) applies to Microsoft Word 2007, 2010, 2013, 2016, 2019, 2021, and Word in Microsoft 365. You can find a version of this tip for the older menu interface of Word here: The Line that Won't Go Away.

Learning Made Easy! Quickly teach yourself how to format, publish, and share your content using Word 2021 or Microsoft 365. With Step by Step, you set the pace, building and practicing the skills you need, just when you need them! Check out Microsoft Word Step by Step today!
Smart quotes can add a finishing touch to your text. You might expect that when AutoCorrect is used to add text, it would ...
Discover MoreWord provides several built-in tools that can affect how what you type is formatted. One of those tools can even change ...
Discover MoreType a few dashes, underscores, or equal signs, and you could end up with a full-width line in your document. This is ...
Discover MoreFREE SERVICE: Get tips like this every week in WordTips, a free productivity newsletter. Enter your address and click "Subscribe."
2025-05-19 07:25:38
Paul Stregevsky
Michael Farris,
Good luck using a Word competitor to collaborate with teammates in OneDrive or Sharepoint Online.
2025-05-18 18:04:11
Tomek
@Michael Farris:
Do you know if any of those free word processors can handle macros created specifically for MS Word? And if so, are there also equivalent spreadsheet programs that can run Excel macros?
2025-05-17 16:59:40
Michael Farris
I see this same issue in Goggle from 2017. There is really a simple solution: change to a word processor that hasn't been broken for 8 years and had at least three major version releases. There are plenty of them available for free and they will read and write Word documents.
2024-09-12 16:18:36
Fern Goldstein
THANK YOU!!!!! I'm trying to format my novel, and this line appeared that I couldn't get rid of until now.
Got a version of Word that uses the ribbon interface (Word 2007 or later)? This site is for you! If you use an earlier version of Word, visit our WordTips site focusing on the menu interface.
Visit the WordTips channel on YouTube

FREE SERVICE: Get tips like this every week in WordTips, a free productivity newsletter. Enter your address and click "Subscribe."
Copyright © 2026 Sharon Parq Associates, Inc.
 Please Note:
This article is written for users of the following Microsoft Word versions: 2007, 2010, 2013, 2016, 2019, 2021, and Word in Microsoft 365. If you are using an earlier version (Word 2003 or earlier), this tip may not work for you. For a version of this tip written specifically for earlier versions of Word, click here:
Please Note:
This article is written for users of the following Microsoft Word versions: 2007, 2010, 2013, 2016, 2019, 2021, and Word in Microsoft 365. If you are using an earlier version (Word 2003 or earlier), this tip may not work for you. For a version of this tip written specifically for earlier versions of Word, click here:
Comments