Written by Allen Wyatt (last updated August 25, 2023)
This tip applies to Word 2007, 2010, 2013, 2016, 2019, and 2021
David created a form in Word. When he exports the data for a single form, he should get one long line of comma separated (CSV) information. Unfortunately, the content of some fields has returns in them. This means he gets a new line in the CSV every time this occurs. David wonders about the best way to handle this situation.
There are a couple of ways you could handle this situation. The first potential approach is to create a macro that is run whenever a form control is exited. This macro could be tied to the text form fields so that the contents of the fields are examined, and returns replaced with different characters, such as a space. Here's an example of such a macro:
Sub RemoveReturns()
    Dim sTemp as String

    sTemp = ActiveDocument.FormFields("Text1").Result
    sTemp = Replace(sTemp, vbCrLf, " ")
    ActiveDocument.FormFields("Text1").Result = sTemp
End Sub
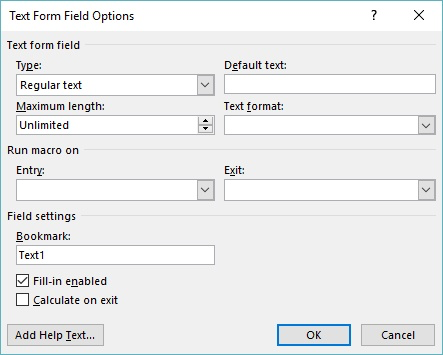
All the macro does is grab the contents of the form field, replace the returns (vbCrLf) with spaces, and put the contents back into the form field. You can tie the macro to the form field in the following manner:

Figure 1. The Text Form Field Options dialog box.
Another approach is to get rid of the return characters after the CSV file is created (by exporting the form data). The CSV file is plain text, which means it can be loaded into a Word or a text editor. You could then use the Find and Replace features of the program to search for the returns and replace them with spaces. In doing so, however, you need to be careful of two things. First, you need to make sure you don't replace all returns—you want the ones at the end of each line in the CSV to remain as they are. Second, you need to make sure you save the CSV document back out without any formatting, meaning as a plain text file.
Note:
WordTips is your source for cost-effective Microsoft Word training. (Microsoft Word is the most popular word processing software in the world.) This tip (5913) applies to Microsoft Word 2007, 2010, 2013, 2016, 2019, and 2021.

Create Custom Apps with VBA! Discover how to extend the capabilities of Office 365 applications with VBA programming. Written in clear terms and understandable language, the book includes systematic tutorials and contains both intermediate and advanced content for experienced VB developers. Designed to be comprehensive, the book addresses not just one Office application, but the entire Office suite. Check out Mastering VBA for Microsoft Office 365 today!
In order to use a form in Word, it must be protected. This means that you cannot make any changes to the form, even if ...
Discover MoreWord doesn't require you to protect entire documents. Instead, you can protect different sections within a document, as ...
Discover MoreOne of the many uses for Word is to create forms that can be easily filled in by other people. This is made possible by ...
Discover MoreFREE SERVICE: Get tips like this every week in WordTips, a free productivity newsletter. Enter your address and click "Subscribe."
There are currently no comments for this tip. (Be the first to leave your comment—just use the simple form above!)
Got a version of Word that uses the ribbon interface (Word 2007 or later)? This site is for you! If you use an earlier version of Word, visit our WordTips site focusing on the menu interface.
Visit the WordTips channel on YouTube
FREE SERVICE: Get tips like this every week in WordTips, a free productivity newsletter. Enter your address and click "Subscribe."
Copyright © 2026 Sharon Parq Associates, Inc.
Comments