In Word 2010 and earlier, when Michael turned on the Show Text Boundaries configuration, Word simply marked the four edges of the printable area of each page in my document. In Word 2013 and Word 2016, turning on this option places "boundaries" around each paragraph in the document, rather than just the pages. Michael wonders if there is a way to make Show Text Boundaries work like it used to instead of what it has now become.
The short answer is no, there is no way to make it work like it used to. Microsoft redid the programming behind the page layout capabilities of Word 2013, and that "redo" made the text boundaries into what you see now. There are some things you can do to work around it (like put your text inside tables or text boxes), but those are bound to be ultimately unsatisfying.
There is a groundswell of people urging Microsoft to restore text boundaries to what they used to be, and there is an online place to make your voice heard. (This is a very long URL; be careful you enter it all into your browser completely.)
https://word.uservoice.com/forums/304924-word-for-windows-desktop-application/suggestions/9253599-bring-back-classic-text-boundaries
Whether Microsoft will listen or not still remains to be seen.
In the meantime, there is one thing you may try out. If you used text boundaries to simply show the limits of your text area, you may be able to achieve the same thing by turning on crop marks. Follow these steps:
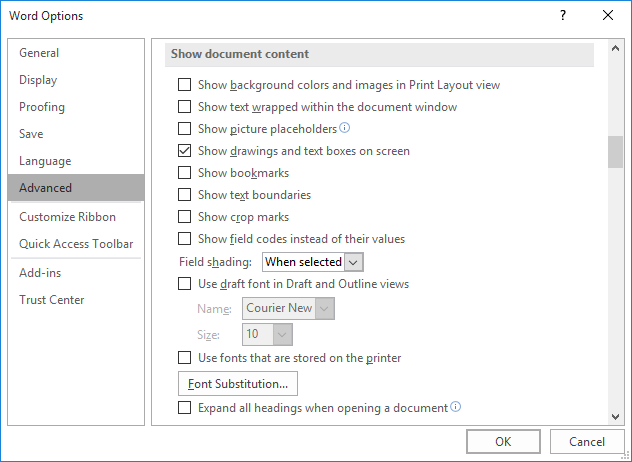
Figure 1. Advanced options in the Word Options dialog box.
The crop marks appear at all four corners of the page and allow you to "eyeball" where the text boundaries actually occur on the page.
WordTips is your source for cost-effective Microsoft Word training. (Microsoft Word is the most popular word processing software in the world.) This tip (533) applies to Microsoft Word 2007, 2010, 2013, and 2016.

Learning Made Easy! Quickly teach yourself how to format, publish, and share your content using Word 2021 or Microsoft 365. With Step by Step, you set the pace, building and practicing the skills you need, just when you need them! Check out Microsoft Word Step by Step today!
Many people use the keyboard to do their primary editing tasks. Word doesn't limit you to the keyboard, however. You can ...
Discover MoreLet's face it, there are times that the text in a task pane or dialog box is just too small to read. If you want to ...
Discover MoreFunction keys are often used, in Word, for common operations. You can, if desired, change the way in which a function key ...
Discover MoreFREE SERVICE: Get tips like this every week in WordTips, a free productivity newsletter. Enter your address and click "Subscribe."
2022-01-20 09:43:33
regit
You can do an additional hack for simpler documents.
After you have the crop marks displayed, edit the header and place vertical lines along the left and right crop marks and horizontal lines along the top and bottom crop marks. Of course, you can write a little macro to create a simple toggle show/hide the lines and another to delete them.
If the crop marks include data for their location, then you can make us of that in a macro to insert the lines for you instead of inserting them manually.
2020-10-08 08:33:39
Robert W. Jamison
I posted this to the Microsoft suggestion page:
I use some specific terms such as "S election" and "F reorganization." From 1985 to about a week ago, word did not flag these. Now the spell checker flags every instance and the only options are to accept the suggestion (which I don't) or to ignore it once. That has become a major time-waster. Please undo the recent change or at lest allow the user to add these terms to the custom dictionary. The former would be preferable. The latter would be acceptable.
I find that Grammarly is no help, and is even worse than word on this issue. Are there other workarounds or add-on programs that might help?
2020-05-26 10:29:43
Paul Stregevsky
Thanks, Tim Slager. Your tip--to use Show Gridlines--is working for me. My margins are 1 inch all around. So I've set Horizontal spacing to 6.5 inches (8.5 -minus 2). I've also set Vertical spacing to 9 (11 minus 2). And being too lazy to use the ribbon, I've added the Gridlines checkbox to my Quick Access Toolbar.
Now the only problem will be that if I save the document with the gridlines showing, colleagues who review or edit my documents will go, "Paul, what have you done to the borders!?" Even if they know that the gridlines won't show up when printed, I can assure you that they'll be annoyed.
Or will the gridlines be hidden when the document is opened on someone else's computer?
2020-05-25 05:57:50
MZ
Another workaround to get rid of line boundaries showing if you choose "show text boundaries options" is to use manual line break instead of paragraph mark by using SHIFT+RETURN each time you add a new paragraph. This way line boundaries will not show, but the boundary of the last line will show; (see Figure 1 below) The reason I guess in word you cannot change the end paragraph mark in a page into manual line break until you reach a new page, and the last line boundary will show on this. You can still use the option of "show crop marks" to show 4 corner boundaries. (see Figure 2 below)
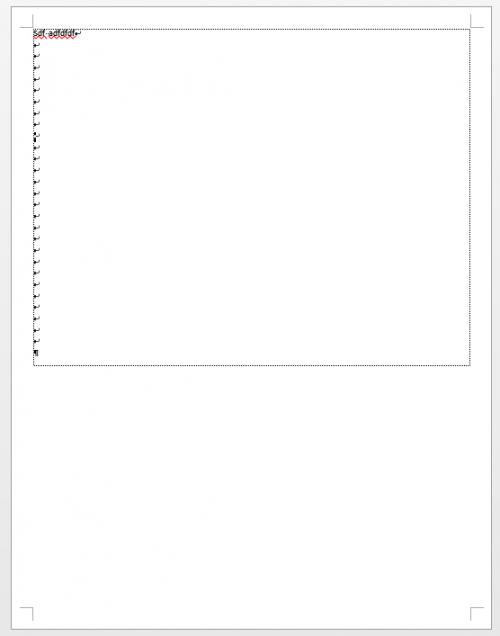
Figure 1.
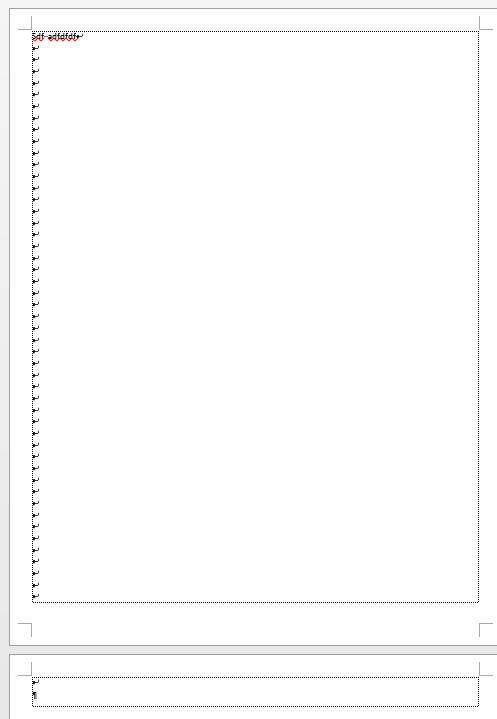
Figure 2.
2019-08-08 08:47:12
Sukhdev
Thanks, nice workaround.
2019-02-19 13:56:44
D
Now, this works for me. The crop marks let me the actual page boundary. Thank you.
2019-01-08 16:13:18
Tim Slager
Workaround:
Use Grid Settings (add to Quick Access Toolbar)
Set Horizontal spacing to width of page minus margins.
Select Use margins.
Select Display gridlines on screen.
Select Vertical every: 1
To toggle on and off, click icon on QAT or select/clear Gridlines on View tab.
2018-09-21 11:23:02
hoonose
Here are my two pennies for the subject. I make use of the gridlines to display text boundaries in the pre-2013 style. The below macro switches those boundaries on/off.
Sub view_page_boundaries()
' provide page boundaries using a customised page grid
With Selection
ActiveDocument.GridOriginFromMargin = False
' uncomment to have page boundaries like standard for pre-2013
' ActiveDocument.GridOriginFromMargin = True
If ActiveDocument.GridOriginFromMargin = False Then
' display crossing boundaries at full width and height
ActiveDocument.GridDistanceHorizontal = .PageSetup.PageWidth - .PageSetup.LeftMargin - .PageSetup.Gutter - .PageSetup.RightMargin
ActiveDocument.GridDistanceVertical = .PageSetup.PageHeight - .PageSetup.TopMargin - .PageSetup.BottomMargin
Else
' display boundaries like those in pre-2013
' 0.05 is half-millimeter to prevent cutting off the right and bottom boundaries by the margins
ActiveDocument.GridDistanceHorizontal = CentimetersToPoints(Round(PointsToCentimeters( _
.PageSetup.PageWidth - .PageSetup.LeftMargin - .PageSetup.Gutter - .PageSetup.RightMargin), 1) - 0.05)
ActiveDocument.GridDistanceVertical = CentimetersToPoints(Round(PointsToCentimeters( _
.PageSetup.PageHeight - .PageSetup.TopMargin - .PageSetup.BottomMargin), 1) - 0.05)
ActiveDocument.GridOriginHorizontal = .PageSetup.LeftMargin + .PageSetup.Gutter
ActiveDocument.GridOriginVertical = .PageSetup.TopMargin
End If
If Options.DisplayGridLines = False Then
Options.DisplayGridLines = True
' do not need cropmarks at all with crossing boundaries
ActiveWindow.View.ShowCropMarks = False
ActiveDocument.GridSpaceBetweenHorizontalLines = 1
ActiveDocument.GridSpaceBetweenVerticalLines = 1
Else
Options.DisplayGridLines = False
' display cropmarks when there are no boundaries
ActiveWindow.View.ShowCropMarks = True
ActiveDocument.GridSpaceBetweenHorizontalLines = 2
ActiveDocument.GridSpaceBetweenVerticalLines = 2
End If
End With
End Sub
Note that the produced boundaries are a bit improved: they extend at the full page width and height, crossing in the corners. If you like boundaries that look just like a rectangle, like it was in Office before 2013, remove ' at the start of this line:
' ActiveDocument.GridOriginFromMargin = True
*Downside*: There will be the same boundaries for the whole document, so if you have multiple sections with different size margins, their boundaries will be like those of the section that is current at the moment when you run the macro.
2018-02-09 14:18:23
Nikos
Using Word 2013, also missing the classic text boundaries. I have found a way to avoid this for new documents, by using compatibility mode, which seems to disable the new layout engine. Unfortunately you will also lose the new formatting capabilities, such as Themes.
Instructions.
1) Create a new document and save as MS Word 97-2003 (*.doc)
2) Save this document again as MS Word (*.docx), making sure that the checkbox "Maintain compatibility with previous Word versions" is selected.
2017-10-12 13:04:29
Eldren Williams
I too dislike the new text boundary in 2016. A temporary work around is to select "view/gridlines" on the toolbar. You can always deselect when not in use.
2016-08-13 18:38:59
Stephen Gray
Microsoft listen to their customers? You must be dreaming.
2016-08-10 08:57:36
Nan
So annoying. I've occasionally resorted to using the full page grid. Unfortunately, I can't make that grid light gray, so I just turn it on,check boundaries, and turn it off. Thanks for this tip!
2016-08-08 14:58:34
Sharon
Shhhh, I have Word 2013 and mine is working as before...
2016-08-08 03:57:37
Uwe
A very good example for all the things that got changed from version to version whithout anybody asking for it.
In German there is a word for it: "verschlimmbessern". It's a nerdy thing: to be so keen to improve one point that you lose the overview of the whole thing and make it worse in the end.
2016-08-06 23:10:12
Grace M
Thank you ... This is helpful. I have left comments to Word about the text boundaries. They only allow you one vote on this (I tried to do it a second time). Since people have been trying to get Word to change their mind about text boundaries for three years, I don't know how much hope there is for us who want the change back.
Thank you for your help and your tips. When I need Word help and search on line, your tips frequently come up. Thanks a bunch.
Got a version of Word that uses the ribbon interface (Word 2007 or later)? This site is for you! If you use an earlier version of Word, visit our WordTips site focusing on the menu interface.
Visit the WordTips channel on YouTube

FREE SERVICE: Get tips like this every week in WordTips, a free productivity newsletter. Enter your address and click "Subscribe."
Copyright © 2026 Sharon Parq Associates, Inc.
Comments