Guy has a custom page size in Word (4.75 inches by 7.15 inches) that matches the InDesign document that the Word files eventually get placed in (his is a press job). This helps the authors see what fits on a page. When Guy prints the drafts in Word for editing, he expects to see a small block of text printed in the middle of a letter-sized piece of paper. Instead, Word enlarges the content so that it fills the letter-sized paper. He wonders if there is a way to make Word do what he is expecting.
There are actually a couple of things that you must take into account in order to get the effect you want. First, you need to tell Word to not scale your text. There are actually a few ways you can do this. One way is to follow these steps:
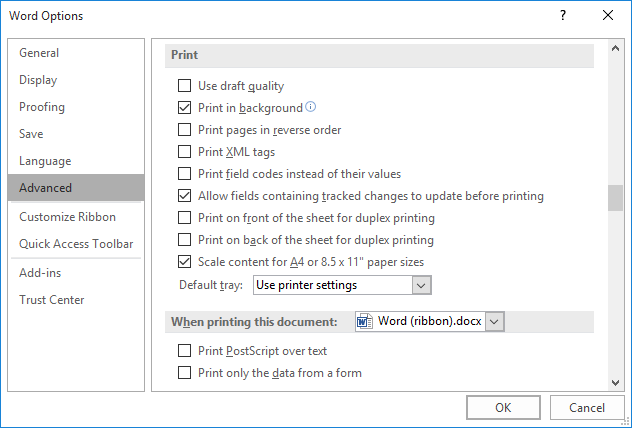
Figure 1. The advanced options of the Word Options dialog box.
If you are using Word 2007, you can also use the Print dialog box (simply press Ctrl+P to display it). In the lower-right corner of the dialog box is the Scale to Paper Size drop-down list. (See Figure 2.)
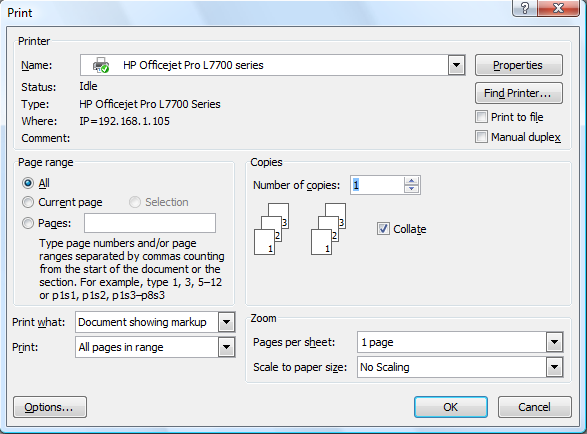
Figure 2. The Print dialog box.
Use the drop-down list to choose No Scaling.
If you are using a later version of Word, display the print settings by (again) pressing Ctrl+P. In the options provided, note the very last drop-down list, just above the Page Setup link. (See Figure 3.)
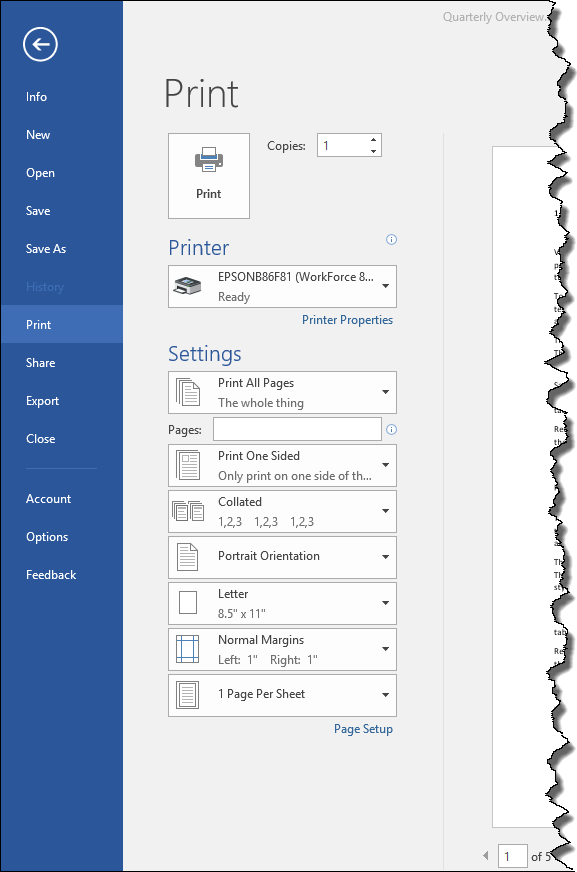
Figure 3. Print options in later versions of Word.
In the screen shot, the drop-down list is set to 1 Page Per Sheet. If you click this drop-down list, you'll see a series of options, with the last being Scale to Paper Size. Hover over that option, and then choose No Scaling.
With the scaling turned off, you won't experience the "enlarging" of the text that Guy noted. However, the content still won't be centered in the middle of the page, as Guy expected. Let's assume that Guy's 4.75 x 7.15 paper size uses half-inch margins on all sides. When Guy prints on letter-sized paper, the content will be half an inch from the left margin, half an inch from the top margin, and the right and bottom margins will be huge. In other words, his text will be aligned to the upper-left corner of the printed page.
The only way to get the text centered is to not use a custom paper size, but instead play with the margins. The paper size should always match what you are actually printing on. In Guy's case, this means letter-size, or 8.5 x 11. If his target is paper that is only 4.75 inches across with half-inch left and right margins, this means his "text block" is only 3.75 inches across. If you subtract 3.75 inches from 8.5 inches, you end up with 4.75 inches. Divide that by 2 (for left and right margins) and you end up with 2.375 inches. This is the margin you should set on both the left and right sides.
You follow the same process for the top and bottom margins. If the target paper is 7.15 inches from top to bottom with half-inch top and bottom margins, that means the text block is only 6.15 inches. Subtract that from 11 inches, and you end up with 4.85. Divide this by 2 and you end up with top and bottom margins of 2.425 inches.
Set up the margins in this manner, and you end up with the small block of text printed in the middle of a letter-sized piece of paper, just like Guy wanted.
WordTips is your source for cost-effective Microsoft Word training. (Microsoft Word is the most popular word processing software in the world.) This tip (135) applies to Microsoft Word 2007, 2010, 2013, 2016, 2019, 2021, and Word in Microsoft 365.

Create Custom Apps with VBA! Discover how to extend the capabilities of Office 365 applications with VBA programming. Written in clear terms and understandable language, the book includes systematic tutorials and contains both intermediate and advanced content for experienced VB developers. Designed to be comprehensive, the book addresses not just one Office application, but the entire Office suite. Check out Mastering VBA for Microsoft Office 365 today!
Documents can contain images, as you already know. What if you spend a lot of time adding images to your documents, but ...
Discover MoreIf you want to force Word to print some of its colors in black and white, you may be out of luck. One bright spot, as ...
Discover MoreIf you notice that the margins on a printout aren't the same as those you have set within Word, there could be any number ...
Discover MoreFREE SERVICE: Get tips like this every week in WordTips, a free productivity newsletter. Enter your address and click "Subscribe."
There are currently no comments for this tip. (Be the first to leave your comment—just use the simple form above!)
Got a version of Word that uses the ribbon interface (Word 2007 or later)? This site is for you! If you use an earlier version of Word, visit our WordTips site focusing on the menu interface.
Visit the WordTips channel on YouTube

FREE SERVICE: Get tips like this every week in WordTips, a free productivity newsletter. Enter your address and click "Subscribe."
Copyright © 2026 Sharon Parq Associates, Inc.
Comments