Written by Allen Wyatt (last updated June 3, 2023)
This tip applies to Word 2007, 2010, 2013, and 2016
Heather often works with templates that have three-row tables already present (i.e. a header row plus three empty rows). Sometimes, she needs to add 10 or 20 rows to the table. To insert the rows, Heather highlights the three existing rows and clicks 'Insert Row Below.' She then selects all six rows and repeats the process, until she has the number of rows she needs. This is tedious, so Heather is wondering if there's a way to simply tell Word how many rows she wants to add, rather than having to take this patchwork approach or create a whole new table.
There are actually many different ways you can add the rows you want to the table. (Flexible? Yep. Word is flexible!) One way is to rely on the trusty F4 key. Insert a single row into your table, and then repeatedly press the F4 key until you have the number of rows you want. The F4 key repeats whatever your last action was, and since the action just before you pressed it was to insert a row, that's what each press of F4 accomplishes.
Another approach is to position the insertion point in the very last (bottom-right) cell of the table. Press the Tab key and Word adds a row to the table. The reason it does this is because the Tab key actually moves to the next cell in the table. Since there is no "next cell," Word creates one by adding the row. As you continue to press Tab, the insertion point moves through the cells in the new row until it gets to the last cell and, pressing Tab another time again adds a new row. It is more keypresses than the F4 method, but if your table doesn't have a lot of columns is easy to do.
An easy way that I often use to add multiple rows is to select one of the rows, press Ctrl+C (to copy the row to the Clipboard) and then immediately start pressing Ctrl+V. Each press of Ctrl+V adds another row to the table.
If you are using Word 2013 or a later version, you can also insert table rows easily using the mouse. Make sure the insertion point is somewhere within the table, and then move the mouse pointer just to the left of the table and between two rows. Word displays an "insert indicator." (See Figure 1.)
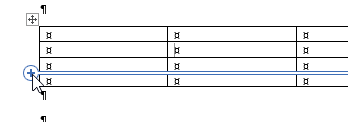
Figure 1. Inserting a table row in Word 2013 and later versions.
Click the plus sign on the indicator as many times as you want; each click inserts a new row.
You could also position the insertion point immediately below the existing table and use the Insert Table option (on the Insert tab of the ribbon, click the Table tool and then choose Insert Table). In the resulting dialog box, specify how many columns you want (the same as the number in your current table) and how many rows. When you click OK, Word inserts the rows and makes them a continuation of the previous table. You may need to adjust the column widths on the new rows to match the existing rows, but you'll get exactly the number of rows you want with one action.
If you would like to use a macro to do the trick, this one is particularly helpful.
Sub AddTableRows()
    If Selection.Information(wdWithInTable) Then
        Application.Dialogs(wdDialogTableInsertRow).Show
    Else
        MsgBox "Insertion point not in a table!"
    End If
End Sub
All you need to do is to make sure the insertion point is within the table and then run the macro. (Remember you can assign it to the Quick Access Toolbar or a shortcut key.) When you do, you'll see the Insert Rows dialog box. (See Figure 2.)
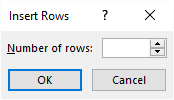
Figure 2. The Insert Rows dialog box.
Just enter the number of rows you want and when you click OK, Word inserts that number into the table.
Note:
WordTips is your source for cost-effective Microsoft Word training. (Microsoft Word is the most popular word processing software in the world.) This tip (13454) applies to Microsoft Word 2007, 2010, 2013, and 2016.

Create Custom Apps with VBA! Discover how to extend the capabilities of Office 365 applications with VBA programming. Written in clear terms and understandable language, the book includes systematic tutorials and contains both intermediate and advanced content for experienced VB developers. Designed to be comprehensive, the book addresses not just one Office application, but the entire Office suite. Check out Mastering VBA for Microsoft Office 365 today!
Tired of Word changing the dimensions of table cells to accommodate what you place in those cells? You can instruct Word ...
Discover MoreTables can be great for organizing and presenting information in a document. If you find there is not enough white space ...
Discover MoreWant to move a row in a table very easily? You can do so by using the same editing techniques you are already using.
Discover MoreFREE SERVICE: Get tips like this every week in WordTips, a free productivity newsletter. Enter your address and click "Subscribe."
There are currently no comments for this tip. (Be the first to leave your comment—just use the simple form above!)
Got a version of Word that uses the ribbon interface (Word 2007 or later)? This site is for you! If you use an earlier version of Word, visit our WordTips site focusing on the menu interface.
Visit the WordTips channel on YouTube

FREE SERVICE: Get tips like this every week in WordTips, a free productivity newsletter. Enter your address and click "Subscribe."
Copyright © 2026 Sharon Parq Associates, Inc.
Comments