Written by Allen Wyatt (last updated January 26, 2026)
This tip applies to Word 2007, 2010, 2013, 2016, 2019, 2021, 2024, and Word in Microsoft 365
Keryn works at a bilingual university and often has English and Spanish mixed together in the same document. She has to manually select the text and set to review in Spanish. This can be very time consuming. Keryn wonders if there is a way to tell Word to review in two languages, by default. She knows this can increase the likelihood of spelling errors but it would be easier, for her, than selecting and setting languages over and over again.
Word cannot, by default, review in two different languages. As Keryn has discovered, you need to do something in order to tell Word what should be checked in which language. Once that specification is done, then Word can do the review in a single pass.
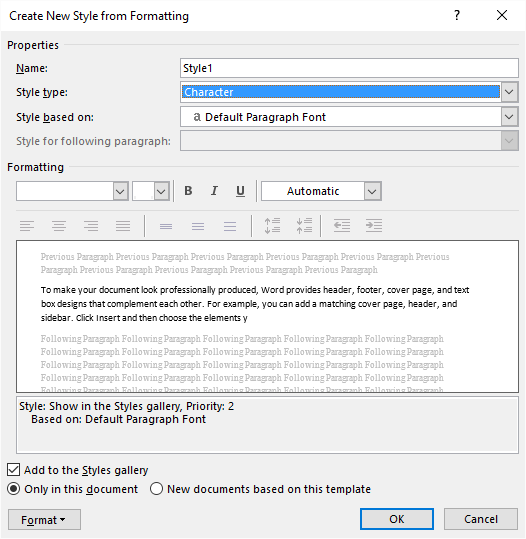
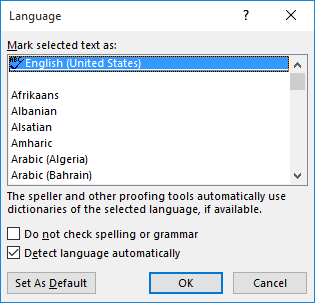
You can make the "specifying" process easier if you use styles in your document. Language (such as English or Spanish) is an attribute you can specify in a style. So, for instance, you could create a character style named something like "Spanish Text" and make sure that the style definition has the language for that style set to Spanish. Here are the steps to do that:

Figure 1. The Create New Style from Formatting dialog box.

Figure 2. The Language dialog box.

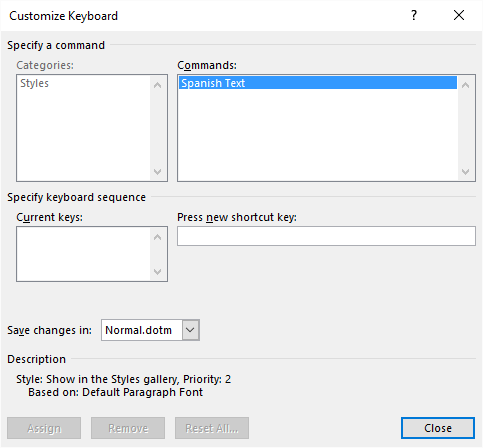
Figure 3. The Customize Keyboard dialog box.
You've now created the style you want to use for your Spanish text. You would then apply that style to any words you type in Spanish, and Word would take care of doing the spelling and grammar checks appropriately. If you defined a shortcut key for the style (steps 9 through 12) then you can use the shortcut key to apply the style to whatever text you selected.
The bottom line is that it is much easier to apply a style to selected text than it is to continually change the Language setting for selected text.
WordTips is your source for cost-effective Microsoft Word training. (Microsoft Word is the most popular word processing software in the world.) This tip (13441) applies to Microsoft Word 2007, 2010, 2013, 2016, 2019, 2021, 2024, and Word in Microsoft 365.

Create Custom Apps with VBA! Discover how to extend the capabilities of Office 365 applications with VBA programming. Written in clear terms and understandable language, the book includes systematic tutorials and contains both intermediate and advanced content for experienced VB developers. Designed to be comprehensive, the book addresses not just one Office application, but the entire Office suite. Check out Mastering VBA for Microsoft Office 365 today!
If you use styles to format your document, you might want a way to print the document and show, to the left of each ...
Discover MoreWord can hyphenate documents automatically, if you want it to. But what about those situations where you want most of a ...
Discover MoreOne of the features of Word that can cause some problems is one that allows styles to be automatically updated based upon ...
Discover MoreFREE SERVICE: Get tips like this every week in WordTips, a free productivity newsletter. Enter your address and click "Subscribe."
2020-11-27 02:56:41
Patrick
Our company works routinely with two languages altough not necessarily in the same document. It seems to require maintaining two sets of templates, with different standard text, different language setting in all styles, and different logo. Any ideas how I would synchronise those two sets?
2016-04-23 13:18:43
Chris
For anyone working with more than one language, it's useful to have the current language displayed in the status bar. To achieve that, right-click on the status bar and check the box next to "Language".
I use macros to switch languages, with keyboard shortcuts to make it quick and easy. 1) Click on the record macro button on the status bar. 2) Name the macro (e.g. MySetLanguageSpanish). 3) Click the option to assign to keyboard. 4) Type the shortcut key combination. As I use lots of shortcuts for other things, I group all my language shortcuts together by using a prefix combination (Alt-L for language) followed by a single key for the particular language I want (so: Alt-L followed by s for Spanish). 5) Click Assign and then Close. 6) Click on the current language in the status bar and scroll down the list to find the language you want (e.g. Spanish (International Sort)); click on it. 7) Click on the Stop recording macro button on the status bar. Done.
Got a version of Word that uses the ribbon interface (Word 2007 or later)? This site is for you! If you use an earlier version of Word, visit our WordTips site focusing on the menu interface.
Visit the WordTips channel on YouTube
FREE SERVICE: Get tips like this every week in WordTips, a free productivity newsletter. Enter your address and click "Subscribe."
Copyright © 2026 Sharon Parq Associates, Inc.
Comments