Written by Allen Wyatt (last updated September 13, 2021)
This tip applies to Word 2007, 2010, and 2013
Anne is having problems getting the spacing above and below her tables to work properly. The paragraph styles she uses for her document body have 6 points before and 6 points after, which provides an aggregated 12 points between paragraphs. However, this spacing doesn't seem to apply (at least not properly) before and after tables. She is looking for the best way to control spacing before and after tables.
There are only two ways to adjust the spacing, and the method you use depends on how the table itself is formatted within your document.
Tables can be either inline or not, the same as text boxes and graphics. When you insert a table it is, by default, inserted inline. You can adjust spacing before and after a table my making it non-inline, which is a particularly good approach if your table extends across the entire width of the page. Follow these steps:
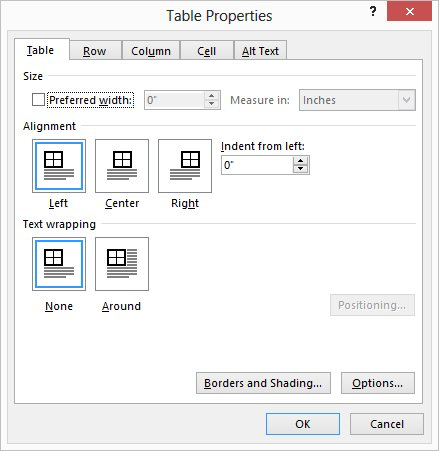
Figure 1. The Table tab of the Table Properties dialog box.
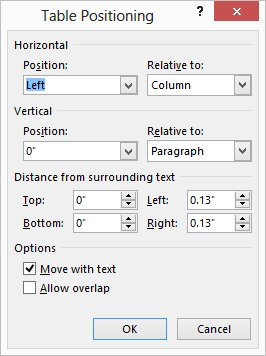
Figure 2. The Table Positioning dialog box.
There is one drawback with this approach: Your table now is treated as an independent element in the document, which means that text can flow around it. If you need the table to always be after a particular paragraph, then you'll want to check after any heavy editing that it is still where you expect it to be.
If you want your table to remain inline, then the proper approach to take is to adjust the spacing on the paragraph immediately before the table and the paragraph immediately after the table. If you are using styles, as Anne does, the easiest way to do this is to create two additional styles based on whatever body style you are using in your document. One style would be for the paragraph before the table and the other for the paragraph after.
For instance, let's say you create two styles called TableBefore and TableAfter. You could format the TableBefore style so that the Space After setting is however-many points you want to appear between the text and the table. You can then format the TableAfter style so that the Space Before setting is likewise reflective of the space you want after the table. Apply the styles appropriately, and your table should appear "spaced" properly.
It should be noted that it does no good to try to adjust the spacing of any of the paragraphs within the table, particularly if the table has borders visible. That will only adjust the spacing within the table cell in which the paragraph is located and won't affect the actual space between the table and the surrounding paragraphs.
WordTips is your source for cost-effective Microsoft Word training. (Microsoft Word is the most popular word processing software in the world.) This tip (11729) applies to Microsoft Word 2007, 2010, and 2013.
The First and Last Word on Word! Bestselling For Dummies author Dan Gookin puts his usual fun and friendly candor back to work to show you how to navigate Word 2013. Spend more time working and less time trying to figure it all out! Check out Word 2013 For Dummies today!
When creating tables, Word automatically sets the size of the cells. But what if you want to make sure each cell is a ...
Discover MoreWhen working with tables (particularly those created by others), you can spend a large amount of time getting the ...
Discover MoreNeed a way to make sure your text fits within the space available in a table cell? Word has a handy setting that will ...
Discover MoreFREE SERVICE: Get tips like this every week in WordTips, a free productivity newsletter. Enter your address and click "Subscribe."
2023-06-23 03:52:02
Nomfundo
It worked. Thank you.
2022-05-05 23:37:20
Lisa
Thank you!!
2022-04-27 13:10:04
Kevin
Thanks this was driving me crazy!! Great tip!
2021-09-03 08:19:58
Ken
If you want an "around" table to always follow a particular paragraph simply give the preceding paragraph the Keep with next attribute.
When a caption is applied to a table using the Insert Caption of the References ribbon then the caption paragraph it is automatically given Keep with next.
2021-09-02 09:33:36
Jessica
I found out the issue I was having and here is how I fixed it. Triple-click to select the space between the tables. Open Paragraphs by using the toolbar at the top or right-clicking and selecting Paragraph. Under SPACING, "After:" was set to 8 pt for some reason. Once I reduced it to 0 pt, the spacing between the tables returned to normal line spacing. [{fig}}
2021-08-24 19:04:08
Malantheon
OK, here is the trick that I use: I adjust the space after tables in my document by inserting an extra row in the table and assigning paragraph style to the cells on this row - Table-last-line.
This has some advantages:
- by modifying this style I can modify the width of the space after the table
- table cells can have keep with next attribute defined in their style, this keeping tables together. Table-last-line does not use keep with next.
- the "space" is attached to the table rather then to the following paragraph, thus if I need to shuffle paragraphs around, it does not matter whether these were right after tables or not.
Disadvantage:
- empty cells inside the table are not accessibility friendly approach
2021-07-14 03:04:22
RP
Doesn't work - we are not even getting the highlights or selection which you are mentioning..
2021-05-07 07:49:36
Riette
THANK YOU! I had ONE table that was giving me problems and this solved it.
2020-11-10 11:08:14
Ella Kowalski
This is very helpful! Thank you ^_^
2020-08-20 09:38:43
Paul Stregevsky
"F" wrote: "I've deleted any vertical space between the tables, put the positioning on 0 (deleted spacing before/after paragraphs), disabled overlay but they still collide/scale up/go crazy when you try to move them too close to each other. Does anyone have any idea what might be wrong? I didn't make this document, I'm just trying to correct and format it."
To prevent neighboring wrap-type tables from overlapping, take three steps:
1. Under Table Properties > Positioning, clear the checkbox "Allow overlap." You've already done that.
2. Under Table Properties > Positioning, stagger (or alternate) the horizontal positioning of neighboring tables. If one table is positioned "Left relative to column," position the next table "Right relative to column." Of course, your carefully laid arrangement can unravel if a new table is inserted or an old table is moved. But that's something you can fix.
3. Adjust the table widths to get neighbors to "play nice." Some tables might need to be widened.
By practicing all three steps, I've created documents whose wrapped tables and wrapped text boxes "play nice" together.
2020-08-20 08:38:50
Paul Stregevsky
"There is one drawback with this approach: Your table now is treated as an independent element in the document, which means that text can flow around it."
Which in turn creates a second drawback: If your wraparound table spills onto a second page, the header row won't repeat.
2020-08-19 04:03:54
Bert Hooyman
I like your non-inline trick a lot. To prevent text from appearing to the right of a table that is not full-width, insert a text-wrapping break.
Regarding the solution for inline tables, rather than creating a variant Body style, I prefer to create a 'Filler' style, with a line spacing of exactly 6 points. And simply add an empty line with that style.
This works regardless of what style comes before/after the table, and has lots of other use cases.
2020-03-03 14:06:52
F
I've deleted any vertical space between the tables, put the positioning on 0 (deleted spacing before/after paragraphs), disabled overlay but they still collide/scale up/go crazy when you try to move them too close to each other. Does anyone have any idea what might be wrong? I didn't make this document, I'm just trying to correct and format it.
2017-11-27 13:52:54
John M
Allen says, “If you want your table to remain inline, then the proper approach to take is to adjust the spacing on the paragraph immediately before the table and the paragraph immediately after the table.”
If your table needs to stay inline and your table does not have (top/bottom) borders, you can cheat by setting white (top/bottom) borders equal in width to the desired space.
This lets you avoid creating and managing the extra paragraph styles Allen describes.
2017-04-25 05:42:27
Christian Land Hansen
What i f I need to remove spacing between two tables, and still have word treating the tabes as two tables?
My goal: I want row nb. 2 to be shown as Top row on all followong pages.
2017-03-29 15:15:40
Pilar
Fantastic, THANK YOU ! Very well explained. I was having trouble with a table that was displaying several lines below the title. I had to change the positioning of the table defaults ! It worked, THANK YOU !
2016-05-10 07:18:13
claire
I need to make a space between two tables row and I don't want the space row to be a table.
Word 2010
Thank you
2016-01-18 00:51:37
You wrote at the top of this page that spacing before and after paragraphs aggregates (or sums) between both the paragraph above and the paragraph below. But i checked it out and it doesn't seem to sum in Word 2010.
Word seems to just check that the greater one is satisfied.
2015-10-13 12:52:24
Paul Franklin Stregevsky
Marilyn,
The behavior you've described is called called HTML auto spacing. In Word 2007 and 2010, you can disable it by File > Option > Advanced > Layout Options. ? > Don't use HTML paragraph autospacing. But like so many Word settings, that setting may contend with a competing setting set elsewhere--say, for Normal or tables.
2015-10-12 22:51:11
Dmitry
Thank you for the valuable tips. Cheers
2013-09-25 10:21:01
Marilyn
Is the spacing between 2 paragraphs the result of some deep hidden selection? Word 2010 on my computer will use the larger of the after setting on the preceding paragraph and the before setting on the current paragraph.
2013-09-24 08:30:54
Doug Vetter
Hi Allen. Thanks for your interest in my comment. I use Word 2007 and determined this behavior through experimentation. When setting up templates, understanding this behavior allows greater flexibility in how paragraphs interact. I use 6 points before and 6 points after on my body text, and 0 points after on my headings. I have an optional subheading style that uses 0 points before and 6 points after. So the spacing between headings and body text is 6 points, and the spacing between body text paragraphs is 6 points; but when I include a subheading, the spacing between the heading and subheading is 0 points, while the spacing between the subheading and the body text remains at 6 points. I'll send you a sample document if you respond privately.
2013-09-23 10:14:46
Marilyn Hayner
I agree with Doug. My experience is the same as his; therefore I use 12 points after each paragraph. Six points before and six points after results in six points between paragraphs. I'm using Word 2010.
2013-09-23 09:10:03
awyatt
Doug,
That's not my experience with Word. Can you tell me what you are basing your comment on?
-Allen
2013-09-23 09:00:36
Doug Vetter
I would like to clarify one comment you make in your introductory paragraph. The spacing between two paragraphs is determined by the larger of the "before" and "after" settings, not the sum of them. For example, two paragraphs, both with with "6 points before" and "6 points after," will have only six points between them. If the first paragraph has "12 points after" and the second has "6 points before," there will be 12 points between them.
Got a version of Word that uses the ribbon interface (Word 2007 or later)? This site is for you! If you use an earlier version of Word, visit our WordTips site focusing on the menu interface.
Visit the WordTips channel on YouTube

FREE SERVICE: Get tips like this every week in WordTips, a free productivity newsletter. Enter your address and click "Subscribe."
Copyright © 2025 Sharon Parq Associates, Inc.
Comments