 Please Note:
This article is written for users of the following Microsoft Word versions: 2007, 2010, 2013, 2016, 2019, 2021, 2024, and Word in Microsoft 365. If you are using an earlier version (Word 2003 or earlier), this tip may not work for you. For a version of this tip written specifically for earlier versions of Word, click here: Adding Vertical Lines at the Sides of a Word.
Please Note:
This article is written for users of the following Microsoft Word versions: 2007, 2010, 2013, 2016, 2019, 2021, 2024, and Word in Microsoft 365. If you are using an earlier version (Word 2003 or earlier), this tip may not work for you. For a version of this tip written specifically for earlier versions of Word, click here: Adding Vertical Lines at the Sides of a Word.
Adding Vertical Lines at the Sides of a Word
Written by Allen Wyatt (last updated April 12, 2025)
This tip applies to Word 2007, 2010, 2013, 2016, 2019, 2021, 2024, and Word in Microsoft 365
Word allows you to easily add all sorts of flourishes to the text in your document. If you want to add vertical lines at the left and right of a word—perhaps for a page title—you can do so easily using any one of several different methods.
One way is to use the "pipe" character before and after your word. On most keyboards the pipe, or vertical bar, is a shifted version of the \ character. Type the pipe, a few spaces, the word, the same number of spaces, and then another pipe character. You can then center the paragraph.
If you are comfortable with the use of fields in a document, you could also try using the pipe character with the EQ field. Just insert a set of field braces (by pressing
Ctrl+F9) and then making sure the field looks like this:
{eq \b \bc\| ( myword )}
When you collapse the field (put the insertion point within the field code and press
F9) you end up with "myword" centered between the pipe characters.
Another method is to simply type your word and then format the paragraph so that it has borders at the left and right sides. Follow these steps:
- Make sure the insertion point is within the word for which there should be vertical lines on both sides.
- Display the Home tab of the ribbon.
- Click the down-arrow next to the Borders tool in the Paragraph group and then choose Borders and Shading. Word displays the Borders and Shading dialog box. (See Figure 1.)
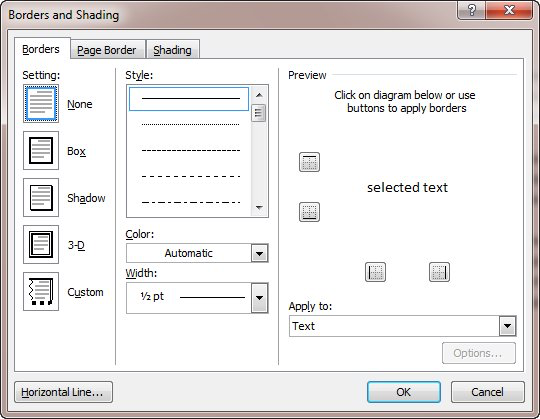
Figure 1. The Borders and Shading dialog box.
- Make sure the Borders tab is selected.
- Use the controls in the dialog box to add the desired border to both the left and right sides of the paragraph.
- Click on OK.
At this point you should see the borders on both sides of the paragraph. However, they are probably too far from the text, as the paragraph extends all the way from the left margin to the right. (This means that the borders appear at the left and right margins.) Adjust the left and right indents of the paragraph so that the vertical lines move in closer to the center. You can also adjust the other settings for the paragraph formatting (like Space Before and Space After) to get the paragraph exactly where you want it.
You can select the word itself and raise it or lower it in relation to the bordering lines in this manner:
- Select the word you want to adjust.
- Press Ctrl+D to display the Font dialog box.
- Make sure the Character Spacing tab (Word 2007) or Advanced tab (Word 2010 and later versions) is selected. (See Figure 2.)
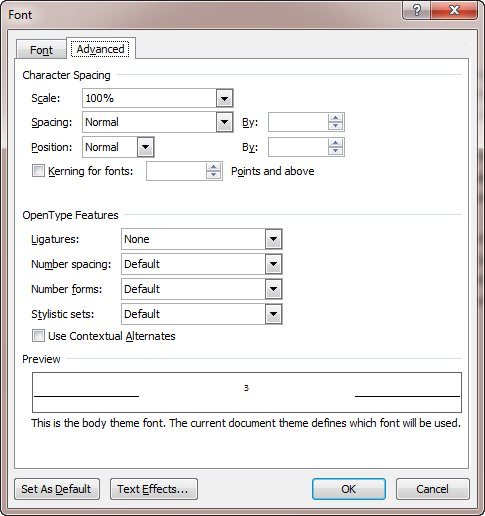
Figure 2. The Advanced tab of the Font dialog box.
- Using the Position drop-down list, choose either Raised or Lowered, as desired.
- Using the By box (to the right of the Position drop-down list) specify how far, in points, the text should be raised or lowered.
- Click OK.
Using the paragraph borders in this manner can require a lot of trial and error to get everything just right. If you use a table instead of a regular paragraph, the positioning is just a bit easier. Simply create a centered single-cell-table and make sure the cell is wide enough to contain the word you want. When you center the word in the table cell, you can then add borders to the left and right sides of the cell. Finally, you'll want to vertically adjust the word within the cell by following these steps:
- Make sure that the paragraph within the table cell is formatted so there is no space before or after.
- Make sure the insertion point is within the word in the cell.
- Display the Layout tab of the ribbon under Table Tools.
- In the Table group click the Properties tool. Word displays the Table Properties dialog box.
- Make sure the Cell tab is displayed. (See Figure 3.)
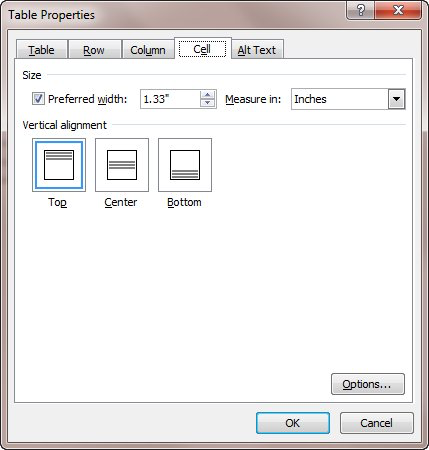
Figure 3. The Cell tab of the Table Properties dialog box.
- In the Vertical Alignment area click Center.
- Click OK.
Finally, you could create the desired lines by simply drawing the vertical lines you want. This is particularly helpful if you want the lines to be "fancy" in some way—a way that can only be achieved through using the shapes available in Word. Draw two of the same lines, place your word in a text box, adjust the lines and text box so all elements are in the desired relative positions, and then select all three items and group them. This last step is particularly important since it will ensure that the relative positions of the elements don't move around later.
WordTips is your source for cost-effective Microsoft Word training.
(Microsoft Word is the most popular word processing software in the world.)
This tip (6828) applies to Microsoft Word 2007, 2010, 2013, 2016, 2019, 2021, 2024, and Word in Microsoft 365. You can find a version of this tip for the older menu interface of Word here: Adding Vertical Lines at the Sides of a Word.
Author Bio
Allen Wyatt
With more than 50 non-fiction books and numerous magazine articles to his credit, Allen Wyatt is an internationally recognized author. He is president of Sharon Parq Associates, a computer and publishing services company. Learn more about Allen...
Applying Conditional Formatting to Multiple Worksheets
If you just updated your copy of Excel, you may have noticed some differences in how the program handles applying ...
Discover More
Deleting Freezes Computer
Sometimes a strange object or text may appear in your document, as happened to Sharon. To complicate the situation, her ...
Discover More
Inserting a Multi-Page PDF File in a Word Document
Over the decades, Word has always had a rather tenuous relationship with PDF files. Echoes and evidences of this tenuous ...
Discover More


Comments