Written by Allen Wyatt (last updated October 24, 2020)
This tip applies to Word 2007, 2010, 2013, 2016, 2019, and 2021
Kerry wonders how he can make a signature line so that when it is typed on, the line itself doesn't disappear.
A lot of people will use the underscore key (Shift+Dash) to create their signature lines. Depending on your typeface and font size, this may provide an acceptable approach if you are creating a paper printout that will be signed. It won't be acceptable at all, however, if someone needs to type on that line within the actual document. Doing so will do nothing but move your underscore characters to the right as you type.
There are four sure-fire ways to create signature lines that don't disappear. These involve drawing the line, using a table, using a text box, and using tabs.
Drawing a Line
You already know that Word allows you to insert shapes into your documents. One of those shapes is the lowly line. You could, using the Shapes tool on the Insert tab of the ribbon, draw a line where you want your signature to be. If you position the line just right, it will "stay put" as someone types in the paragraph just above the line.
Using a Table
A historically tried-and-true method is to use a table to create your signature line. You could, if desired, create a single-cell table and format that cell so that only the bottom border is visible. This allows someone to type within the cell and that border will not disappear. You can also make the cell as large or small as you want to accommodate what must be typed within it.
Another advantage of this approach is that you can use more than one cell in order to add more information to your signature block. For instance, you could create a cell (with the bottom border) for the signature, but use a cell just below that one to contain the words "signature" or "sign here" or whatever meets your needs. Place that text in a small font and adjust the row height so the text is just below the border of the cell above, and you can create a layout that is professional looking.
Using a Text Box
Closely akin to using a table is using a text box. Text boxes are easily placed where you want them and sized as you need. Just like the table cells, you can format text boxes so that only the bottom border will be visible.
Using Tabs
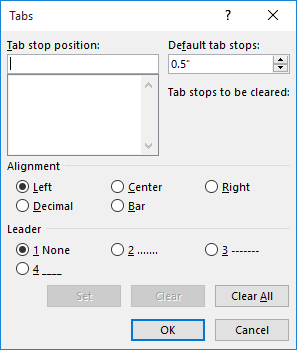
My favorite approach is to use tabs. This approach takes a bit more explaining, but the advantage is that it uses straight text, which means you don't have to worry about your shape, table, or text box moving around if someone messes with your document. Follow these general steps:

Figure 1. The Tabs dialog box.
That's it. Now someone could type on the line (beginning at the left margin, before the tab character, and it will appear as if the underline doesn't move at all. If you want your signature line to be indented from the left margin, just adjust the left margin for the paragraph and you're all set.
WordTips is your source for cost-effective Microsoft Word training. (Microsoft Word is the most popular word processing software in the world.) This tip (13793) applies to Microsoft Word 2007, 2010, 2013, 2016, 2019, and 2021.

Create Custom Apps with VBA! Discover how to extend the capabilities of Office 365 applications with VBA programming. Written in clear terms and understandable language, the book includes systematic tutorials and contains both intermediate and advanced content for experienced VB developers. Designed to be comprehensive, the book addresses not just one Office application, but the entire Office suite. Check out Mastering VBA for Microsoft Office 365 today!
Want to know exactly how far something on the ruler is from the left and right margins of your document? It's easy to ...
Discover MoreCreate a form in Word and you will invariably be faced with the need to places fill-in-the-blank lines in the document. ...
Discover MoreVertical lines are even easier to add around a word than are horizontal lines. There are a variety of methods you can use ...
Discover MoreFREE SERVICE: Get tips like this every week in WordTips, a free productivity newsletter. Enter your address and click "Subscribe."
2020-10-24 12:44:41
Jay
If you want a line after text, such as "Signature: _______", you can do the following :
1. Select underline.
2. Insert space and tab.
3. Adjust tab stops as desired. (Manual addition/adjustment is easiest in my opinion.)
If you click anywhere to right of underlined space but left of line end, you can add text at insertion point that will remain underlined (with one underlined space remaining to the left).
Got a version of Word that uses the ribbon interface (Word 2007 or later)? This site is for you! If you use an earlier version of Word, visit our WordTips site focusing on the menu interface.
Visit the WordTips channel on YouTube
FREE SERVICE: Get tips like this every week in WordTips, a free productivity newsletter. Enter your address and click "Subscribe."
Copyright © 2026 Sharon Parq Associates, Inc.
Comments