Peter is an author. When he creates a manuscript ready for print, often the last lines of pages don't match up: the last sentence might flip over to the start the next page. Peter wonders how to keep all pages with the same number of lines.
There are a good number of points to cover here, and it is all going to take some explanation.
First, there is a huge difference between getting the same number of lines per page and making the bottoms of pages line up. Word can do one rather easily, but not both. The reason is because Word is not a page-layout program. (More on that in a moment.)
The only sure way to get the same number of lines per page is to modify a few settings for the paragraphs in your document. This can be done either explicitly (by selecting all the paragraphs) or by creating styles that handle the paragraph formatting.
All the setting changes are made in the Paragraph dialog box. You display this dialog box by displaying the Home tab of the ribbon and clicking the small icon at the bottom-right corner of the Paragraph group. First, examine the Indents and Spacing tab of the dialog box. (See Figure 1.)
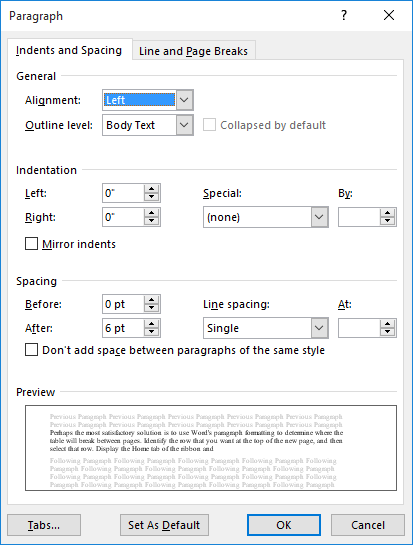
Figure 1. The Indents and Spacing tab of the Paragraph dialog box.
Here you want to use the controls in the Space section to adjust how your paragraphs are vertically spaced:
You can, if you desire, compute other settings to use in these controls, but you'll need to do the math to make it work properly on a page. It is simply a matter of making sure that there is uniformity in how your text is vertically placed.
Next, you want to display the Line and Page Breaks tab. (See Figure 2.)
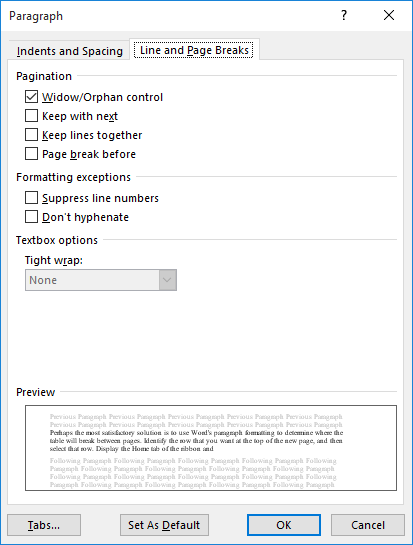
Figure 2. The Line and Page Breaks tab of the Paragraph dialog box.
On this tab you want to clear the very first check box, Widow/Orphan Control. When selected, this option makes sure that in a multi-line paragraph, there is no single line at the bottom of a page (widows) and no single line at the beginning of a page (orphans). Since you want to have the exact same number of lines per page, you need to turn this off so that single lines are allowed.
Click OK, and your pages should now have the same number of lines each. They will, however, look odd. This is especially true because your headings should also be the same size as your text and, therefore, take the same amount of vertical space. This is necessary, though, to ensure the same number of lines per page.
Understand, as well, that graphics and special elements (such as tables) can mess up your pages so that you don't end up with the same number of lines per page. You can fiddle with the formatting of these elements, as desired, to try to get the same number of lines, but it can be a big chore.
In page-layout parlance, pages should be "bottomed." This means that vertical space is added between each line of a page to ensure that the last line of the page ends at the bottom margin of the page. It makes a page look "finished" and all pages look uniform. Normally, the final page of a chapter will not be bottomed, but all other pages will.
There is a crucial point to understand here: Bottomed pages will not have the same number of lines on each page. It is simply a process of adding vertical space to make sure that each page appears to be the same length.
Because of varying sizes of type (for headings, figure captions, tables, and the like), bottoming can be a real hassle. Word does a terrible job at bottoming pages, so this task is best left to a dedicated page-layout program.
There is one thing you can try in Word, however. Follow these steps:

Figure 3. The Layout tab of the Page Setup dialog box.
This may make your pages bottom, but this will depend on how complex your document is. As I said, Word historically isn't very good at bottoming, so you'll want to check all your pages to make sure they look OK.
I'm going to state the obvious—authors create prose of one type or another; they write. Some authors are very good at it. These authors have mastered their craft and readers benefit because the author is able to communicate ideas coherently, efficiently, and effectively.
Now, another piece of obviousness—authors are not editors. Neither are they proofreaders, indexers, or typesetters. They are not cover designers or graphic designers. This is why so many authors work with publishers—because publishers bring expertise to the table that authors do not possess. I worked for publishers for years and have hired many editors, proofreaders, indexers, typesetters, and cover designers.
If the author is working with a publisher, the publisher will not want a manuscript that is "ready for print." The reason is because there are many steps in the manuscript preparation after the author is done. Instead, they want authors to focus on the prose and leave the other prep work to the experts that the publisher hires. So, don't worry about how the prose looks on the page; the publisher will take care of that.
If you are self-publishing, however, you get to wear many hats that the publisher would normally wear. You would do well, in this instance, to do what the publisher does and actually hire the expertise you don't have. Hire a copy editor. If your book demands precision, hire a proofreader. If it requires indexing, hire an indexer. And, by all means, hire a typesetter.
It is this person—the typesetter—who will make the manuscript "print ready." He or she will take your prose out of Word and put it into a page-layout program such as InDesign or LaTex. (This is the same thing a publisher would do.) Page-layout programs are optimized to the task of making your work look good on a page. The tools available in such programs are way beyond what you could ever hope to do with Word alone.
The typesetter will be an expert in using the page-layout program (just like you, the author, are an expert in crafting prose) and will be able to actually bottom the pages correctly. He or she will do things with laying out your text that you simply cannot do because you don't have the tools or the expertise.
Trust me—you'll be money and time ahead if you leave your typesetting to someone with the proper tools and knowledge.
WordTips is your source for cost-effective Microsoft Word training. (Microsoft Word is the most popular word processing software in the world.) This tip (13610) applies to Microsoft Word 2007, 2010, 2013, 2016, 2019, 2021, 2024, and Word in Microsoft 365.

Learning Made Easy! Quickly teach yourself how to format, publish, and share your content using Word 2021 or Microsoft 365. With Step by Step, you set the pace, building and practicing the skills you need, just when you need them! Check out Microsoft Word Step by Step today!
You can use the highlighter tool to add all sorts of color to your document. If you want to turn off those colors so that ...
Discover MoreSection breaks got your document formatting all messed up? It could be because of the way you added the section breaks in ...
Discover MoreYou can highlight words and phrases in your document, much the same as you can mark printed words and phrases with a ...
Discover MoreFREE SERVICE: Get tips like this every week in WordTips, a free productivity newsletter. Enter your address and click "Subscribe."
2022-11-07 16:00:00
melanie mabry
This is good stuff, thank you! I was especially excited about the advice on "Lining up bottoms", but found that when I did that the pages where I inserted a page break (i.e., the last page of a chapter) spread out across the page to fill to the bottom.
Do you know how to deal with that?
Thanks!
Melanie
2019-01-19 23:41:44
This was excellent post, Allen. As a copyeditor who does some internal-layout work in Word for self-publishing clients, this is just the sort of information I would loved to have had at my fingertips when I started dabbling with these settings.
Got a version of Word that uses the ribbon interface (Word 2007 or later)? This site is for you! If you use an earlier version of Word, visit our WordTips site focusing on the menu interface.
Visit the WordTips channel on YouTube

FREE SERVICE: Get tips like this every week in WordTips, a free productivity newsletter. Enter your address and click "Subscribe."
Copyright © 2026 Sharon Parq Associates, Inc.
Comments